实验十一、为NodeGroup使用EC2 Spot实例
本文介绍EKS中使用EC2 Spot实例的完整方案。阐述Spot相比On-Demand的成本优势,对比Intel和Graviton架构选择,通过价格历史数据选型,最后演示创建Spot Nodegroup并部署应用的实践步骤。
EKS动手实验合集请参考这里。
EKS 1.36 版本 @2026-09 AWS Global 区域(ap-southeast-1)实测通过,eksctl 使用
eksctl.io/v1alpha5ClusterConfig 创建托管 Spot 节点组。
一、规划使用Spot实例
1、使用Spot类型的优势
EC2 Spot是云端当前Region和AZ内闲置的计算资源对外低价提供短期用途的一种商务模式。成本测算如下:
- 假设一个配置较高的机型采用 On-demand 按需默认的EC2实例每小时 10 元钱,那么跑满一个月则是 10元/小时 x 720小时 =7200元
- 如果购买 Reserve Instance(RI),其一整个月价格可能是 3600 元,或者更低(根据RI折扣)
- 当申请使用Spot时候,可能每小时只需要 3 元,跑满一个月 3元/小时 x 720小时 = 2160元
如果应用系统是高峰期的每天只有4个小时,那么一个月不需要按照 720 小时来计算成本,成本则是 3元/小时 x(4小时高峰/天x30天)= 3元/小时 x 120 小时 = 360元。
由此可看到使用Spot非常显著的降低了整体成本,因为负载有周期性浮动的,最佳手段不一定是新增几个RI预留实例节点,而是适当增加Spot节点混合到当前集群,实现按需缩放。
2、如何选择INTEL(X86_64)和Graviton(ARM)架构
ARM机型由于其比Intel机型更好的性能,更低的价格,获得了广泛用户的环境,普遍被用于EC2、EKS、RDS、Redis、OpenSearch等众多服务。
ARM机型由于相对较少的规格型号,在每个Region限制的比例也较低,而且替代机型少。例如,生产机型是m6g.2xlarge(8vCPU/32GB),那么使用Spot机型的型号一般是c6g.4xlarge(16vCPU/32GB)和r6g.2xlarge(8vCPU/64GB),可选的组合仅3个。
Intel机型由于上几代处理器机型的存在,可提供替代进行很多。以生产机型是m6i.2xlarge(8vCPU/32GB),那么替代机型可包括m4.2xlarge, m5.2xlarge。除此之外,还有AMD处理器机型,以及带有本地存储的m5d,本地存储和网络优化型m5dn等许多型号可以申请Spot。
由此可知,使用Intel的机型的Spot在选择广泛程度上更有优势。
3、使用ec2-instance-selector查看可选合适的机型
要查看能提供特定CPU和内存比例数量的机型,可以使用ec2-instance-selector工具,这个工具的安装使用方法参考这篇文章。
假设运行EKS的Nodegroup节点希望配置最低32GB为目标,那么可按如下方式查询。
(1) 按机型查询
执行如下命令可以查看相似机型:
ec2-instance-selector --base-instance-type m6i.2xlarge --flexible
返回结果如下:
m3.2xlarge
m4.2xlarge
m5.2xlarge
m5a.2xlarge
m6a.2xlarge
t2.2xlarge
t3.2xlarge
(2) 按最低内存量进行查询
也可以手工指定vCPU和内存进行查询
ec2-instance-selector --vcpus 8 --memory 32
即可获得匹配的机型清单。
(3) 确认机型清单
将以上两个步骤配置清单合并。这其中:
- 增加上目标机型本身
m6i.2xlarge - 去掉3系列机型(因为计算架构不是Nitro)
- 去掉t系列机型(Burst爆发型CPU算力不足)
最后可获得可用的机型清单如下:
m4.2xlarge
m5.2xlarge
m5a.2xlarge
m6a.2xlarge
4、基于Spot往期历史价格选择机型
Spot的目标是低成本的实现弹性扩展。因此,Spot机型的历史价格也是一个关注点。因此,使用Spot时候,有时候不是以特定机型为目标,而是以一组机型在当前一段时间内的折扣最优化为目标。
查看Spot历史的价格的方法是,进入EC2控制台,点击左侧的Spot Requests按钮。然后点击右侧的Pricing history按钮。如下截图。
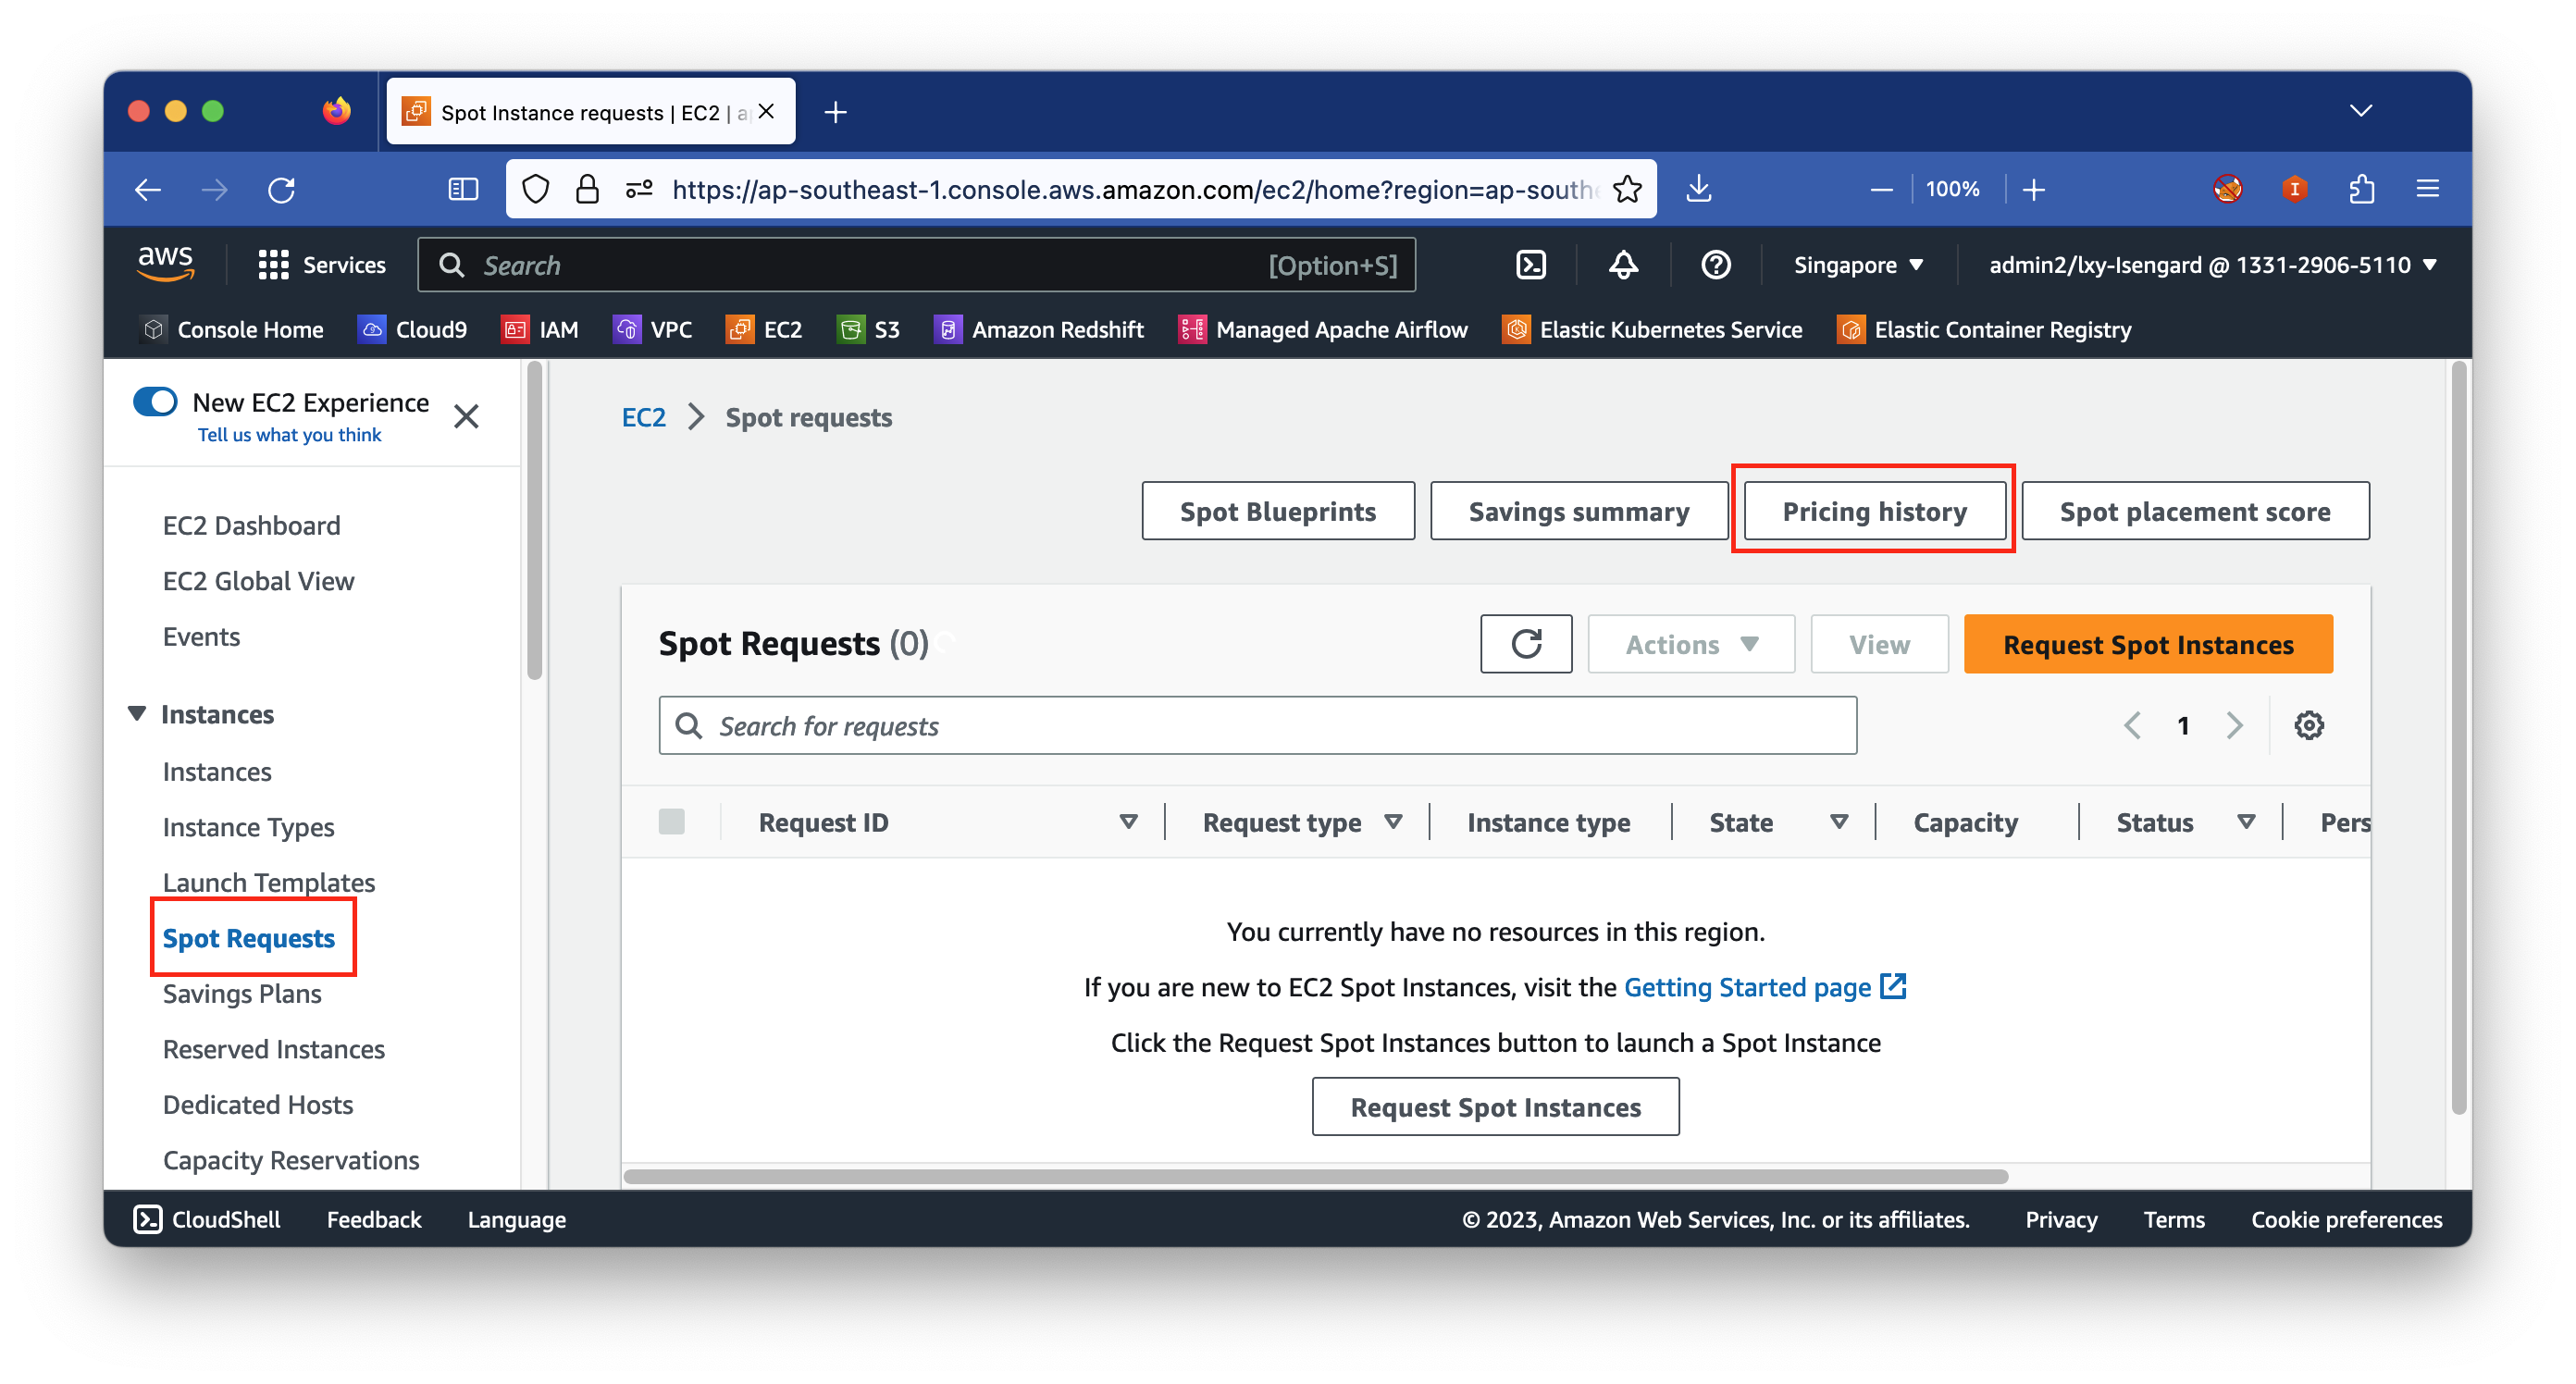
查询价格注意事项:
- 多个AZ可用区空余容量不一样,因此Spot价格可能不一样
- 查询价格页面右上角的选项
Display normalized prices按钮不要打开,这个按钮是显示vCPU等单位价格,请确保这个按钮不要打开。当这个按钮没有打开时候,显示的On-Demand标准价格与AWS EC2官网Pricing页面的价格是一致的。
现在开始查询几个机型,例如m6g.2xlarge,m5.2xlarge,m5a.2xlarge三个机型。
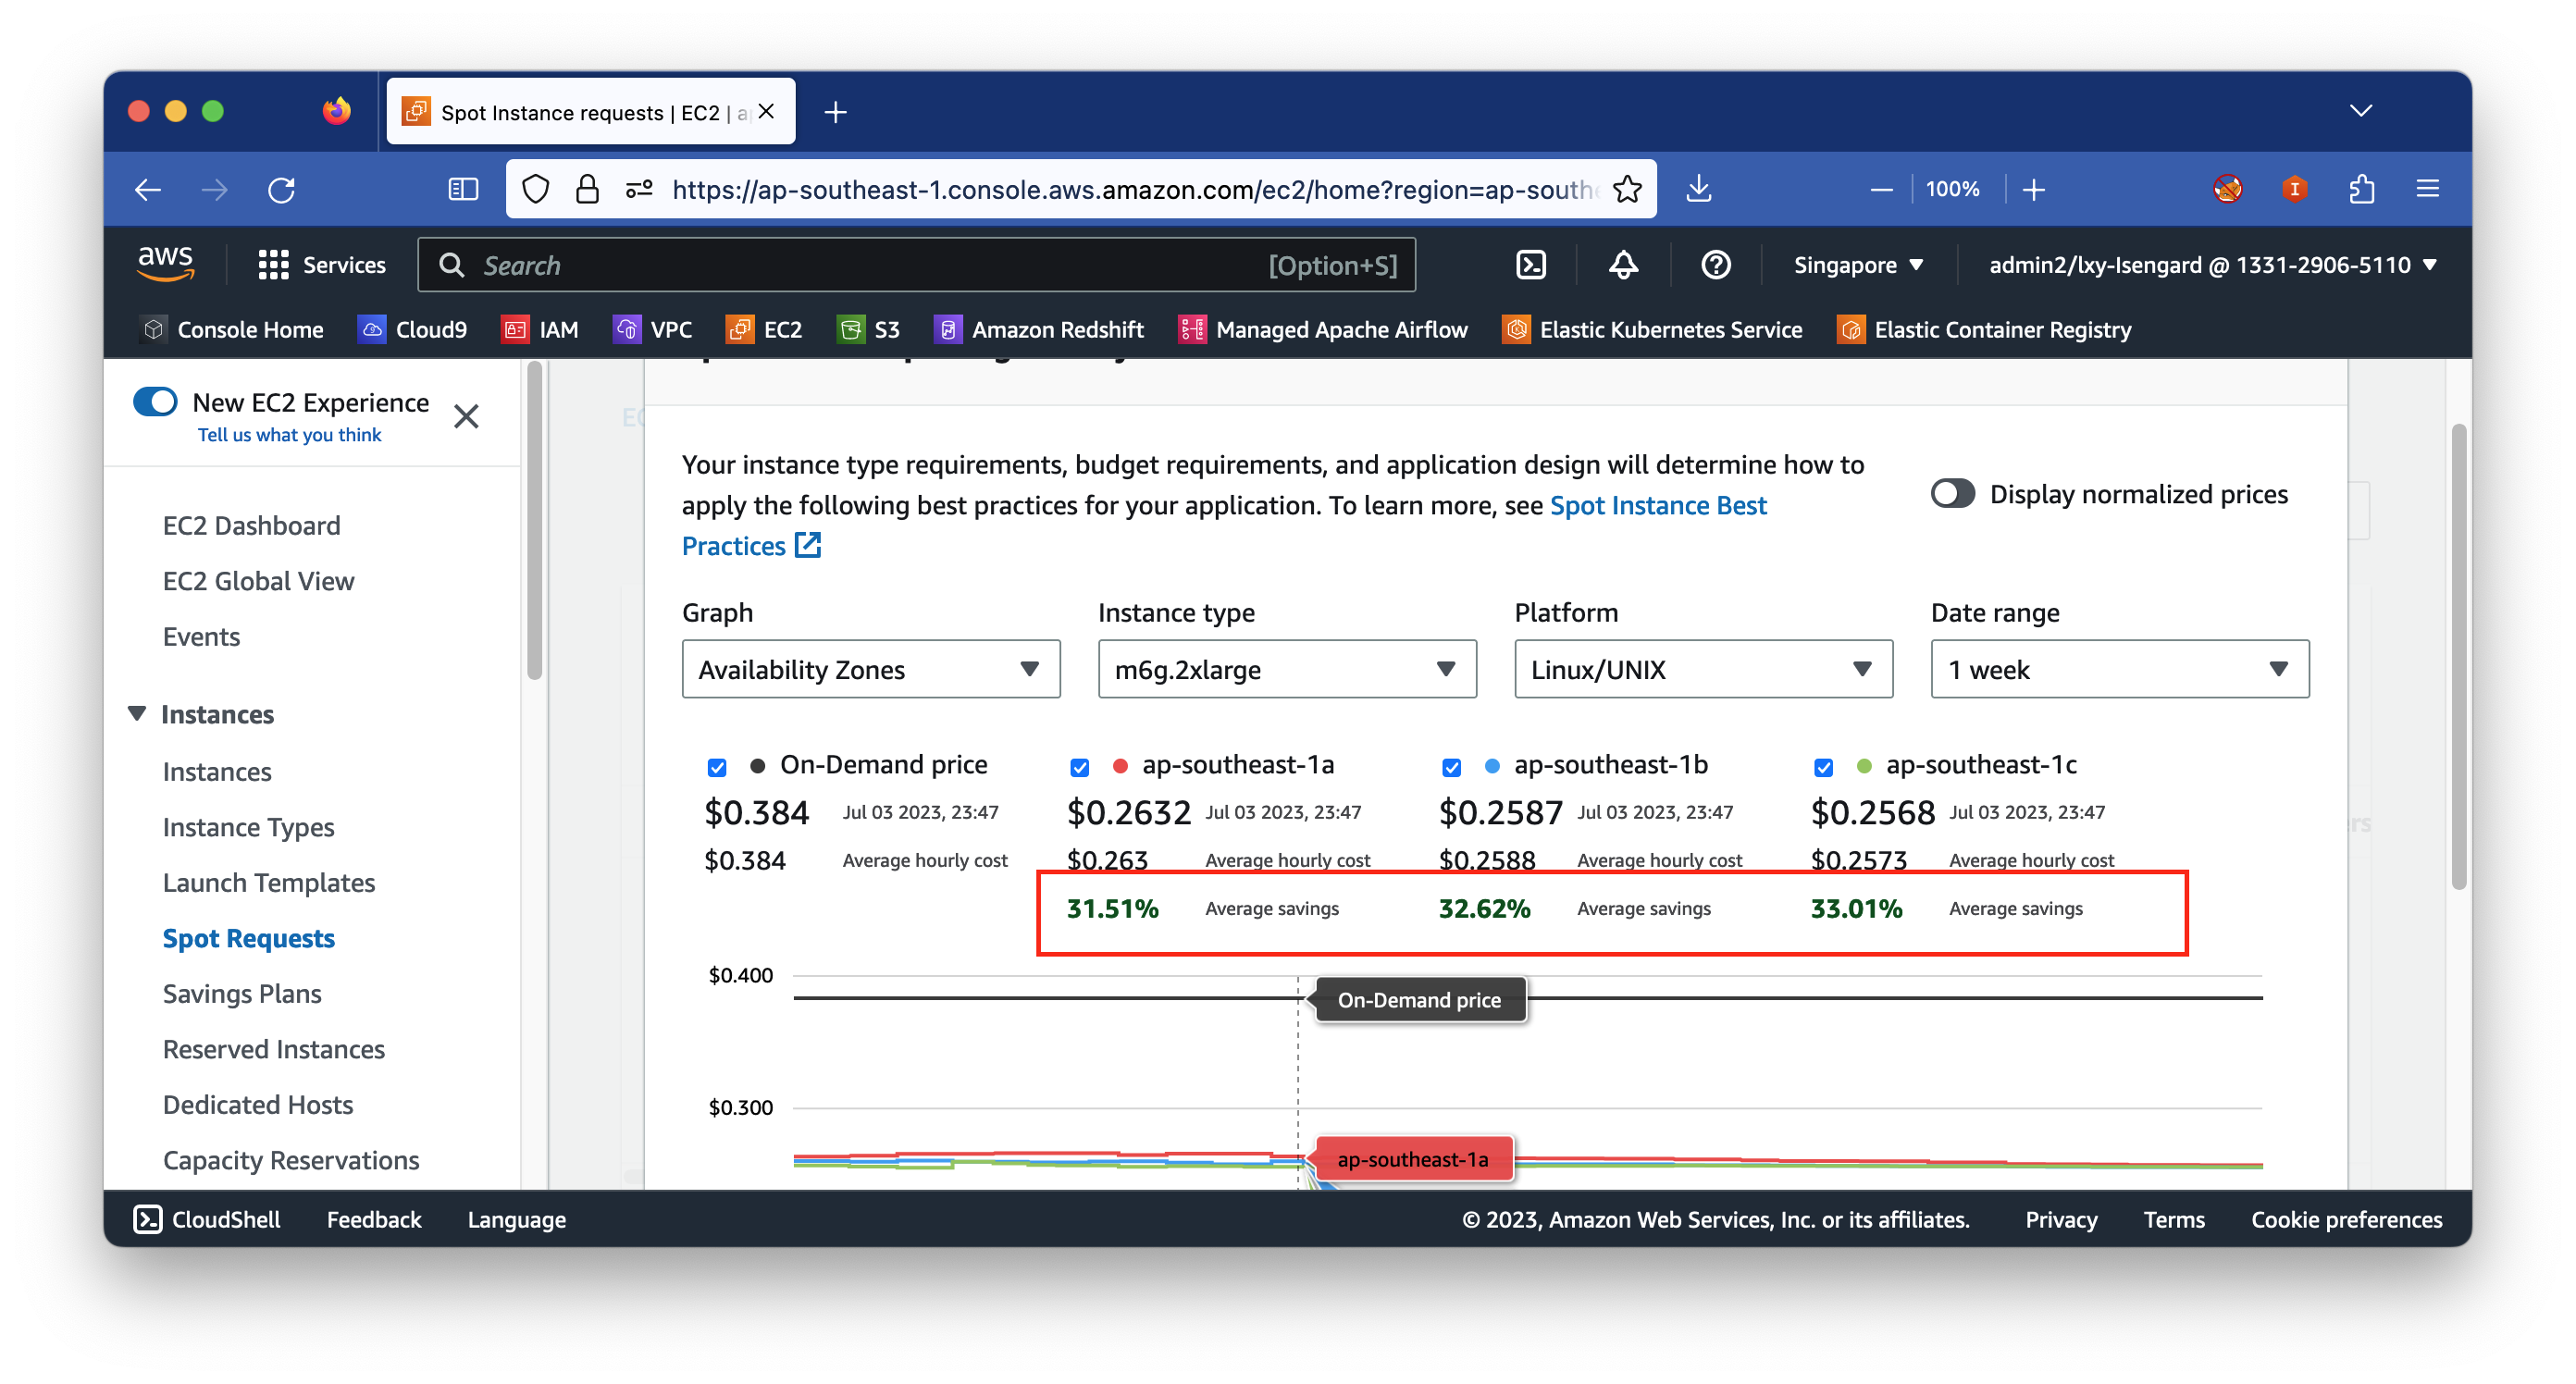
在弹出的对话框中,在Instance Type位置输入要查询价格的目标机型,例如输入m6g.2xlarge(使用Graviton2处理器的ARM机型),可获得信息是按需机型(On-Demand)价格是0.384美元每小时,而Spot的折扣为31.51%,由此当前价格约为0.2632美元每小时。如下截图。
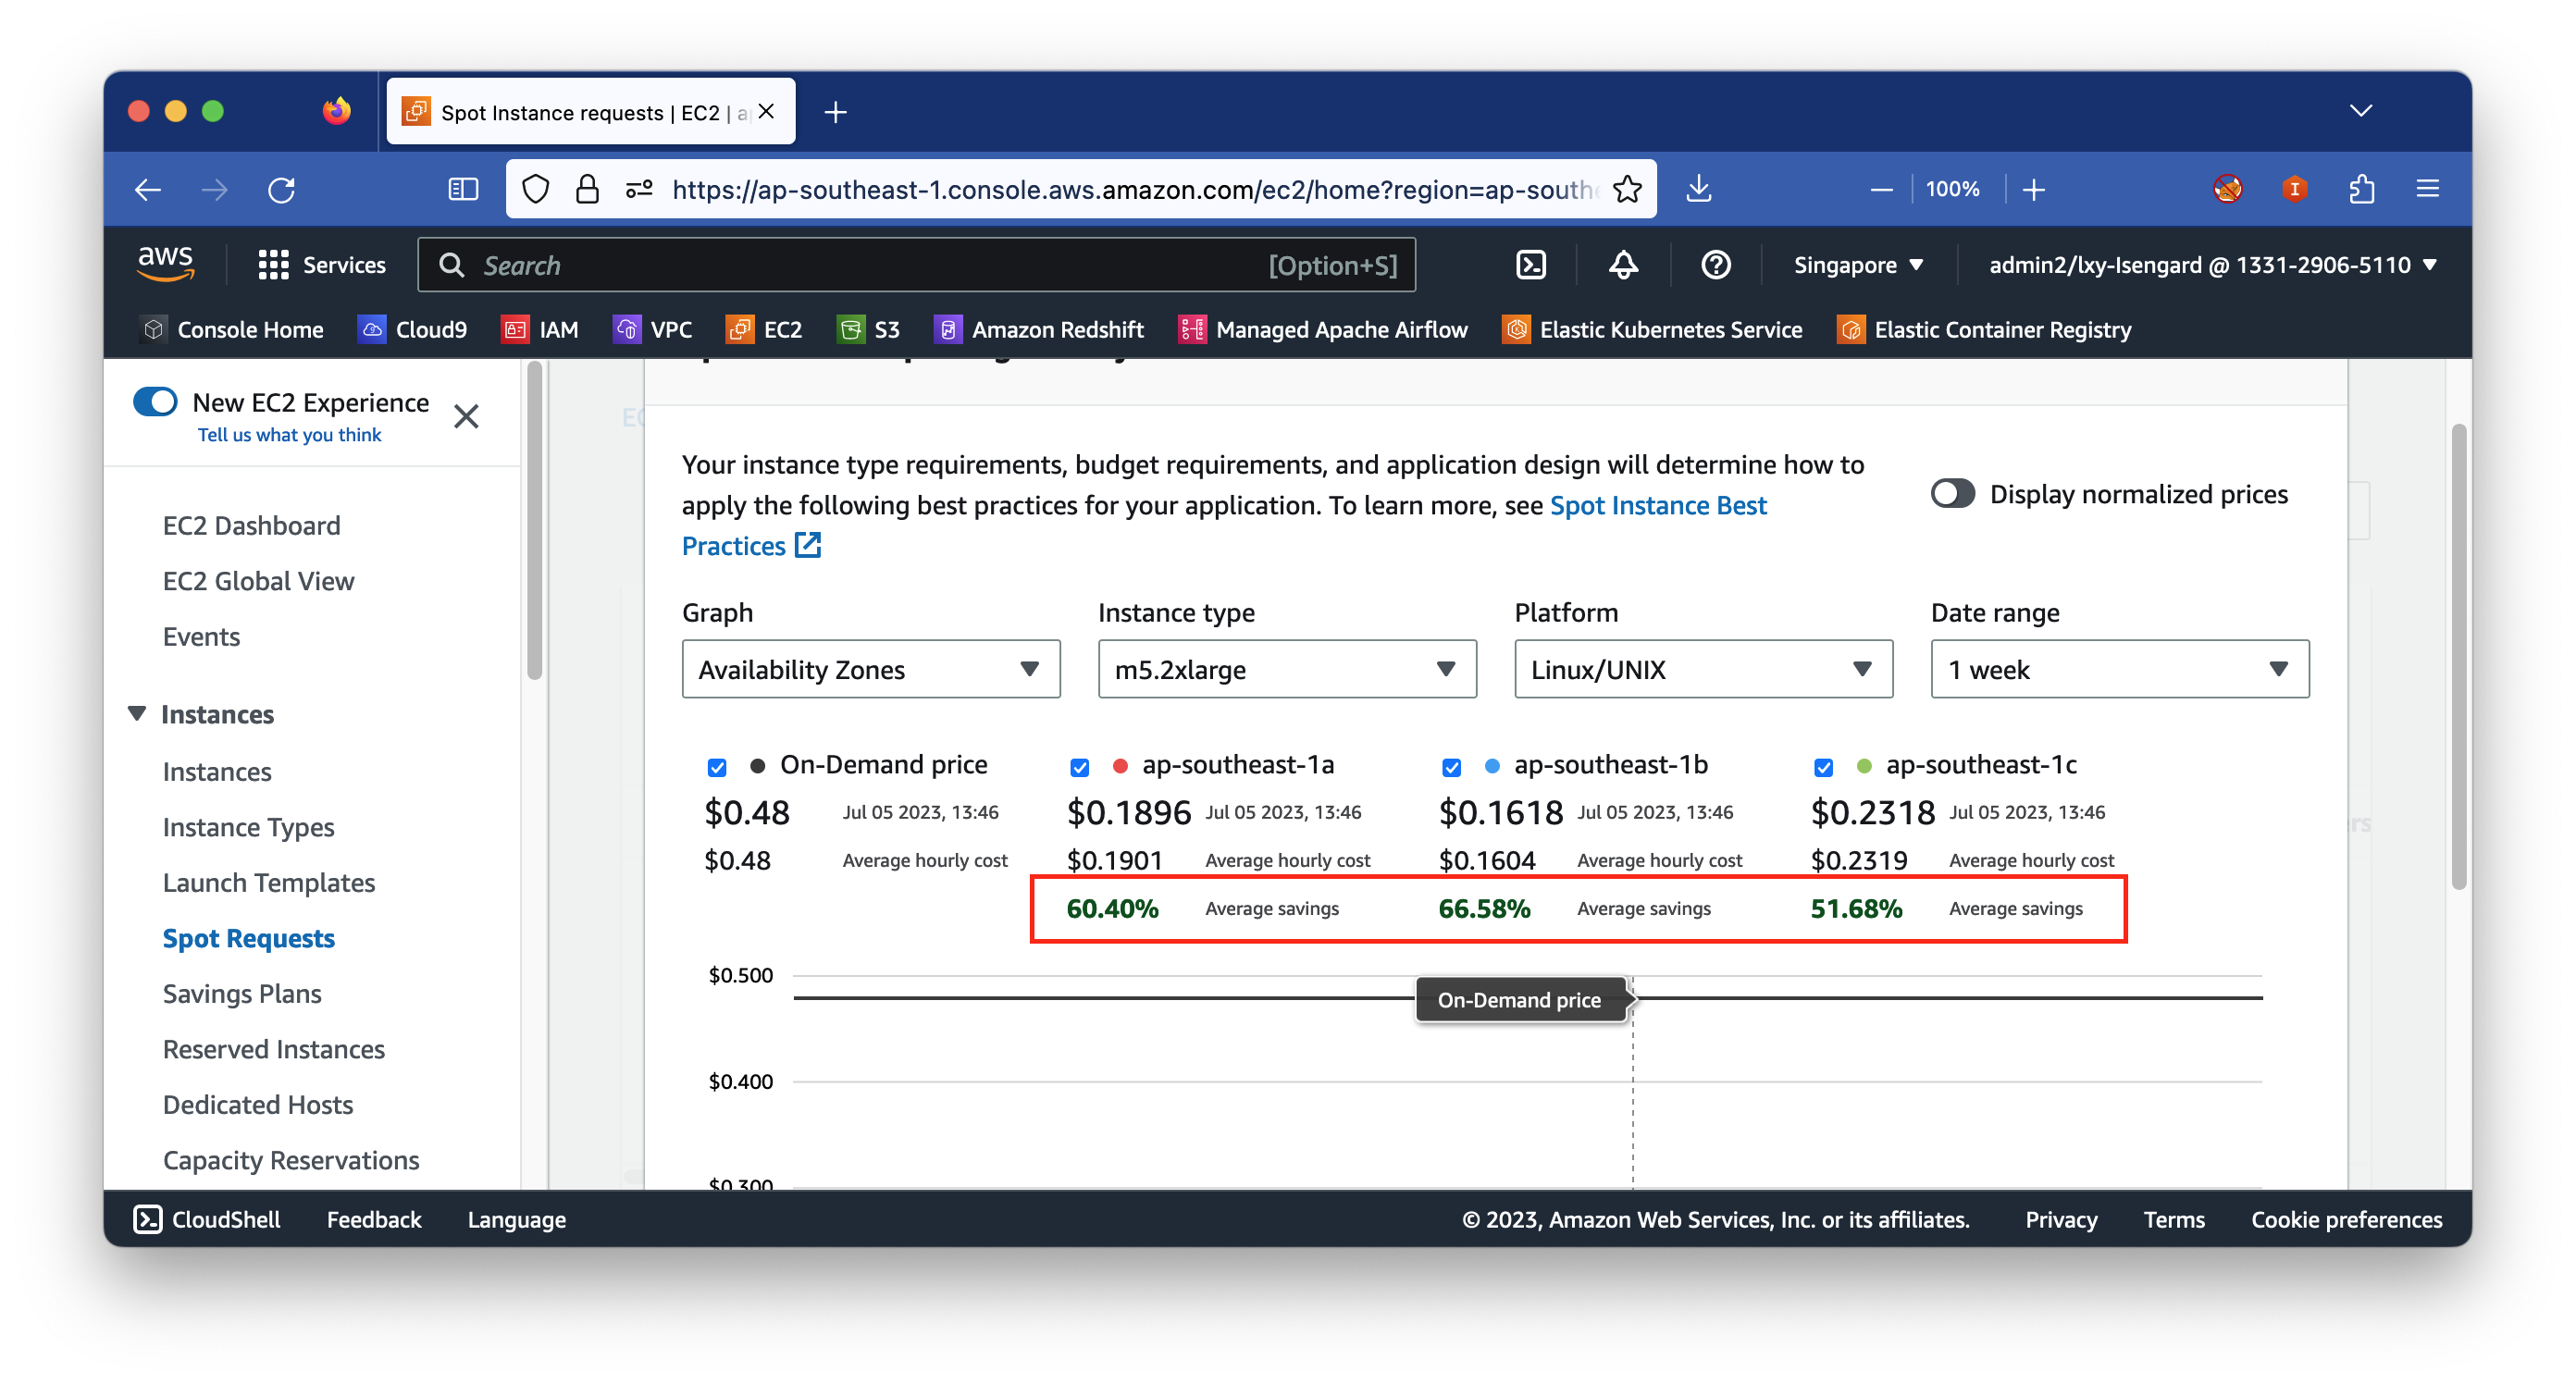
接下来调查其他机型。在Instance Type位置输入m5.2xlarge(使用Intel Xeon处理器),可获得信息是按需机型(On-Demand)价格是0.48美元每小时,而Spot的折扣为60.40%,由此当前价格约为0.1896美元每小时。如下截图。
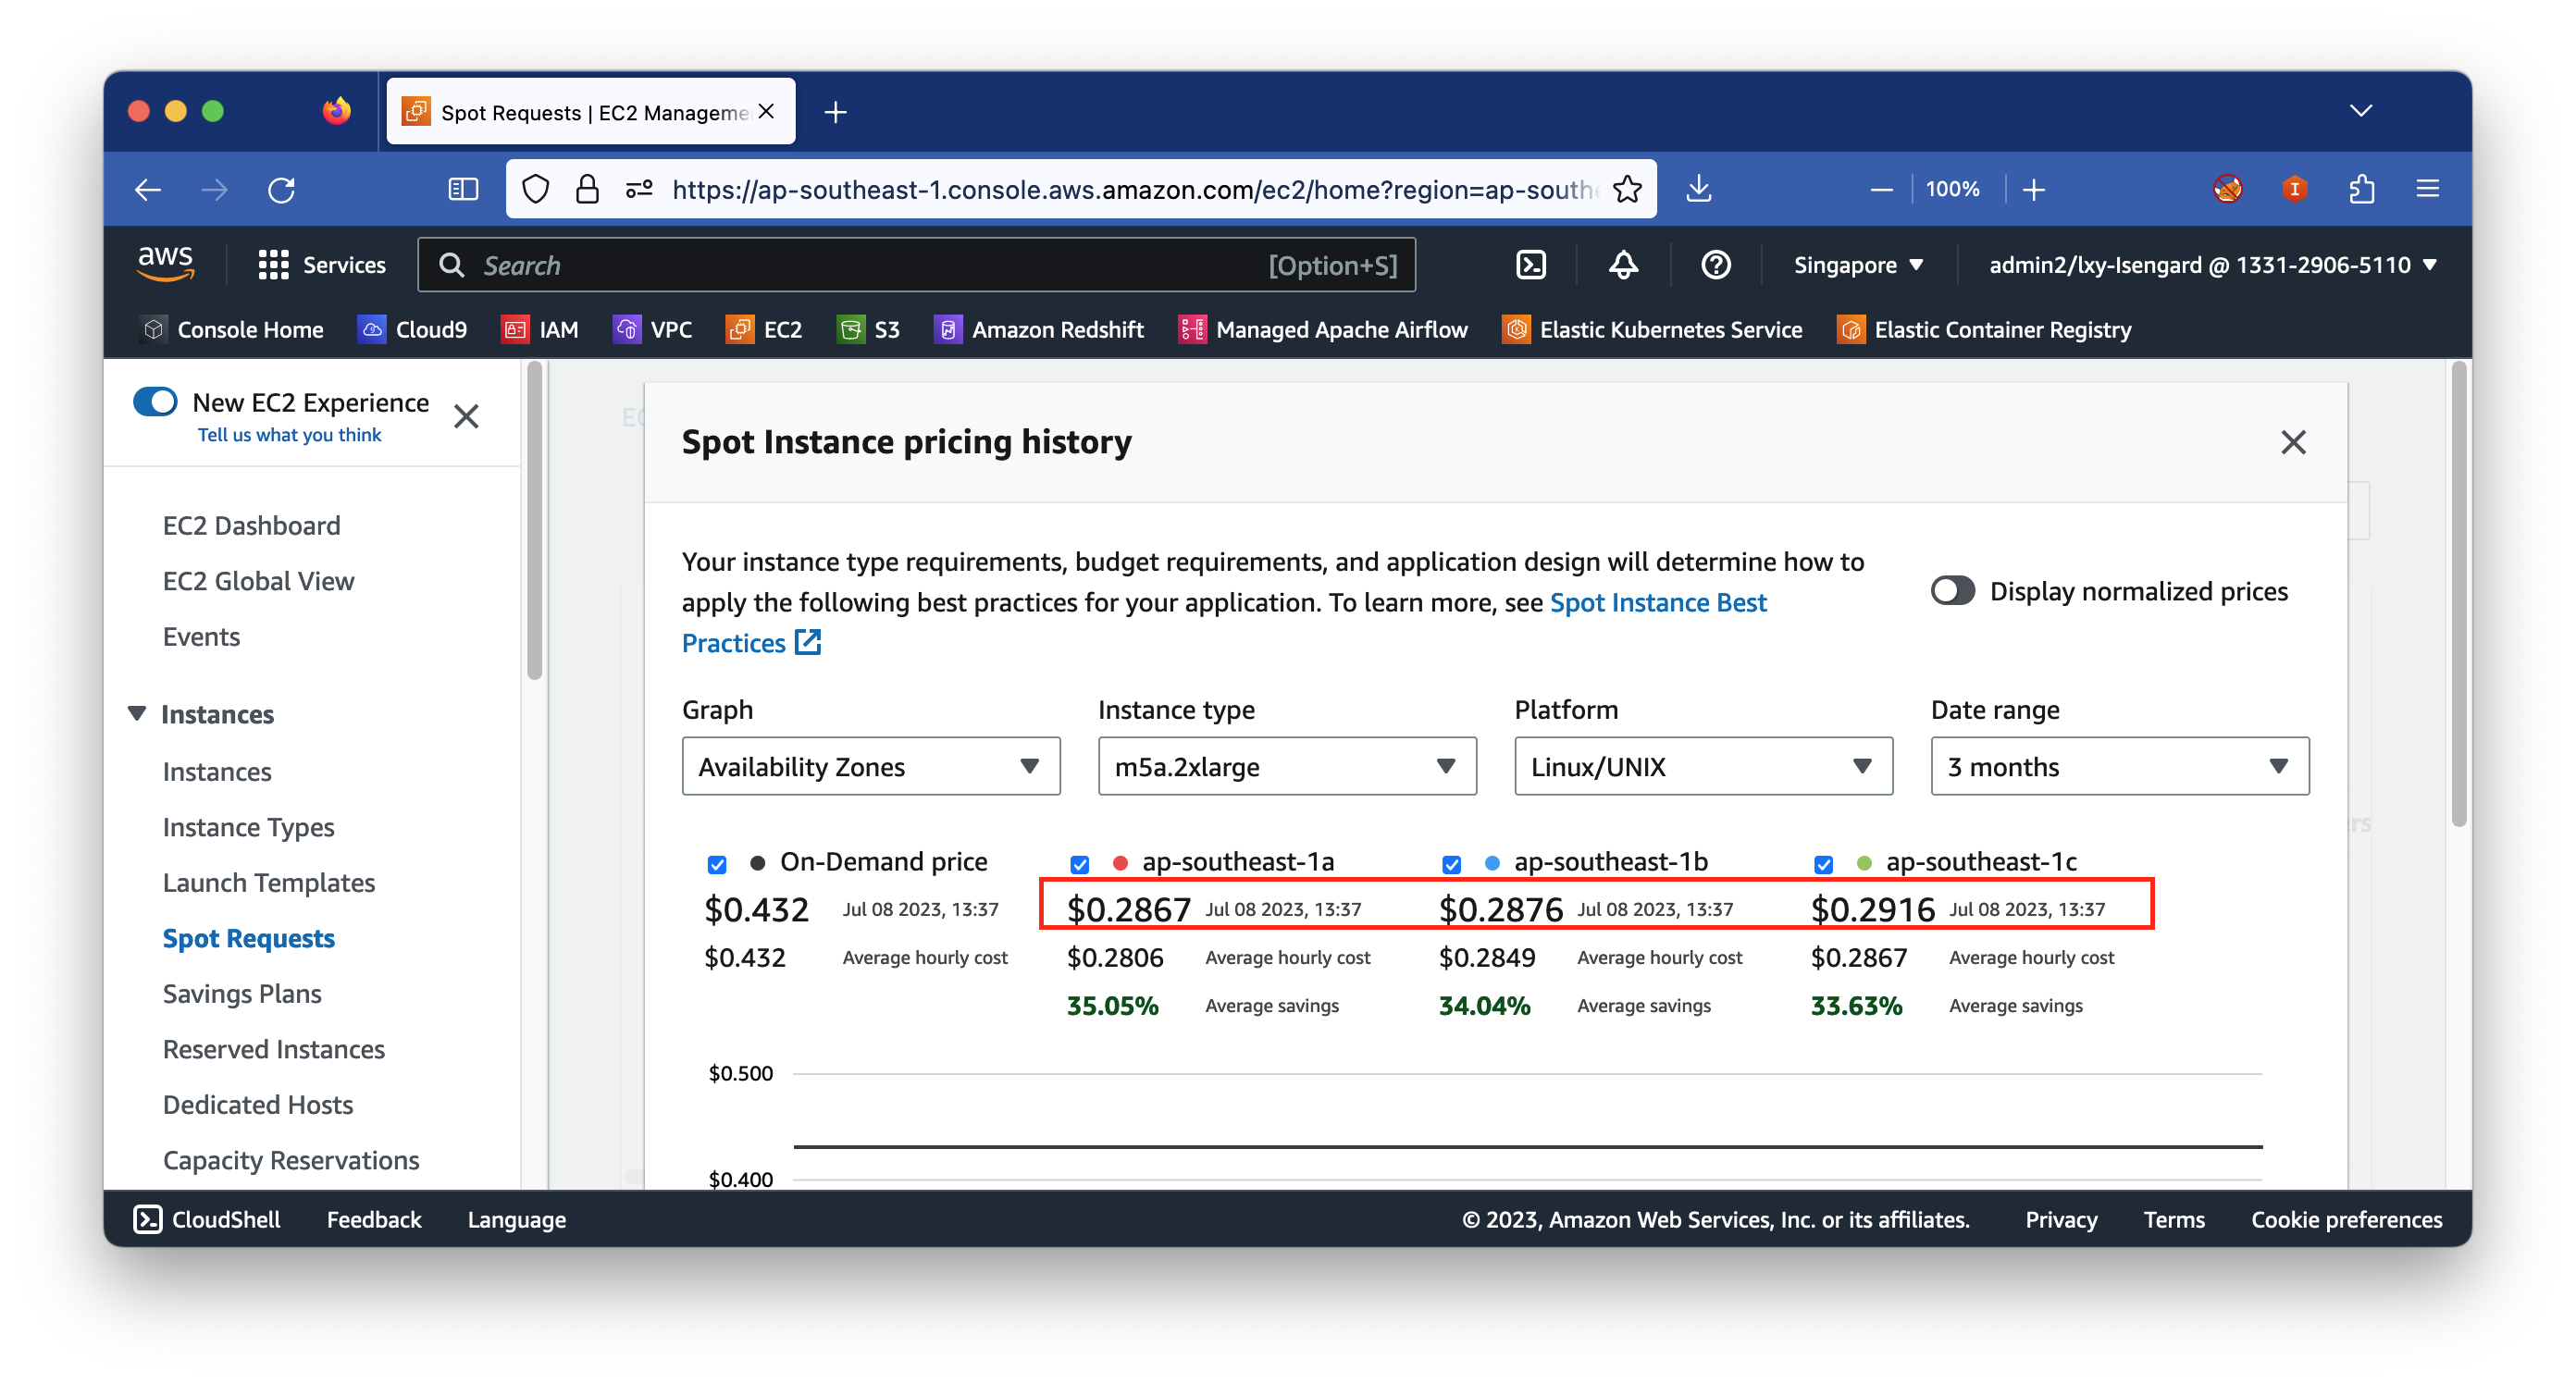
接下来调查其他机型。在Instance Type位置输入m5a.2xlarge(使用AMD EPYC处理器),可获得信息是按需机型(On-Demand)价格是0.432美元每小时,而Spot的折扣为35.05%,由此当前价格约为0.2867美元每小时。如下截图。
几个价格对比下来,Graviton2处理器虽然单价便宜,但总体容量不如之前的Intel机型,因此选择上一代Intel机型的Spot是价格最便宜的。
5、本项目最终选择的Spot机型
前几个实验的按需 Nodegroup 使用 x86_64 架构的 t3.2xlarge,为保持架构一致,本次实验的 Spot 节点组选择 x86_64 架构的多机型混合作为容量池:m5.large、m5a.large、m6i.large。三者同为 2vCPU/8GB 的等价规格,覆盖 Intel、AMD、Nitro 三代处理器,Spot 中断时可在池内跨系列切换,容量更稳定。若使用 Graviton 架构,则可将 instanceTypes 替换为 m6g.large、c6g.large、t4g.large 等等价 ARM 机型。
二、新建使用Spot的Nodegroup
1、为现有的EKS集群创建新的使用Spot的Nodegroup
本文假设集群已经创建好,并且有 Nodegroup 存在,同时部署了 AWS Load Balancer Controller 等必要的组件。搭建本文实验环境可参考实验一完成。下面开始部署 Spot 节点。
编辑如下内容,并保存为 spot-nodegroup.yaml 文件。本文的按需 Nodegroup 位于 Public Subnet(同时被 CNI Custom Networking 关联到 100.64 Pod 子网),因此 Spot Nodegroup 沿用相同的三个 Public Subnet ID,以便 Pod 由 aws-node DaemonSet 从对应的 100.64 ENIConfig 上分配 IP。请把 subnets 三个 ID 替换为您 EKS 集群实际的子网 ID。
apiVersion: eksctl.io/v1alpha5
kind: ClusterConfig

metadata:
  name: eksworkshop
  region: ap-southeast-1
  version: "1.36"

managedNodeGroups:
  - name: spot1
    labels:
      role: spot
    instanceTypes: ["m5.large", "m5a.large", "m6i.large"]
    spot: true
    minSize: 2
    desiredCapacity: 2
    maxSize: 4
    privateNetworking: false
    subnets:
      - subnet-0cc67479094982fdf
      - subnet-0fcbf89630d3c64b3
      - subnet-0f54b0e3e082589d8
    volumeType: gp3
    volumeSize: 30
    tags:
      nodegroup-name: spot1
    iam:
      withAddonPolicies:
        autoScaler: true
        ebs: true
        albIngress: true
        cloudWatch: true
编辑完毕后保存退出。执行如下命令创建:
eksctl create nodegroup -f spot-nodegroup.yaml
创建过程通常耗时 3~5 分钟,eksctl 会以 CloudFormation Stack 形式提交托管 Nodegroup,完成后返回 all nodegroups have up-to-date cloudformation templates。
2、通过EC2控制台Spot服务界面确认Spot启动正常
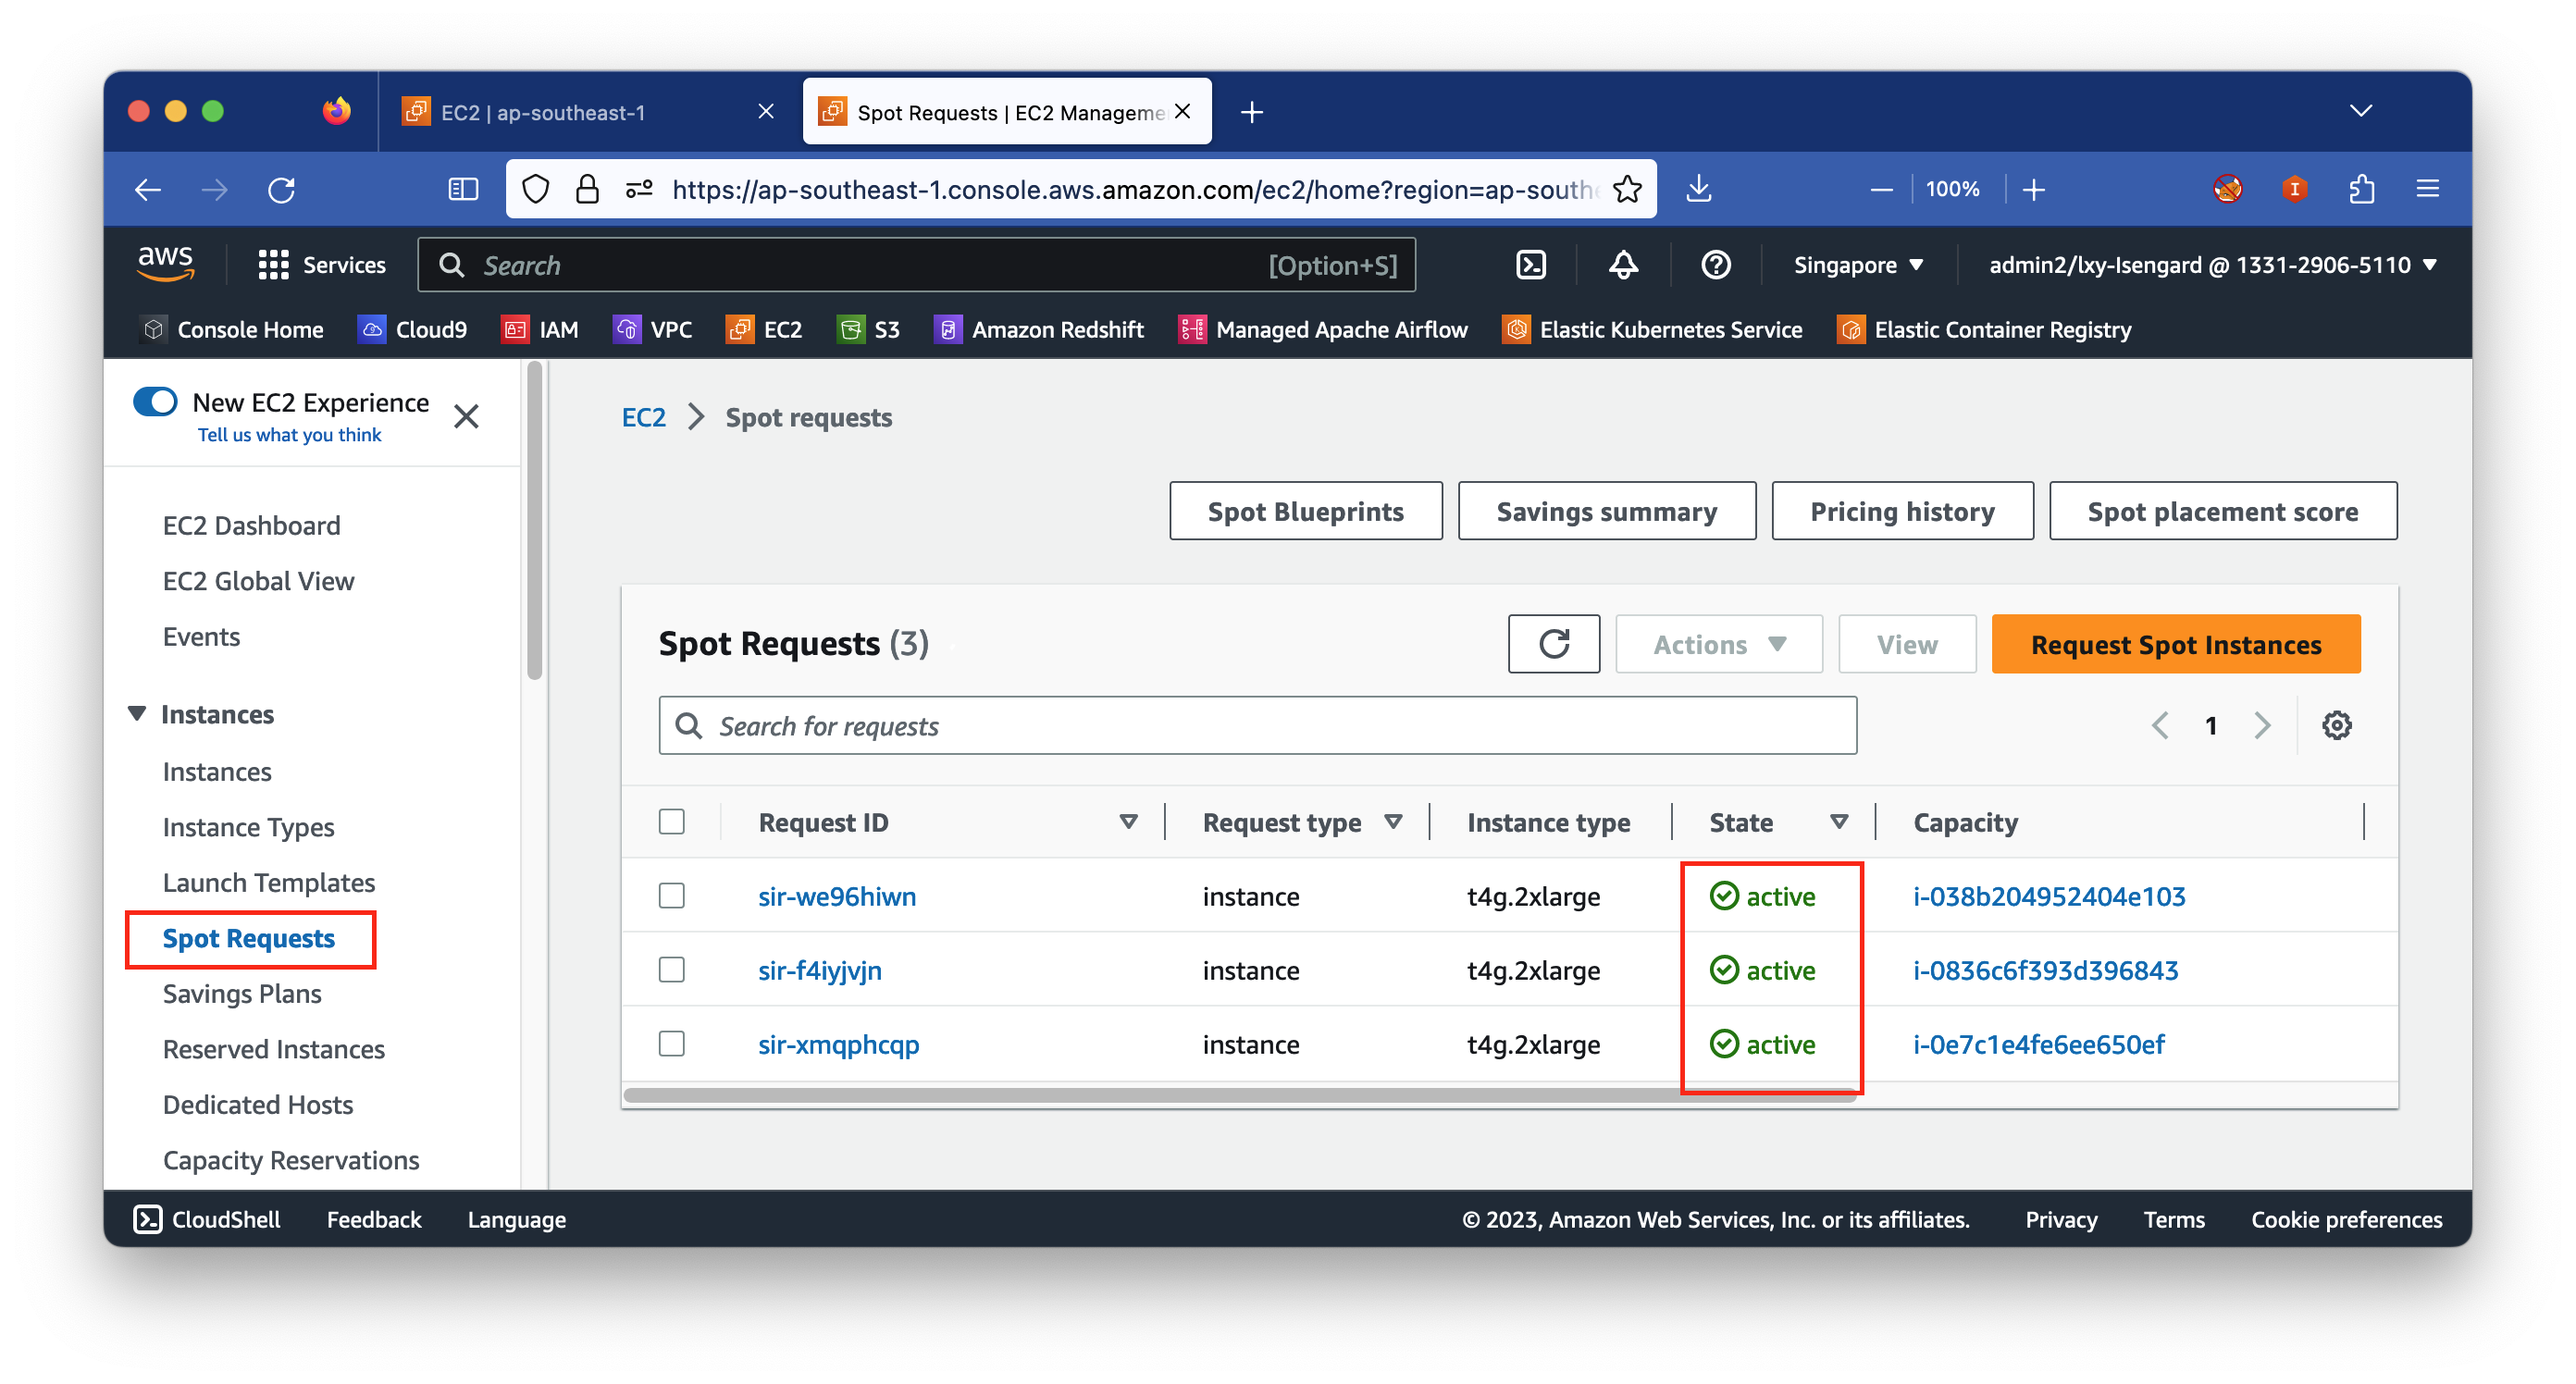
进入EC2控制台,点击左侧菜单的Spot requests,即可看到正常启动了三台EC2作为Nodegroups节点组。如下截图。
3、通过kubectl查询新的Spot的Nodegroup
执行如下命令查看nodegroup是否正常。请注意修改cluster名称与当前集群名称要匹配。
eksctl get nodegroup --cluster eksworkshop --region ap-southeast-1
返回结果可以看到原来的和新创建的两个 nodegroup 如下:
CLUSTER      NODEGROUP     STATUS  CREATED               MIN SIZE  MAX SIZE  DESIRED CAPACITY  INSTANCE TYPE                    IMAGE ID                ASG NAME                                              TYPE
eksworkshop  podsubnet-ng  ACTIVE  2026-09-19T13:40:54Z  3         6         3                 t3.2xlarge                       AL2023_x86_64_STANDARD  eks-podsubnet-ng-74d05cf2-fab0-a446-979c-fabf549e22c2  managed
eksworkshop  spot1         ACTIVE  2026-09-20T08:31:38Z  2         4         2                 m5.large,m5a.large,m6i.large     AL2023_x86_64_STANDARD  eks-spot1-68d05ef8-96cb-a4df-7aaa-be41a24f7896        managed
查看节点的创建时间:
kubectl get nodes --sort-by=.metadata.creationTimestamp
返回信息类似如下:
NAME                                                STATUS   ROLES    AGE   VERSION
ip-192-168-30-108.ap-southeast-1.compute.internal   Ready    <none>   18h   v1.36.4-eks-a887778
ip-192-168-54-190.ap-southeast-1.compute.internal   Ready    <none>   18h   v1.36.4-eks-a887778
ip-192-168-69-155.ap-southeast-1.compute.internal   Ready    <none>   18h   v1.36.4-eks-a887778
ip-192-168-20-167.ap-southeast-1.compute.internal   Ready    <none>   3m    v1.36.4-eks-a887778
ip-192-168-85-82.ap-southeast-1.compute.internal    Ready    <none>   3m    v1.36.4-eks-a887778
4、分别按On-Demand类型(含RI)和Spot类型查看当前集群的Nodegroup
查看On-Demand类型(含RI)的Nodegroup,执行如下命令:
kubectl get nodes \
  --label-columns=eks.amazonaws.com/capacityType \
  --selector=eks.amazonaws.com/capacityType=ON_DEMAND
输出结果类似如下:
NAME                                                STATUS   ROLES    AGE   VERSION               CAPACITYTYPE
ip-192-168-30-108.ap-southeast-1.compute.internal   Ready    <none>   18h   v1.36.4-eks-a887778   ON_DEMAND
ip-192-168-54-190.ap-southeast-1.compute.internal   Ready    <none>   18h   v1.36.4-eks-a887778   ON_DEMAND
ip-192-168-69-155.ap-southeast-1.compute.internal   Ready    <none>   18h   v1.36.4-eks-a887778   ON_DEMAND
查看节点类型是Spot的Nodegroup:
kubectl get nodes \
  --label-columns=eks.amazonaws.com/capacityType \
  --selector=eks.amazonaws.com/capacityType=SPOT
返回结果如下:
NAME                                                STATUS   ROLES    AGE   VERSION               CAPACITYTYPE
ip-192-168-20-167.ap-southeast-1.compute.internal   Ready    <none>   3m    v1.36.4-eks-a887778   SPOT
ip-192-168-85-82.ap-southeast-1.compute.internal    Ready    <none>   3m    v1.36.4-eks-a887778   SPOT
三、部署应用分别运行在Spot和On-demand机型上
1、在配置文件中指定使用On-Demand或者Spot类型的Nodegroup的写法
在和Container配置平级的位置,增加如下一段配置,表示使用On-demand节点运行服务:
      affinity:
        nodeAffinity:
          requiredDuringSchedulingIgnoredDuringExecution:
            nodeSelectorTerms:
            - matchExpressions:
              - key: eks.amazonaws.com/capacityType
                operator: In
                values:
                - ON_DEMAND
在和Container配置平级的位置,增加如下一段配置,表示优先使用Spot节点运行服务。preferredDuringSchedulingIgnoredDuringExecution 为软亲和,当 Spot 容量不足时,Pod 会回退到 On-Demand 节点;如果要强制只在 Spot 节点运行,可改为 requiredDuringSchedulingIgnoredDuringExecution 并按 On-Demand 段的写法组织字段。
      affinity:
        nodeAffinity:
          preferredDuringSchedulingIgnoredDuringExecution:
          - weight: 1
            preference:
              matchExpressions:
              - key: eks.amazonaws.com/capacityType
                operator: In
                values:
                - SPOT
      tolerations:
      - key: "spotInstance"
        operator: "Equal"
        value: "true"
        effect: "PreferNoSchedule"
关于 tolerations:EKS 托管 Spot 节点默认不会打上 spotInstance 污点。上述 toleration 是为兼容手工加了 spotInstance=true:PreferNoSchedule 污点的 Spot 节点而保留,若未手动打污点则不产生影响。
2、使用Spot节点启动应用的示例(基于ALB Ingress)
编辑如下配置文件,保存为SPOT-ALB-ingress.yaml。
---
apiVersion: v1
kind: Namespace
metadata:
  name: spot-alb-ingress
---
apiVersion: apps/v1
kind: Deployment
metadata:
  namespace: spot-alb-ingress
  name:  spot-alb-ingress
spec:
  selector:
    matchLabels:
      app.kubernetes.io/name: spot-alb-ingress
  replicas: 3
  template:
    metadata:
      labels:
        app.kubernetes.io/name: spot-alb-ingress
    spec:
      containers:
      - image: public.ecr.aws/nginx/nginx:1.31-alpine-slim
        imagePullPolicy: Always
        name: spot-alb-ingress
        ports:
        - containerPort: 80
      affinity:
        nodeAffinity:
          preferredDuringSchedulingIgnoredDuringExecution:
          - weight: 1
            preference:
              matchExpressions:
              - key: eks.amazonaws.com/capacityType
                operator: In
                values:
                - SPOT
      tolerations:
      - key: "spotInstance"
        operator: "Equal"
        value: "true"
        effect: "PreferNoSchedule"
---
apiVersion: v1
kind: Service
metadata:
  namespace: spot-alb-ingress
  name: spot-alb-ingress
spec:
  ports:
    - port: 80
      targetPort: 80
      protocol: TCP
  type: NodePort
  selector:
    app.kubernetes.io/name: spot-alb-ingress
---
apiVersion: networking.k8s.io/v1
kind: Ingress
metadata:
  namespace: spot-alb-ingress
  name: spot-alb-ingress
  annotations:
    alb.ingress.kubernetes.io/scheme: internet-facing
    alb.ingress.kubernetes.io/target-type: ip
spec:
  ingressClassName: alb
  rules:
    - http:
        paths:
        - path: /
          pathType: Prefix
          backend:
            service:
              name: spot-alb-ingress
              port:
                number: 80
执行如下命令启动服务:
kubectl apply -f SPOT-ALB-ingress.yaml
启动完毕。
3、确认应用启动成功
确认ALB Ingress运行正常,使用如下命令查看Ingress:
kubectl get ingress -n spot-alb-ingress
返回结果如下:
NAME               CLASS   HOSTS   ADDRESS                                                                        PORTS   AGE
spot-alb-ingress   alb     *       k8s-spotalbi-spotalbi-61ad5ed1a2-1998557095.ap-southeast-1.elb.amazonaws.com   80      1m
使用 curl 等工具或者网页浏览器访问这个 ALB 的入口,等待 ALB 目标组变为 healthy 后可看到 nginx 欢迎页:
curl -s -o /dev/null -w "HTTP %{http_code}\n" http://k8s-spotalbi-spotalbi-61ad5ed1a2-1998557095.ap-southeast-1.elb.amazonaws.com/
返回结果如下:
HTTP 200
4、查看运行在Spot节点组上的Pod
前一步确认了ALB Ingress访问应用正常,现在我们来确认应用是运行在Spot节点组上。
执行如下命令查看运行在Spot节点组上的Pod:
for n in $(kubectl get nodes -l eks.amazonaws.com/capacityType=SPOT --no-headers | cut -d " " -f1); do
  echo "Pods on instance ${n}:"
  kubectl get pods --all-namespaces --no-headers --field-selector spec.nodeName=${n}
  echo
done
返回信息如下:
Pods on instance ip-192-168-20-167.ap-southeast-1.compute.internal:
amazon-cloudwatch   cloudwatch-agent-vbfkk             1/1   Running   0     3m8s
amazon-cloudwatch   fluent-bit-cz4gs                   1/1   Running   0     3m8s
kube-system         aws-node-hwjrd                     2/2   Running   0     3m8s
kube-system         kube-proxy-2497g                   1/1   Running   0     3m8s
spot-alb-ingress    spot-alb-ingress-756cc9994-f88mm   1/1   Running   0     2m8s

Pods on instance ip-192-168-85-82.ap-southeast-1.compute.internal:
amazon-cloudwatch   cloudwatch-agent-47xfc             1/1   Running   0     3m10s
amazon-cloudwatch   fluent-bit-hpkcz                   1/1   Running   0     3m10s
kube-system         aws-node-l4sbw                     2/2   Running   0     3m10s
kube-system         kube-proxy-6tqj7                   1/1   Running   0     3m10s
spot-alb-ingress    spot-alb-ingress-756cc9994-8nc2g   1/1   Running   0     2m10s
spot-alb-ingress    spot-alb-ingress-756cc9994-rj7zd   1/1   Running   0     2m9s
可以看到 Namespace spot-alb-ingress 中的 3 个 Pod 全部被调度到 Spot 节点上(本例 desiredCapacity=2,因此 3 个 Pod 被分配到 2 个 Spot 节点)。与预期结果一致。
5、查看On-demand节点组上的Pod
执行如下命令查看运行在On-demand节点组上的Pod:
for n in $(kubectl get nodes -l eks.amazonaws.com/capacityType=ON_DEMAND --no-headers | cut -d " " -f1); do
  echo "Pods on instance ${n}:"
  kubectl get pods --all-namespaces --no-headers --field-selector spec.nodeName=${n}
  echo
done
返回信息如下:
Pods on instance ip-192-168-30-108.ap-southeast-1.compute.internal:
amazon-cloudwatch   cloudwatch-agent-...              1/1   Running   0   18h
amazon-cloudwatch   fluent-bit-...                    1/1   Running   0   18h
kube-system         aws-load-balancer-controller-... 1/1   Running   0   18h
kube-system         aws-node-...                      2/2   Running   0   18h
kube-system         coredns-...                       1/1   Running   0   18h
kube-system         kube-proxy-...                    1/1   Running   0   18h
可看到On-Demand节点组上没有刚才启动的Pod,因此确认了本应用的Pod都运行在Spot节点组上。
四、删除实验环境
清理测试应用与 Spot 节点组,恢复到实验开始前的状态:
kubectl delete -f SPOT-ALB-ingress.yaml
eksctl delete nodegroup --cluster eksworkshop --region ap-southeast-1 --name spot1
五、参考文档
Spot最佳实践:
https://docs.aws.amazon.com/AWSEC2/latest/UserGuide/spot-best-practices.html
eksctl 托管节点组配置参考:
https://eksctl.io/usage/spot-instances/
全文完。
最后修改于 2026-09-20