EKS使用预加载机制加速EC2 Nodegroup上大镜像的启动速度
本文介绍EKS中大镜像冷启动问题,通过EventBridge和System Manager实现ECR镜像预加载缓存,将Pod启动时间从110秒优化至2秒。
EKS动手实验合集请参考这里。
EKS 1.36 版本 @2026-09 AWS Global 区域(ap-southeast-1)实测通过,节点操作系统为 Amazon Linux 2023(kubelet
v1.36.4-eks-a887778,containerd 2.2.7),测试镜像大小约为 4.1 GiB。
目录
- 一、背景
- 二、测试环境准备
- 三、应用Yaml是否打开缓存开关的对比
- 四、使用EventBridge构建预加载
- 五、验证预缓存机制生效
- 六、参考文档
一、背景
在机器学习等场景下,需要在EKS上运行较大体积的Pod,其Image体积可能达到数个GB乃至数十GB。此时在第一次启动Pod时候,会遇到所谓的冷启动问题,也就是EC2 Nodegroup需要从ECR容器镜像仓库拉取较大尺寸的镜像并解压,然后才能启动Pod。后续启动相同镜像即可利用节点上的缓存,无须重复下载。本文介绍如何通过EventBridge与Systems Manager在镜像发布和节点扩容两个时间点主动预加载镜像,从而消除冷启动时间。
1、优化镜像拉取时间的几种方法
EKS最佳实践文档中提到的几种优化方法如下:
- 让镜像最小化瘦身;
- 使用multi-stage builds去除构建阶段才需要的内容;
- 使用网络带宽与EBS吞吐更高的EC2机型作为Nodegroup;
- 使用SOCI(Seekable OCI)快照器的并行拉取与解压模式(Parallel Pull mode),通过多连接分段下载和多层并行解压缩短单次拉取时间;
- 使用Bottlerocket的数据卷或EBS快照预置镜像;
- 在EC2 Nodegroup上预先缓存镜像,即本文介绍的方法。
以上方法可以组合使用。SOCI并行拉取模式缩短的是每一次拉取的耗时,而本文的预加载方法是把拉取动作提前到Pod调度之前完成,二者解决的是冷启动问题的不同环节。
2、在应用中复用节点上的镜像缓存
在拉起应用的配置文件定义中,增加如下imagePullPolicy标签,即可复用EC2 Nodegroup节点上已经存在的缓存。
    spec:
      containers:
      - name: bigimage1
        image: 133129065110.dkr.ecr.ap-southeast-1.amazonaws.com/bigimage:1
        imagePullPolicy: IfNotPresent
        ports:
        - containerPort: 80
参数IfNotPresent表示节点上已存在该镜像时直接使用缓存。需要注意,当镜像Tag为latest或者未指定Tag时,Kubernetes默认的拉取策略是Always,每次启动都会访问镜像仓库,因此建议使用明确的版本Tag并显式设置IfNotPresent。对于第一次下载,节点上没有缓存,仍然需要较长时间的冷启动。为了解决冷启动,就需要预加载。
3、通过EventBridge和Systems Manager自动预加载镜像的方案
当新的镜像推送到ECR后,ECR会向EventBridge发送ECR Image Action事件。EventBridge规则匹配该事件后,通过Systems Manager Run Command向集群所有节点下发拉取镜像的命令,实现预加载。对于扩容新增的节点,则通过Systems Manager State Manager的关联(Association)在节点注册到Systems Manager时自动执行相同的拉取命令。整体流程如下:
              推送新版本镜像                        扩容新增节点
                    |                                    |
                    v                                    v
      ECR 发送 ECR Image Action 事件         节点 SSM Agent 注册上线
                    |                                    |
                    v                                    v
      EventBridge 规则匹配 PUSH 事件         State Manager 关联按Tag匹配新节点
                    |                                    |
                    v                                    v
      Run Command 下发到带集群Tag的节点      对新节点执行 AWS-RunShellScript
                    \                                   /
                     v                                 v
         节点执行 ctr -n k8s.io images pull 拉取最新Tag的镜像
                                    |
                                    v
         Pod调度到节点后镜像已存在,跳过拉取直接启动容器
详情参考这篇博客。本文将着重讲述本方案的部署。
4、使用Bottlerocket作为Node底层系统实现快速启动的方案
Bottlerocket是AWS开发的开源的、用于运行容器的操作系统,其体积更小、更安全。EKS 1.36默认使用Amazon Linux 2023作为EC2 Nodegroup的操作系统(Amazon Linux 2的EKS AMI已停止发布),可选使用Bottlerocket来作为操作系统运行容器。二者的区别是,使用Amazon Linux 2023的Nodegroup默认只有一块EBS磁盘,操作系统和容器镜像缓存都在这个磁盘上。而Bottlerocket使用两块EBS磁盘,分别作为OS系统盘和容器镜像的数据盘,可以基于预先拉取好镜像的数据盘EBS快照启动新节点,新节点启动时镜像即已存在。
篇幅所限,本文不会展开描述本方案。详情请参考这篇博客。
5、局限
以上方法均不支持Fargate场景。Fargate的每个Pod运行在独立的计算环境中,没有可复用的节点缓存,Fargate应用拉起无法利用到本文的缓存特性。对于Fargate,可参考文末关于zstd压缩镜像的博客优化拉取速度。
下面开始准备测试环境。
二、测试环境准备
1、构建应用
为了模拟大体积的容器镜像,本文在Amazon Linux 2023的基础镜像上安装Apache,然后在构建阶段通过/dev/urandom生成4个各1 GiB的随机数据文件,每个文件单独形成一个镜像层。随机数据无法被压缩,因此推送到ECR后压缩尺寸依然约为4 GiB,可以真实地反映大镜像的下载耗时。旧版本实验使用的amazonlinux:2基础镜像已于2026年6月结束支持,本文改为amazonlinux:2023。
构建Image的定义如下:
FROM public.ecr.aws/amazonlinux/amazonlinux:2023

# Install apache
RUN dnf install -y httpd \
 && dnf clean all \
 && rm -rf /var/cache/dnf

# Install app
COPY src/run_apache.sh /root/
COPY src/index.html /var/www/html/
RUN chown -R apache:apache /var/www \
 && chmod +x /root/run_apache.sh \
 && echo "ServerName localhost" >> /etc/httpd/conf/httpd.conf

# Simulate a large image: 4 layers x 1 GiB of random data (about 4 GiB in total).
# Random data cannot be compressed, so the compressed size in ECR stays close to 4 GiB.
# Change BUILD_ID on every build to generate brand new layers.
ARG BUILD_ID=1
RUN echo "${BUILD_ID}" > /root/build-id && head -c 1G /dev/urandom > /root/blob-1
RUN echo "${BUILD_ID}" >> /root/build-id && head -c 1G /dev/urandom > /root/blob-2
RUN echo "${BUILD_ID}" >> /root/build-id && head -c 1G /dev/urandom > /root/blob-3
RUN echo "${BUILD_ID}" >> /root/build-id && head -c 1G /dev/urandom > /root/blob-4

EXPOSE 80

# starting script for httpd
CMD ["/bin/bash", "-c", "/root/run_apache.sh"]
其中run_apache.sh的脚本如下:
#!/bin/bash
mkdir -p /run/httpd
/usr/sbin/httpd -D FOREGROUND
src/index.html为任意静态页面即可。以上文件均已放在本仓库的21目录下。构建参数BUILD_ID用于在后续测试中生成全新的镜像层:由于BUILD_ID的值发生变化,其后的RUN指令不会命中构建缓存,会重新生成4个随机数据层,从而模拟发布一个新版本的大镜像。
执行如下命令创建ECR仓库:
aws ecr create-repository --repository-name bigimage --region ap-southeast-1
然后在构建环境上执行如下命令,构建并推送Tag为1的镜像。请替换其中的AWS账户ID:
aws ecr get-login-password --region ap-southeast-1 | docker login --username AWS --password-stdin 133129065110.dkr.ecr.ap-southeast-1.amazonaws.com
docker build --build-arg BUILD_ID=1 -t bigimage:1 .
docker tag bigimage:1 133129065110.dkr.ecr.ap-southeast-1.amazonaws.com/bigimage:1
docker push 133129065110.dkr.ecr.ap-southeast-1.amazonaws.com/bigimage:1
本文的构建环境为一台m7i-flex.large的EC2实例(Ubuntu 22.04,Docker 29.8.1),构建耗时166秒,推送耗时35秒。构建完成后查看本地镜像:
IMAGE        ID             DISK USAGE   CONTENT SIZE   EXTRA
bigimage:1   67804948f6fd       8.95GB         4.38GB
推送完成后,执行如下命令查看ECR上的镜像:
aws ecr describe-images --region ap-southeast-1 --repository-name bigimage \
    --query 'imageDetails[].{tag:imageTags[0],size:imageSizeInBytes,pushed:imagePushedAt,type:imageManifestMediaType}' \
    --output table
返回结果如下:
----------------------------------------------------------------------------------------------------------
|                                             DescribeImages                                             |
+-----------------------------------+-------------+-------+----------------------------------------------+
|              pushed               |    size     |  tag  |                    type                      |
+-----------------------------------+-------------+-------+----------------------------------------------+
|  2026-09-29T20:20:56.595000+08:00 |  1176       |  None |  application/vnd.oci.image.manifest.v1+json  |
|  2026-09-29T20:20:56.579000+08:00 |  4384276568 |  None |  application/vnd.oci.image.manifest.v1+json  |
|  2026-09-29T20:20:56.904000+08:00 |  4384276568 |  1    |  application/vnd.oci.image.index.v1+json     |
+-----------------------------------+-------------+-------+----------------------------------------------+
可以看到,一次推送在ECR上产生了3条记录。这是因为新版本Docker默认使用containerd镜像存储并生成构建证明(Provenance Attestation),推送的是一个OCI镜像索引(Image Index),其中包含一个实际的amd64镜像清单和一个约1 KB的证明清单,只有镜像索引带有Tag。这一点会影响后文查询“最新镜像Tag”的命令写法,后文使用--filter tagStatus=TAGGED排除没有Tag的记录。
注意:如果开发者本机为MacOS,特别是Apple Silicon芯片的Mac,不建议在本机构建推送此类大镜像。一方面ARM架构默认构建出的是arm64镜像,与x86_64节点不匹配;另一方面数GB的上传会占用较长时间。建议使用一台与集群同架构的EC2实例作为构建环境。
2、构建EC2 Nodegroup
如果已经按照实验一创建了名为eksworkshop的集群,则可以跳过本节,直接使用该集群。本文的实测即在实验一的集群上完成,该集群的Nodegroup为3台t3.2xlarge节点(后文输出中的Nodegroup名称为podsubnet-ng,节点的Name标签为eksworkshop-podsubnet-ng-Node)。
如需新建集群,定义如下配置文件,并将其中的三个子网ID替换为实际环境中位于三个可用区的私有子网ID:
apiVersion: eksctl.io/v1alpha5
kind: ClusterConfig

metadata:
  name: eksworkshop
  region: ap-southeast-1
  version: "1.36"

vpc:
  clusterEndpoints:
    publicAccess:  true
    privateAccess: true
  subnets:
    private:
      ap-southeast-1a: { id: subnet-04a7c6e7e1589c953 }
      ap-southeast-1b: { id: subnet-031022a6aab9b9e70 }
      ap-southeast-1c: { id: subnet-0eaf9054aa6daa68e }

kubernetesNetworkConfig:
  serviceIPv4CIDR: 10.50.0.0/24

managedNodeGroups:
  - name: managed-ng
    labels:
      Name: managed-ng
    instanceType: t3.xlarge
    minSize: 2
    desiredCapacity: 2
    maxSize: 4
    privateNetworking: true
    subnets:
      - subnet-04a7c6e7e1589c953
      - subnet-031022a6aab9b9e70
      - subnet-0eaf9054aa6daa68e
    volumeType: gp3
    volumeSize: 100
    volumeIOPS: 3000
    volumeThroughput: 125
    tags:
      nodegroup-name: managed-ng
    iam:
      withAddonPolicies:
        imageBuilder: true
        autoScaler: true
        certManager: true
        efs: true
        ebs: true
        awsLoadBalancerController: true
        xRay: true
        cloudWatch: true

cloudWatch:
  clusterLogging:
    enableTypes: ["api", "audit", "authenticator", "controllerManager", "scheduler"]
    logRetentionInDays: 30
与旧版本配置相比,本配置将version调整为1.36,将已废弃的albIngress替换为awsLoadBalancerController,并将maxSize调整为4,以便后文测试节点扩容。
在以上配置中,使用的是gp3作为EC2 Nodegroup节点组的磁盘,默认为3000 IOPS和125MB/s的吞吐,并且没有额外选配费用,对于一般场景是成本最优选择。对于大镜像,镜像层解压阶段的磁盘写入量约为压缩尺寸的两倍,125MB/s的吞吐往往会成为瓶颈。如果希望加载更快,可酌情上调volumeThroughput与volumeIOPS,但会产生额外的EBS费用。
本方案对节点IAM角色有两项要求,eksctl创建的Nodegroup默认均已满足:
AmazonSSMManagedInstanceCore:节点上的SSM Agent注册到Systems Manager所需,eksctl默认会为节点角色附加该策略;ecr:DescribeImages:节点上执行的预加载命令需要查询仓库中最新的镜像Tag。本配置中imageBuilder: true附加的AmazonEC2ContainerRegistryPowerUser包含该权限。如果节点角色只有AmazonEC2ContainerRegistryPullOnly,则需要额外授予ecr:DescribeImages,否则查询Tag的命令会报AccessDenied。
将以上配置文件保存为eks-private-subnet.yaml,然后执行如下命令启动集群。
eksctl create cluster -f eks-private-subnet.yaml
集群启动完成。这个集群将在私有子网启动,包括2个t3.xlarge节点组成NodeGroup。
3、构建测试应用
构建如下应用。为了让3个副本分别调度到3个节点上,配置中增加了topologySpreadConstraints拓扑分布约束:
---
apiVersion: v1
kind: Namespace
metadata:
  name: bigimage
---
apiVersion: apps/v1
kind: Deployment
metadata:
  name: bigimage1
  namespace: bigimage
  labels:
    app: bigimage1
spec:
  replicas: 3
  selector:
    matchLabels:
      app: bigimage1
  template:
    metadata:
      labels:
        app: bigimage1
    spec:
      topologySpreadConstraints:
      - maxSkew: 1
        topologyKey: kubernetes.io/hostname
        whenUnsatisfiable: ScheduleAnyway
        labelSelector:
          matchLabels:
            app: bigimage1
      containers:
      - name: bigimage1
        image: 133129065110.dkr.ecr.ap-southeast-1.amazonaws.com/bigimage:1
        imagePullPolicy: IfNotPresent
        ports:
        - containerPort: 80
---
apiVersion: v1
kind: Service
metadata:
  name: bigimage1
  namespace: bigimage
  annotations:
    service.beta.kubernetes.io/aws-load-balancer-scheme: internet-facing
    service.beta.kubernetes.io/aws-load-balancer-nlb-target-type: ip
spec:
  loadBalancerClass: service.k8s.aws/nlb
  selector:
    app: bigimage1
  type: LoadBalancer
  ports:
  - protocol: TCP
    port: 80
    targetPort: 80
在以上配置中,imagePullPolicy: IfNotPresent参数表示如果镜像已经存在,则使用缓存;Service的loadBalancerClass: service.k8s.aws/nlb表示由AWS Load Balancer Controller创建NLB,需要集群已按照实验二部署该控制器。将以上文件保存为bigimage.yaml。
下面进行冷启动与缓存启动的对比测试。
三、应用Yaml是否打开缓存开关的对比
1、查询Pod启动时间的脚本
这里参考Github上aws-samples库中的containers-blog-maelstrom/prefetch-data-to-EKSnodes/get-pod-boot-time.sh脚本来统计Pod从被调度(PodScheduled)到就绪(Ready)的时间。原始脚本没有指定Namespace,只能查询default Namespace,因此这里增加了Namespace参数;Pod名称参数改为可选,省略时统计该Namespace下的全部Pod;同时修正了MacOS下按本地时区解析UTC时间的问题。代码如下:
#!/usr/bin/env bash
# Usage: ./get-pod-boot-time.sh <namespace> [pod-name]
# If pod-name is omitted, all pods in the namespace are reported.
namespace="$1"
target_pod="$2"
fail() {
  echo "$@" 1>&2
  exit 1
}
test -n "$namespace" || fail "Usage: $0 <namespace> [pod-name]"
# https://kubernetes.io/docs/concepts/workloads/pods/pod-lifecycle/#pod-conditions
get_condition_time() {
  pod="$1"
  condition="$2"
  iso_time=$(kubectl get pod "$pod" --namespace "$namespace" -o json | jq -r ".status.conditions[] | select(.type == \"$condition\" and .status == \"True\") | .lastTransitionTime")
  test -n "$iso_time" || fail "Pod $pod is not in $condition yet"
  if [[ "$(uname)" == "Darwin" ]]; then
      date -j -u -f "%Y-%m-%dT%H:%M:%SZ" "$iso_time" +%s
  else
      date -u -d "$iso_time" +%s
  fi
}
if [[ -n "$target_pod" ]]; then
  pods="$target_pod"
else
  pods=$(kubectl get pods --namespace "$namespace" -o jsonpath='{.items[*].metadata.name}')
fi
for pod in $pods; do
  scheduled_time=$(get_condition_time "$pod" PodScheduled) || exit 1
  ready_time=$(get_condition_time "$pod" Ready) || exit 1
  node=$(kubectl get pod "$pod" --namespace "$namespace" -o jsonpath='{.spec.nodeName}')
  echo "It took approximately $(( ready_time - scheduled_time )) seconds for $pod to boot up on $node"
done
保存到本地,文件名为get-pod-boot-time.sh,并执行chmod +x get-pod-boot-time.sh赋予执行权限。脚本依赖jq,在具有运行kubectl正确权限的环境下,运行命令:
./get-pod-boot-time.sh <namespace> [podname]
即可显示启动时间。
2、首次拉起没有缓存的测试
首先正常启动应用:
kubectl apply -f bigimage.yaml
等待Pod全部变为Running后,执行如下命令查看Pod启动时间:
./get-pod-boot-time.sh bigimage
返回结果如下:
It took approximately 70 seconds for bigimage1-698c8784f4-lxbqt to boot up on ip-192-168-54-190.ap-southeast-1.compute.internal
It took approximately 60 seconds for bigimage1-698c8784f4-v7vpn to boot up on ip-192-168-69-155.ap-southeast-1.compute.internal
It took approximately 64 seconds for bigimage1-698c8784f4-xdvg2 to boot up on ip-192-168-30-108.ap-southeast-1.compute.internal
也可以通过kubelet上报的事件查看拉取镜像的实际耗时:
kubectl get events -n bigimage --field-selector reason=Pulled \
    -o custom-columns=POD:.involvedObject.name,MSG:.message --no-headers
返回结果如下:
bigimage1-698c8784f4-lxbqt   Successfully pulled image "133129065110.dkr.ecr.ap-southeast-1.amazonaws.com/bigimage:1" in 1m9.12s (1m9.12s including waiting). Image size: 4384279444 bytes.
bigimage1-698c8784f4-v7vpn   Successfully pulled image "133129065110.dkr.ecr.ap-southeast-1.amazonaws.com/bigimage:1" in 59.146s (59.146s including waiting). Image size: 4384279444 bytes.
bigimage1-698c8784f4-xdvg2   Successfully pulled image "133129065110.dkr.ecr.ap-southeast-1.amazonaws.com/bigimage:1" in 1m2.913s (1m2.913s including waiting). Image size: 4384279444 bytes.
测试结果为60至70秒,几乎全部时间消耗在镜像拉取上。EC2 Nodegroup节点是t3.2xlarge机型,EBS为100GB的gp3磁盘(3000 IOPS、125MB/s吞吐)。
3、使用缓存的测试
再启动一个新的应用bigimage2,复用相同的镜像。其配置与bigimage1的Deployment部分相同,仅将名称与标签改为bigimage2,完整文件见本仓库的21/bigimage2.yaml。执行如下命令:
kubectl apply -f bigimage2.yaml
./get-pod-boot-time.sh bigimage
返回结果中bigimage2的部分如下:
It took approximately 1 seconds for bigimage2-59c599c547-hvpkf to boot up on ip-192-168-69-155.ap-southeast-1.compute.internal
It took approximately 1 seconds for bigimage2-59c599c547-jg9wr to boot up on ip-192-168-54-190.ap-southeast-1.compute.internal
It took approximately 1 seconds for bigimage2-59c599c547-w4mt6 to boot up on ip-192-168-30-108.ap-southeast-1.compute.internal
对应的事件显示镜像已经存在于节点上,没有发生拉取:
bigimage2-59c599c547-hvpkf Container image "133129065110.dkr.ecr.ap-southeast-1.amazonaws.com/bigimage:1" already present on machine and can be accessed by the pod
花费时间约1秒。由此可看出,缓存明显提升了启动速度。
4、测试过程的录屏演示
以下录屏为旧版本实验(EKS 1.28)的录制内容,操作流程与本文一致。
5、测试流程小结
整个流程小结如下:
- 1、以Amazon Linux 2023容器镜像为基础,安装Apache后体积约为200MB;
- 2、在构建阶段生成4个各1 GiB的随机数据层,镜像总容量约4.1 GiB;
- 3、随机数据无法压缩,推送到ECR后压缩尺寸依然为4.1 GiB;
- 4、在t3.2xlarge机型、100GB gp3磁盘(3000 IOPS、125MB/s吞吐)的节点上,首次拉起应用花费60至70秒;
- 5、在应用配置文件中指定可利用缓存,使用相同镜像拉起新应用,约1秒启动完毕。
下面配置预加载机制,使首次启动也能命中缓存。
四、使用EventBridge进行预加载
前文介绍过,针对EKS的EC2 Nodegroup,可以使用预加载机制,通过EventBridge触发。在实际使用EKS过程中,有两种场景需要考虑:
- 在ECR上发布最新版镜像后,现有Nodegroup节点只缓存了旧版本的镜像,需要预加载最新版做缓存。此时方案是 EventBridge + Systems Manager Run Command;
- EKS的Nodegroup扩容,新增了新的EC2节点,此时新节点上还没有任何一个版本的缓存,需要预加载最新版做缓存。此时方案是 Systems Manager State Manager。
两种场景都通过节点上的eks:cluster-name标签选择目标节点。EKS托管节点组会自动为EC2实例添加eks:cluster-name与eks:nodegroup-name标签,与旧版本实验使用的Name标签相比,无需拼接Nodegroup名称,集群内新增Nodegroup也会自动纳入预加载范围。如果只希望对特定Nodegroup预加载,可将目标改为tag:eks:nodegroup-name。
两种场景的配置过程如下。
1、创建EventBridge要使用的IAM Role
配置IAM Role可以通过AWS控制台,也可以通过AWSCLI,二者效果一样。本文使用CLI创建。
准备IAM Role的信任策略如下:
{
    "Version": "2012-10-17",
    "Statement": [
        {
            "Action": "sts:AssumeRole",
            "Principal": {
                "Service": "events.amazonaws.com"
            },
            "Effect": "Allow",
            "Sid": ""
        }
    ]
}
将其保存为iam-role.json,然后使用AWSCLI如下命令创建这个IAM Role。
aws iam create-role --role-name ecr-push-cache --assume-role-policy-document file://iam-role.json
返回结果如下表示创建成功:
{
    "Role": {
        "Path": "/",
        "RoleName": "ecr-push-cache",
        "RoleId": "AROAR57Y4KKLDNVZCM4TO",
        "Arn": "arn:aws:iam::133129065110:role/ecr-push-cache",
        "CreateDate": "2023-12-26T04:50:16+00:00",
        "AssumeRolePolicyDocument": {
            "Version": "2012-10-17",
            "Statement": [
                {
                    "Action": "sts:AssumeRole",
                    "Principal": {
                        "Service": "events.amazonaws.com"
                    },
                    "Effect": "Allow",
                    "Sid": ""
                }
            ]
        }
    }
}
最终生成的IAM Role名称是ecr-push-cache,后文会使用这个名称。如果之前做过本实验,命令会返回EntityAlreadyExists错误,可以直接复用已有的角色。
2、挂载IAM Policy到上一步创建的Role
编写如下一段IAM Policy,请替换其中的Region代号、AWS账户ID(12位数字),以及将集群名称eksworkshop替换为实际的名称:
{
    "Version": "2012-10-17",
    "Statement": [
        {
            "Sid": "SendCommandToClusterNodes",
            "Action": "ssm:SendCommand",
            "Effect": "Allow",
            "Resource": [
                "arn:aws:ec2:ap-southeast-1:133129065110:instance/*"
            ],
            "Condition": {
                "StringEquals": {
                    "ssm:resourceTag/eks:cluster-name": "eksworkshop"
                }
            }
        },
        {
            "Sid": "UseRunShellScriptDocument",
            "Action": "ssm:SendCommand",
            "Effect": "Allow",
            "Resource": [
                "arn:aws:ssm:ap-southeast-1::document/AWS-RunShellScript"
            ]
        }
    ]
}
以上策略只允许EventBridge对带有eks:cluster-name=eksworkshop标签的实例执行AWS-RunShellScript文档。旧版本实验的策略使用了ec2:ResourceTag/*这种以通配符作为标签键的写法,无法精确限定到某个标签键,本文改为Systems Manager官方文档推荐的ssm:resourceTag/<标签键>条件键。
将其保存为iam-policy.json,然后使用AWSCLI如下命令将这个IAM Policy挂载到上一步创建的IAM Role上。
aws iam put-role-policy --role-name ecr-push-cache --policy-name ecr-push-cache-ssm-policy --policy-document file://iam-policy.json
配置成功则返回命令行,否则会提示错误信息。
3、创建EventBridge规则
配置EventBridge可以通过AWS控制台,也可以通过AWSCLI,二者效果一样。但是由于在AWS控制台上配置EventBridge步骤较多,页面跳转和输入选项复杂,容易遗漏和出错,因此本文通过AWSCLI预先写好的JSON格式的配置文件,快速加载配置。
准备如下一段EventBridge配置规则,替换其中的Name为规则的名称,此处可以自定义。在repository-name位置,输入ECR容器镜像仓库的名称。注意这里不是写完整URI,因此不需要带有容器镜像仓库的网址,也不要带有tag,只是名称。例如本文叫做bigimage。
{
    "Name": "ecr-push-cache",
    "Description": "Rule to trigger SSM Run Command on ECR Image PUSH Action Success",
    "EventPattern": "{\"source\": [\"aws.ecr\"], \"detail-type\": [\"ECR Image Action\"], \"detail\": {\"action-type\": [\"PUSH\"], \"result\": [\"SUCCESS\"], \"repository-name\": [\"bigimage\"]}}"
}
将其保存为event-rule.json,然后使用AWSCLI如下命令将这个规则配置到EventBridge上。请注意文件名和对应region的正确。执行如下命令:
aws events put-rule --cli-input-json file://event-rule.json --region ap-southeast-1
配置成功,返回信息如下:
{
    "RuleArn": "arn:aws:events:ap-southeast-1:133129065110:rule/ecr-push-cache"
}
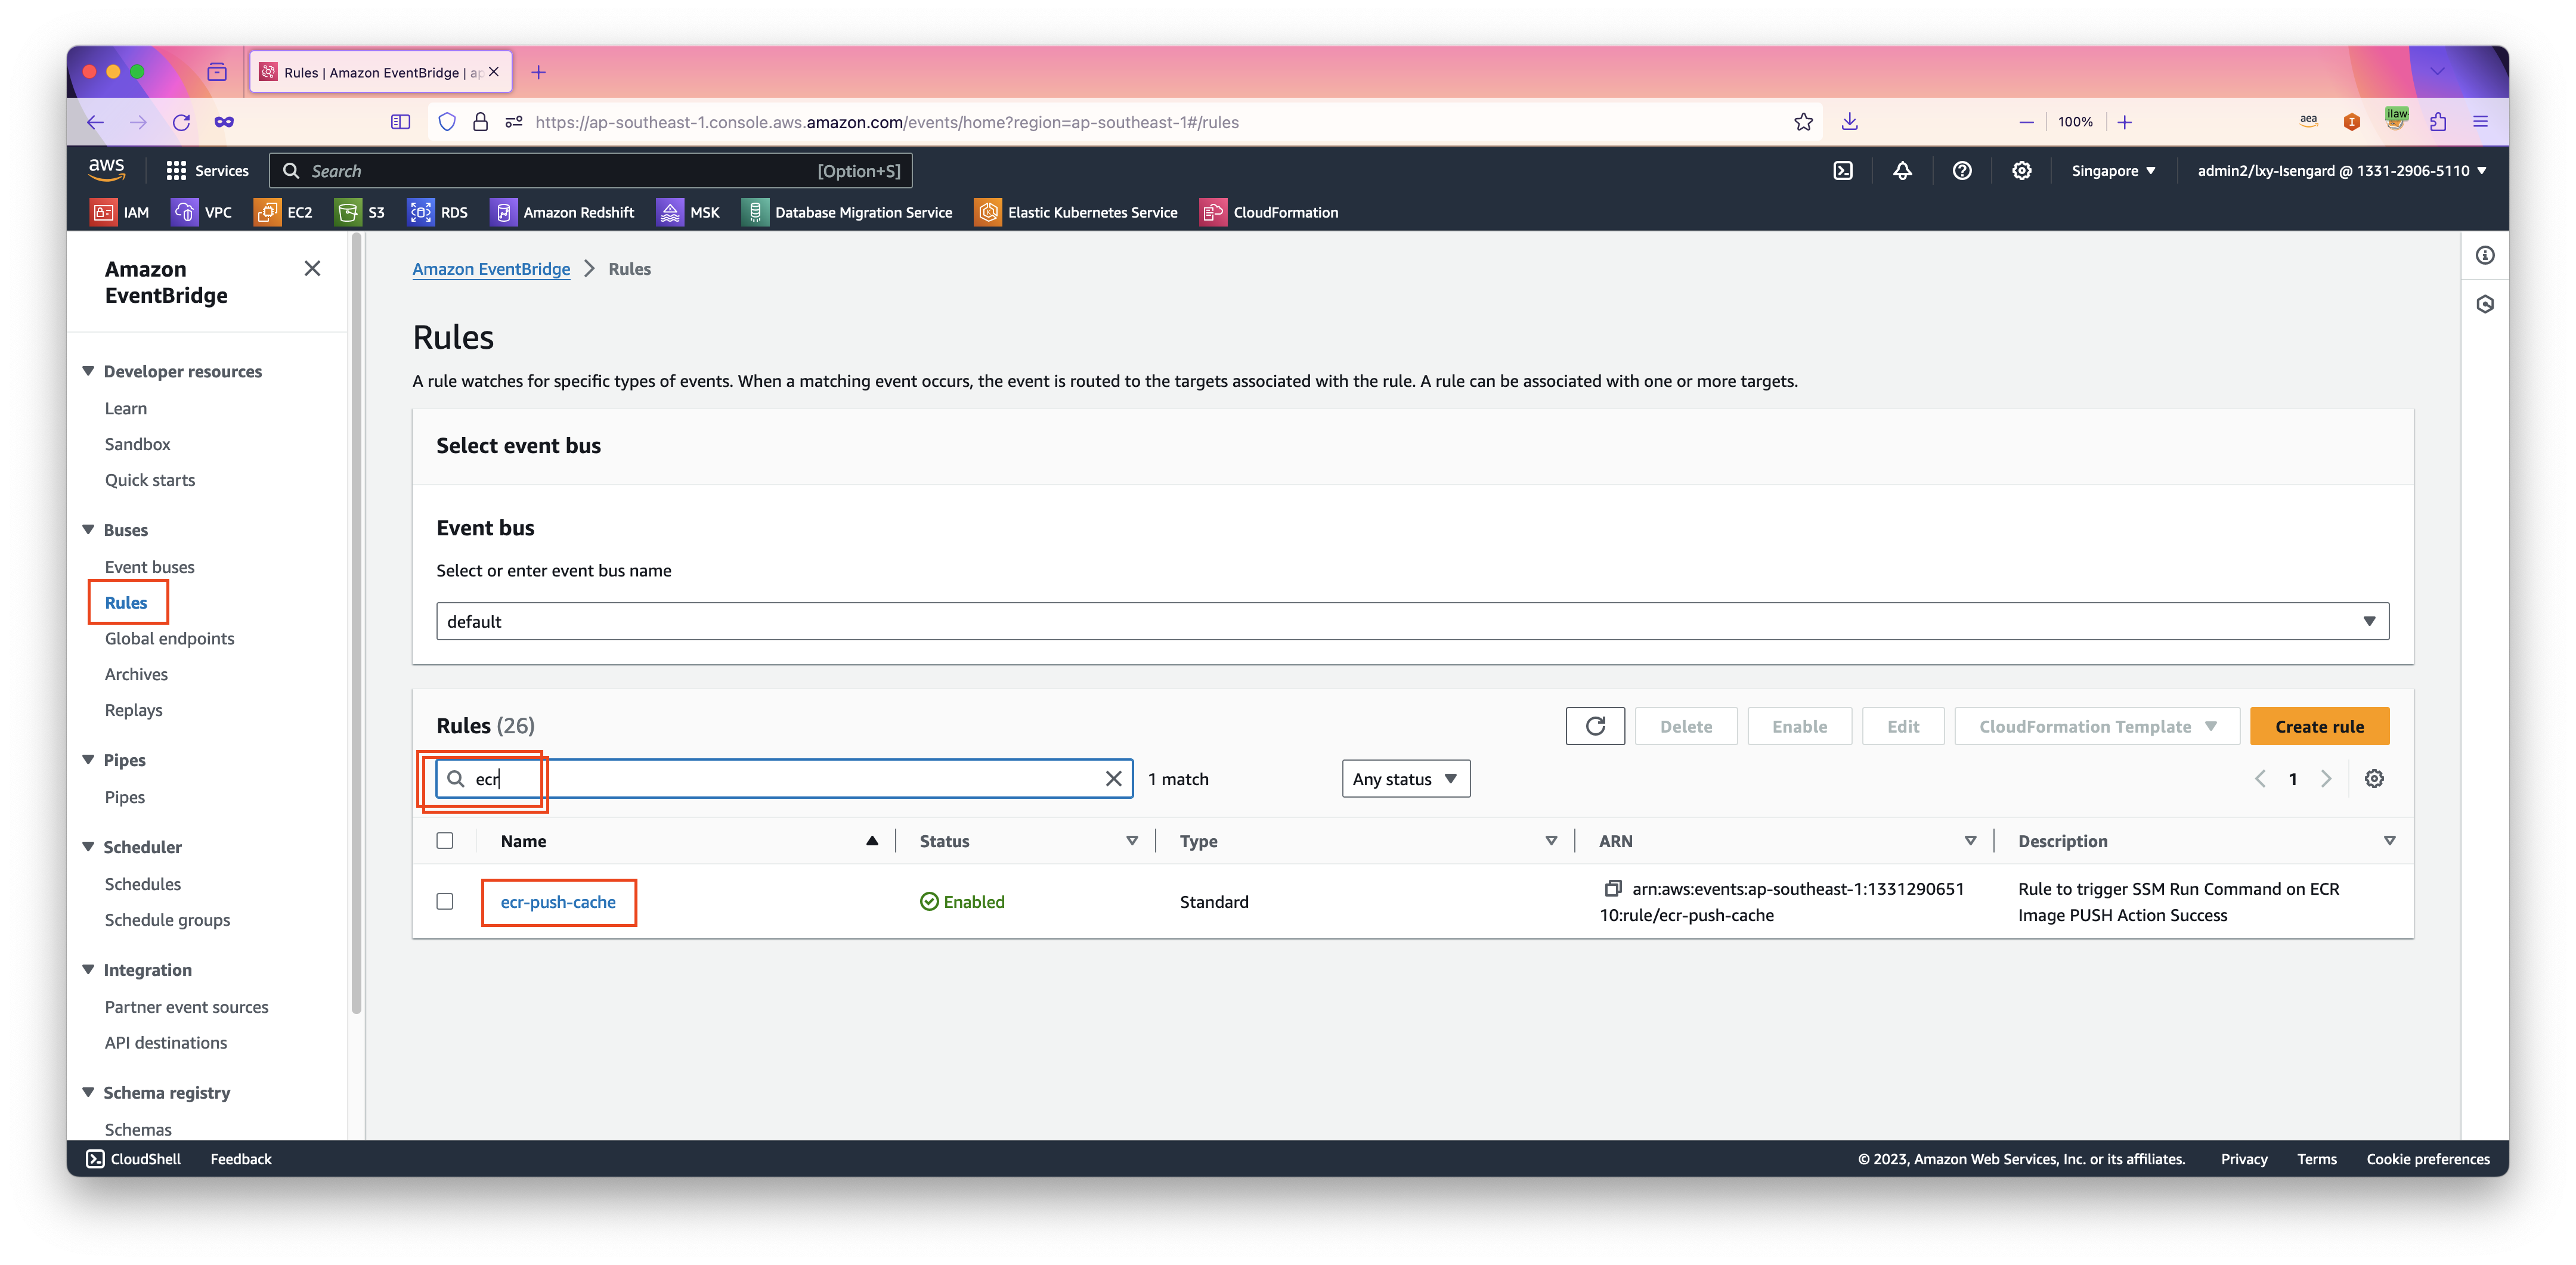
在配置完成后,通过EventBridge控制台在搜索框内输入名字,即可看到刚才创建的规则。如下截图。
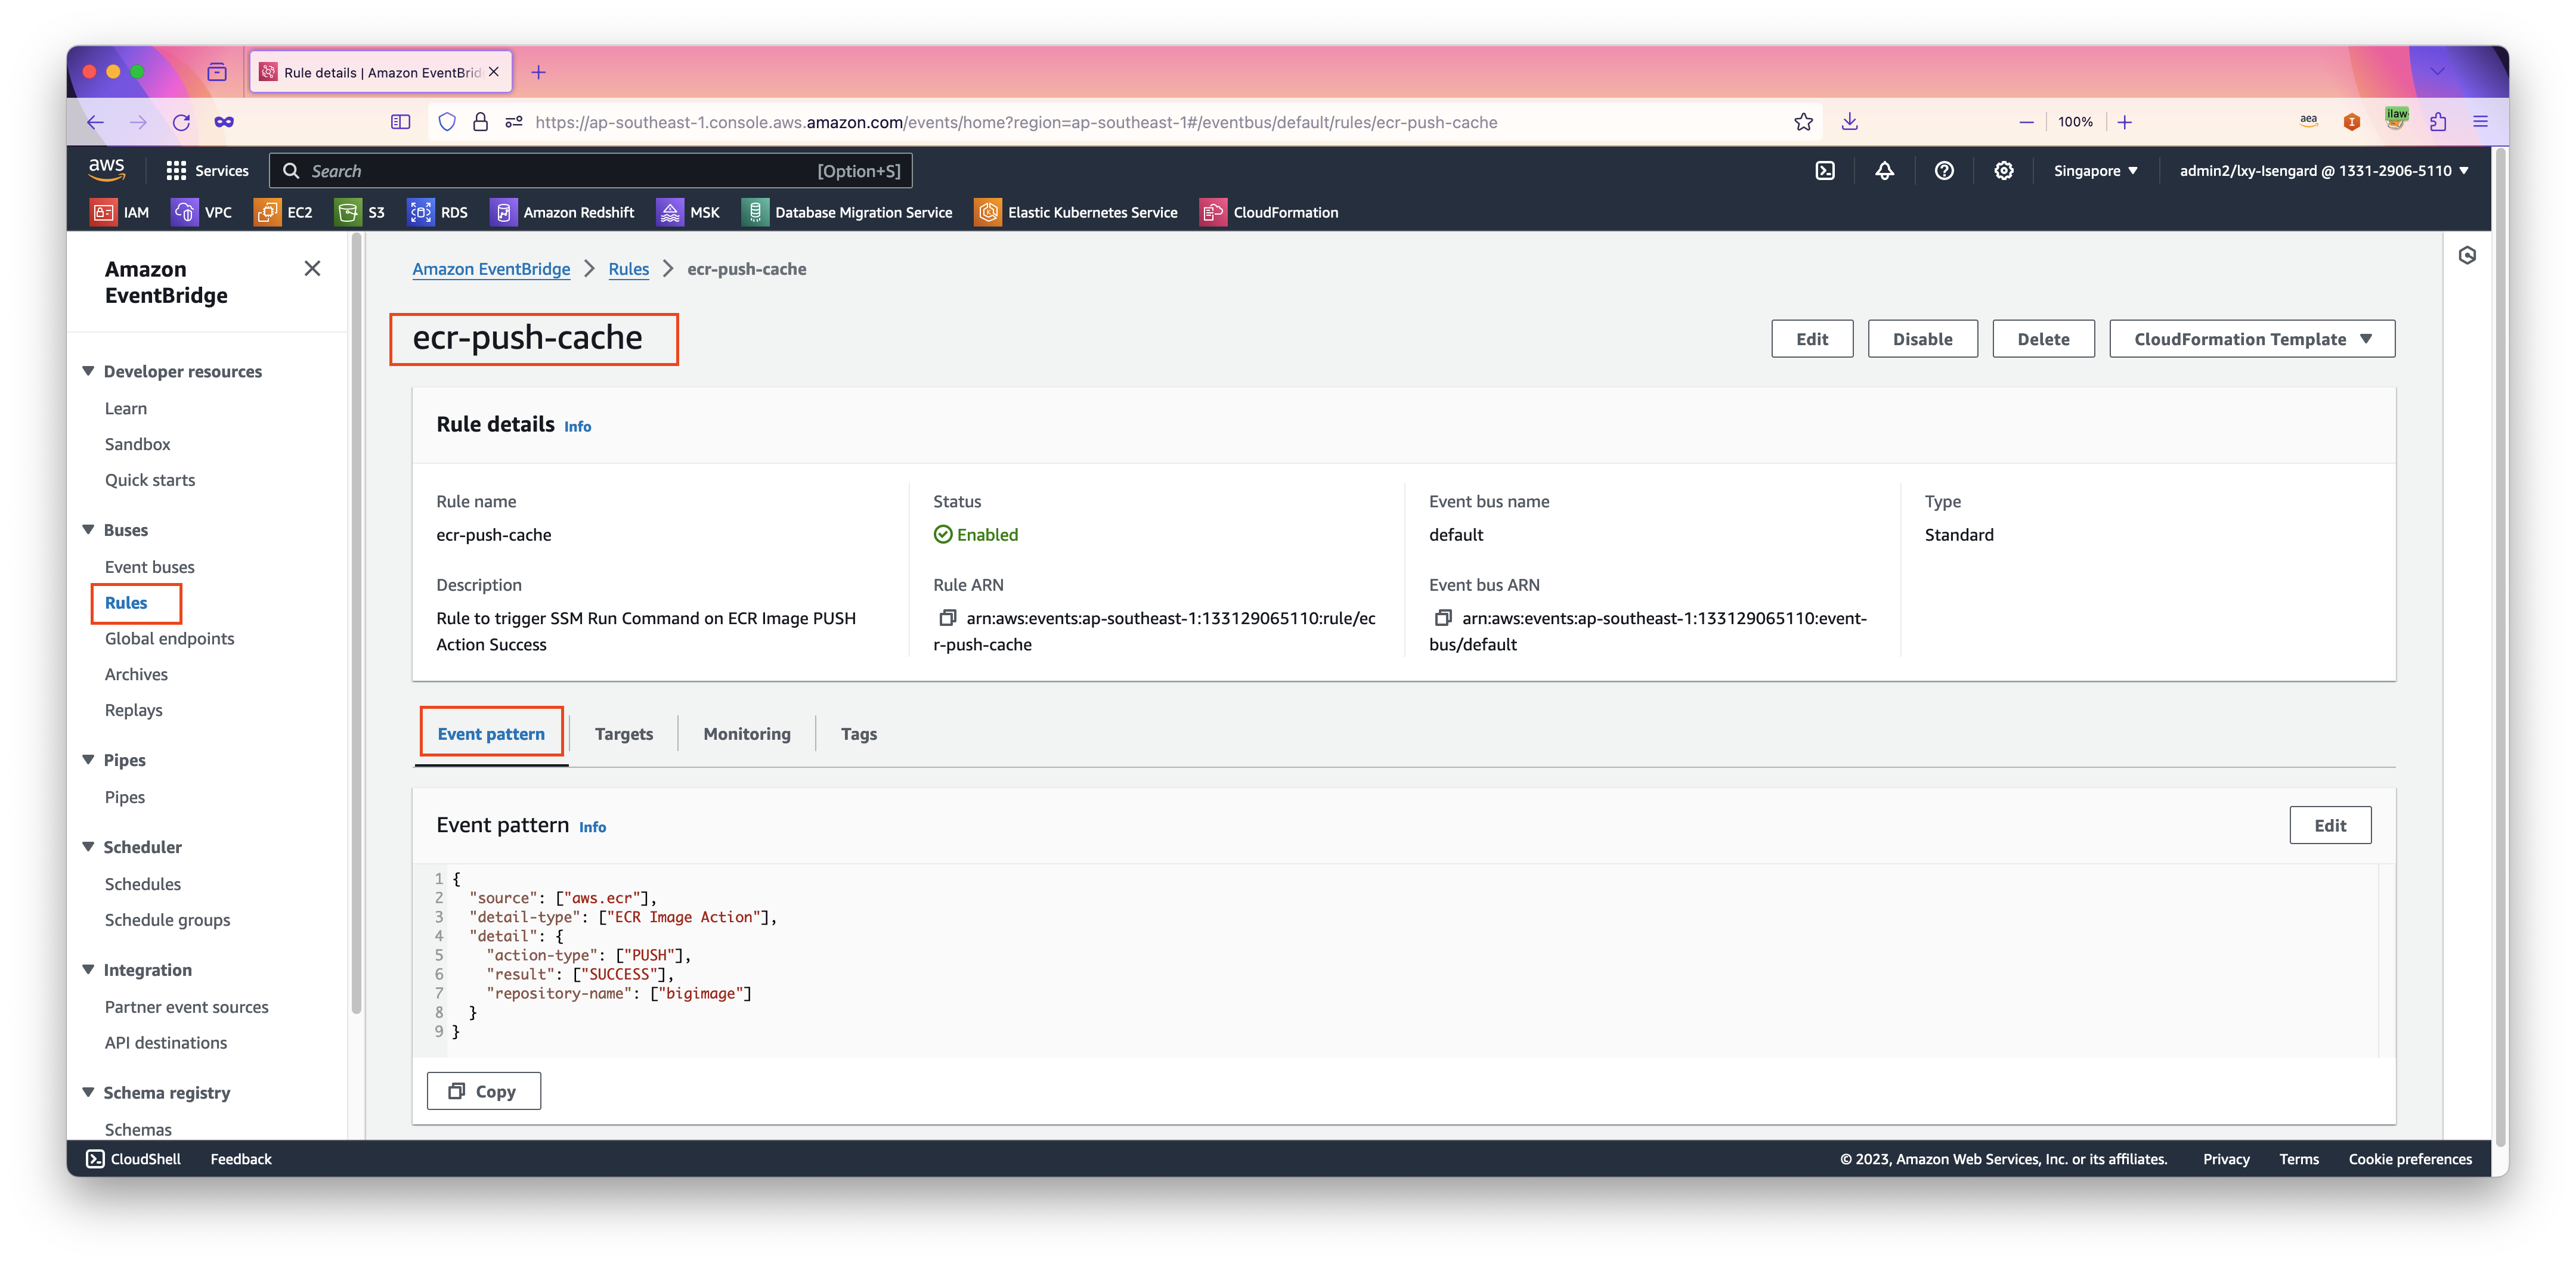
点击规则进入查看详情,可以在第一个标签页Event pattern下看到刚才配置的规则。如下截图。
接下来继续配置规则的Target对象。
4、配置EventBridge规则的Target(用于现有EC2预加载最新版镜像)
准备如下一段Target规则:
{
    "Targets": [{
        "Id": "ecr-push-cache-run-command",
        "Arn": "arn:aws:ssm:ap-southeast-1::document/AWS-RunShellScript",
        "RoleArn": "arn:aws:iam::133129065110:role/ecr-push-cache",
        "Input": "{\"commands\":[\"tag=$(aws ecr describe-images --repository-name bigimage --filter tagStatus=TAGGED --query 'sort_by(imageDetails,& imagePushedAt)[-1].imageTags[0]' --output text)\",\"ctr -n k8s.io images pull --user AWS:$(aws ecr get-login-password) 133129065110.dkr.ecr.ap-southeast-1.amazonaws.com/bigimage:$tag > /dev/null\",\"ctr -n k8s.io images ls name==133129065110.dkr.ecr.ap-southeast-1.amazonaws.com/bigimage:$tag\"]}",
        "RunCommandParameters": {
            "RunCommandTargets": [{
                "Key": "tag:eks:cluster-name",
                "Values": ["eksworkshop"]
            }]
        }
    }]
}
Input中的三条命令依次完成如下工作:
- 查询仓库中最近推送的、带有Tag的镜像的Tag。
--filter tagStatus=TAGGED用于排除前文提到的无Tag的镜像清单与证明清单; - 使用containerd自带的
ctr命令,在Kubernetes使用的k8s.io命名空间中拉取该镜像,只有拉取到该命名空间的镜像才能被kubelet识别为节点缓存。拉取的进度输出较长,这里重定向到/dev/null; - 列出拉取完成的镜像,作为命令执行结果便于核查。
节点上的AWS CLI会自动从实例元数据获取区域,因此命令中无需指定--region。Run Command以root身份执行,也无需sudo。
替换的内容如下:
- Arn部分的Region代号要替换;
- RoleArn里边的AWS账户ID、IAM Role名称要替换;
- Input中的ECR仓库名称要替换(多处),AWS账户ID与Region代号要替换(多处);
- RunCommandTargets中的集群名称要替换(本文是
eksworkshop)。
将其保存为rule-target.json,然后使用AWSCLI如下命令将这个规则配置到EventBridge的Rule上。请注意替换上一步使用的Rule规则名称,文件名和对应region的正确。执行如下命令:
aws events put-targets --rule ecr-push-cache --cli-input-json file://rule-target.json --region ap-southeast-1
配置成功,返回如下:
{
    "FailedEntryCount": 0,
    "FailedEntries": []
}
如果之前做过本实验,规则上会残留旧版本Target(Id为Id4000985d-1b4b-4e14-8a45-b04103f9871b,目标为tag:Name)。由于put-targets按Id覆盖,新旧Target会同时存在,应执行如下命令删除旧Target:
aws events list-targets-by-rule --rule ecr-push-cache --region ap-southeast-1
aws events remove-targets --rule ecr-push-cache --ids Id4000985d-1b4b-4e14-8a45-b04103f9871b --region ap-southeast-1
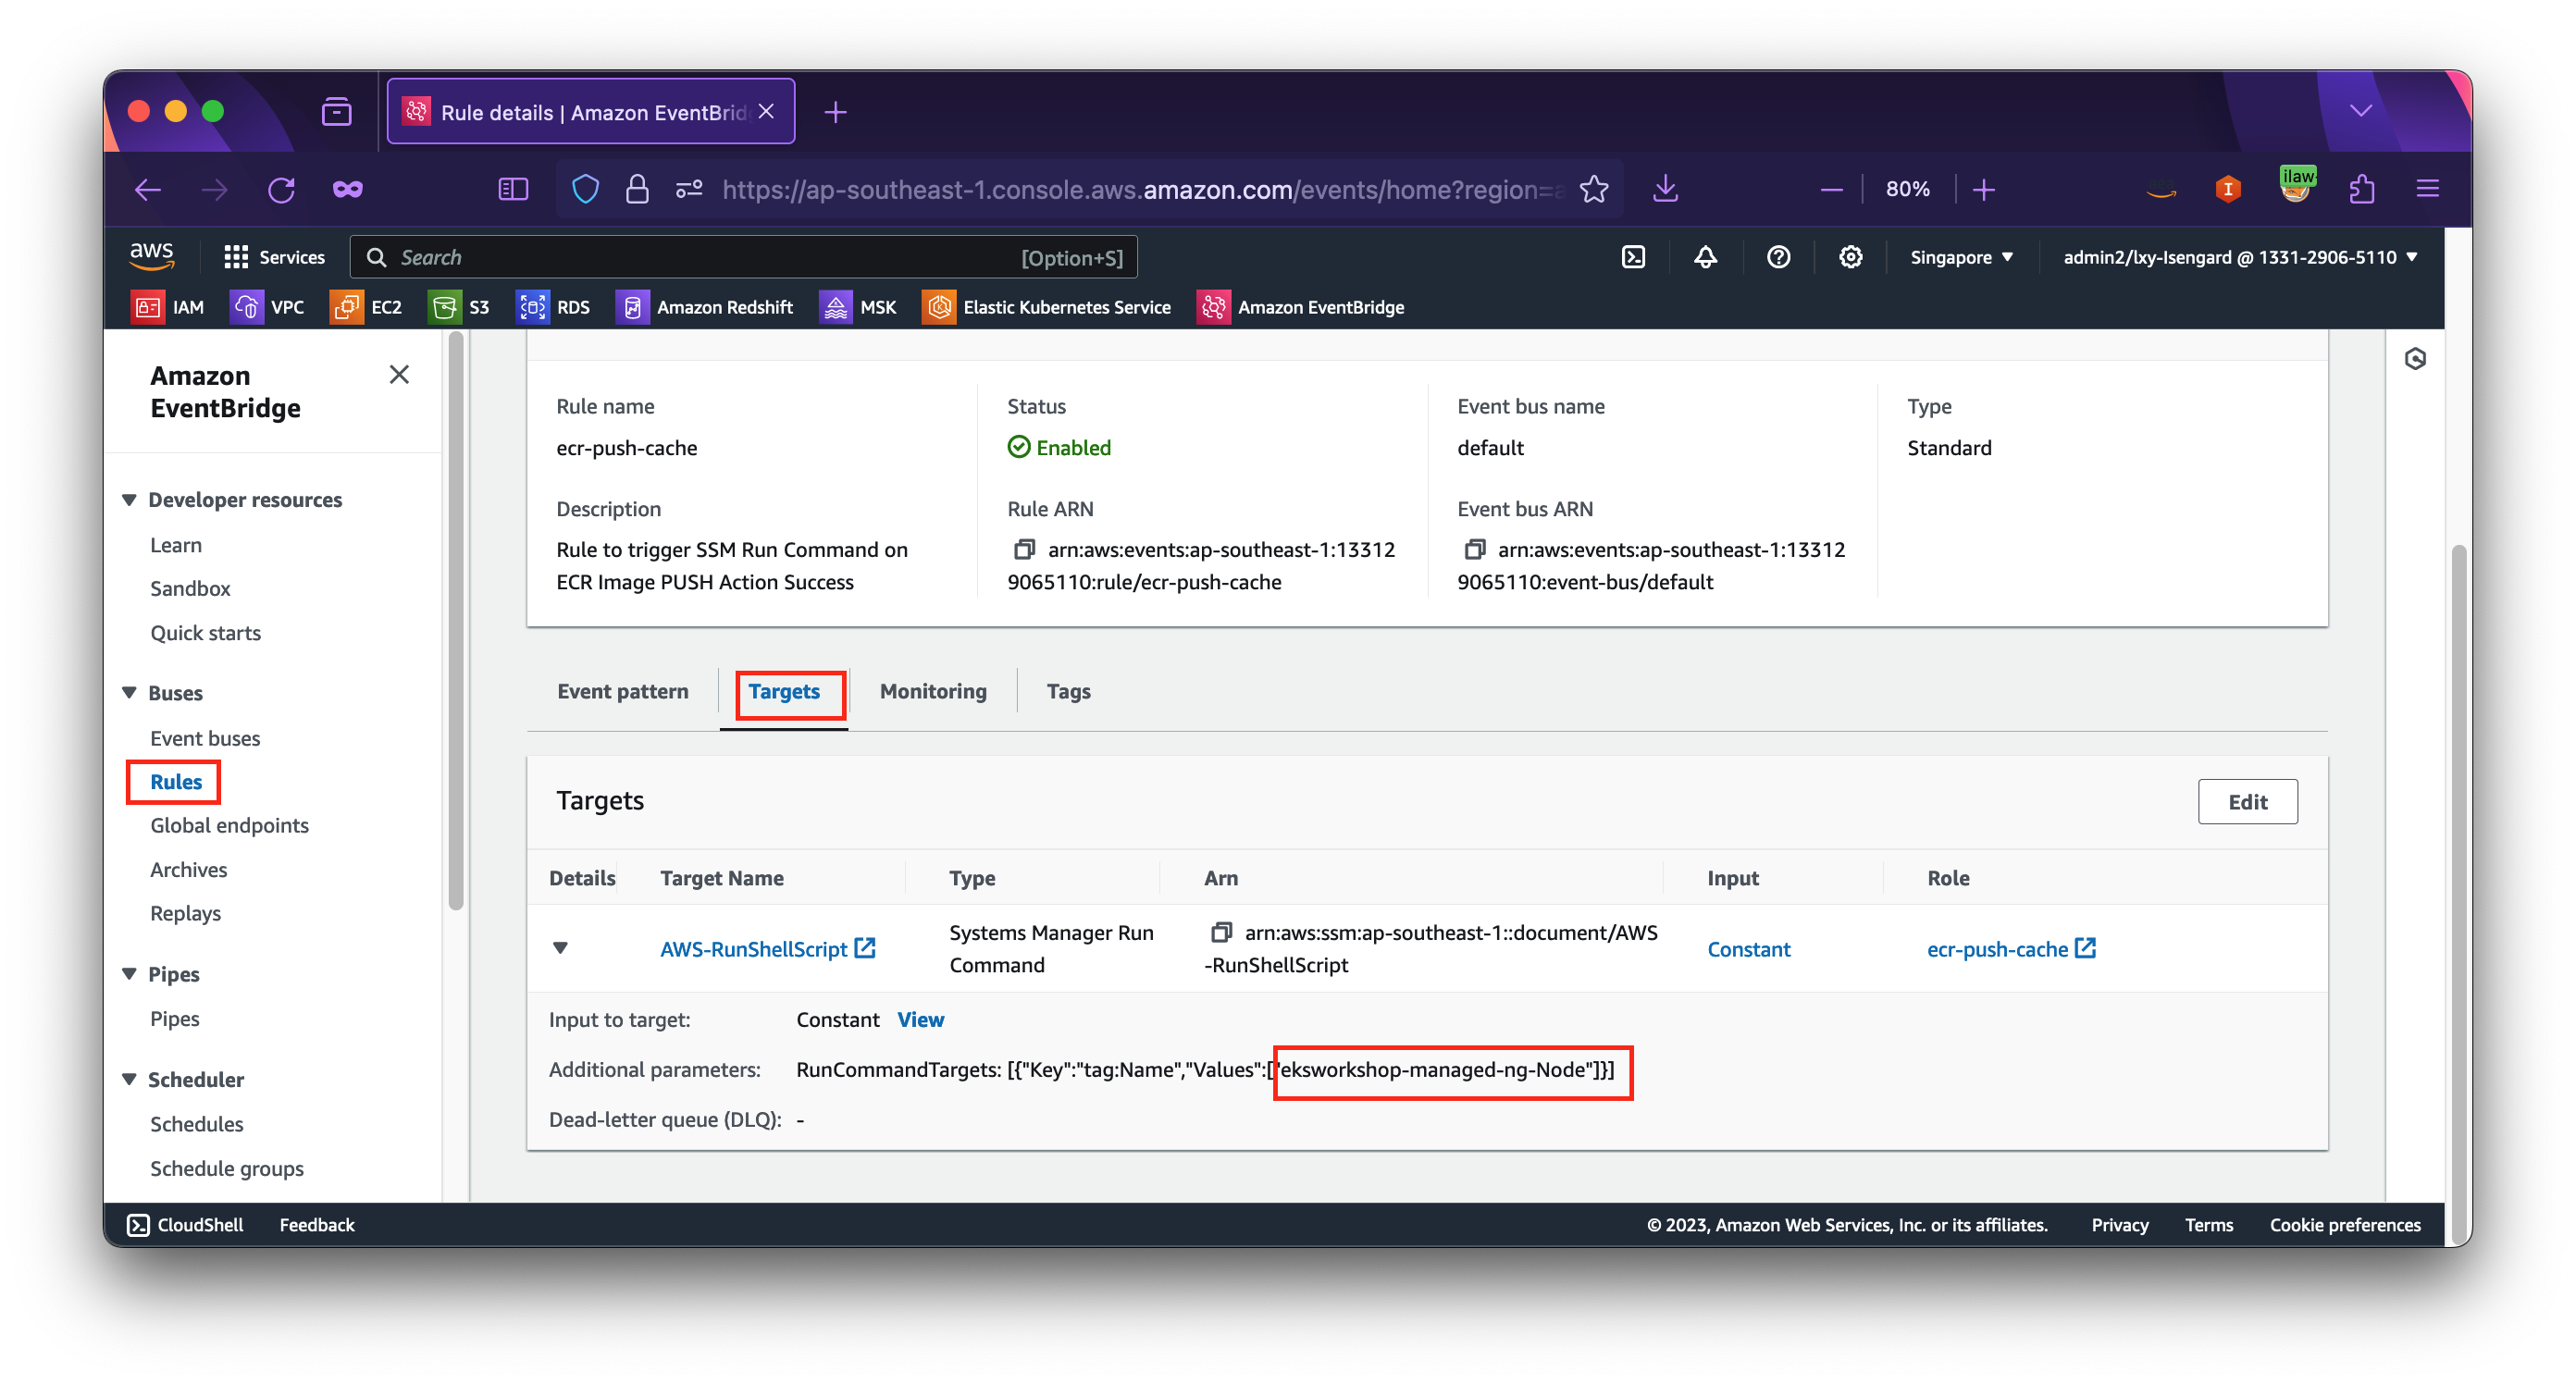
在配置完成后,通过EventBridge控制台,就可以看到规则下能显示出来target了。如下截图。
5、配置Systems Manager的State Manager任务(用于新扩容的EC2预加载最新版镜像)
编辑如下一段配置文件,替换其中Targets下的集群名称,以及commands里边的AWS账户ID、Region代号、ECR仓库名称等。最后一个参数AssociationName是最终在Systems Manager上创建后显示的名称,可自定义输入,后续用于查找和区分任务。
{
  "Name": "AWS-RunShellScript",
  "Targets": [
    {
      "Key": "tag:eks:cluster-name",
      "Values": ["eksworkshop"]
    }
  ],
  "Parameters": {
    "commands": [
      "tag=$(aws ecr describe-images --repository-name bigimage --filter tagStatus=TAGGED --query 'sort_by(imageDetails,& imagePushedAt)[-1].imageTags[0]' --output text)",
      "ctr -n k8s.io images pull --user AWS:$(aws ecr get-login-password) 133129065110.dkr.ecr.ap-southeast-1.amazonaws.com/bigimage:$tag > /dev/null",
      "ctr -n k8s.io images ls name==133129065110.dkr.ecr.ap-southeast-1.amazonaws.com/bigimage:$tag"
    ]
  },
  "AssociationName": "ecr-push-image"
}
将其保存为ssm-command.json。如果之前做过本实验,需要先删除以tag:Name为目标的旧关联,否则会并存两个同名关联。执行如下命令查询旧关联的ID并删除:
aws ssm list-associations --region ap-southeast-1 \
    --association-filter-list key=AssociationName,value=ecr-push-image \
    --query 'Associations[].[AssociationId,Targets[0].Key]' --output text
aws ssm delete-association --association-id <旧关联的AssociationId> --region ap-southeast-1
然后执行如下命令创建关联:
aws ssm create-association --cli-input-json file://ssm-command.json --region ap-southeast-1
配置成功则返回:
{
    "AssociationDescription": {
        "Name": "AWS-RunShellScript",
        "AssociationVersion": "1",
        "Date": "2026-09-29T20:27:32.983000+08:00",
        "LastUpdateAssociationDate": "2026-09-29T20:27:32.983000+08:00",
        "Overview": {
            "Status": "Pending",
            "DetailedStatus": "Creating"
        },
        "DocumentVersion": "$DEFAULT",
        "Parameters": {
            "commands": [
                "tag=$(aws ecr describe-images --repository-name bigimage --filter tagStatus=TAGGED --query 'sort_by(imageDetails,& imagePushedAt)[-1].imageTags[0]' --output text)",
                "ctr -n k8s.io images pull --user AWS:$(aws ecr get-login-password) 133129065110.dkr.ecr.ap-southeast-1.amazonaws.com/bigimage:$tag > /dev/null",
                "ctr -n k8s.io images ls name==133129065110.dkr.ecr.ap-southeast-1.amazonaws.com/bigimage:$tag"
            ]
        },
        "AssociationId": "9c46f543-b357-4a42-adbf-a1d334f3ea33",
        "Targets": [
            {
                "Key": "tag:eks:cluster-name",
                "Values": [
                    "eksworkshop"
                ]
            }
        ],
        "AssociationName": "ecr-push-image",
        "ApplyOnlyAtCronInterval": false
    }
}
关联创建后会立即在当前所有匹配的节点上执行一次,此后每当有新的匹配节点注册到Systems Manager时再自动执行。执行如下命令查看首次执行结果:
aws ssm describe-association --association-id 9c46f543-b357-4a42-adbf-a1d334f3ea33 \
    --region ap-southeast-1 --query 'AssociationDescription.Overview' --output json
返回结果如下,表示在现有3个节点上执行成功:
{
    "Status": "Success",
    "DetailedStatus": "Success",
    "AssociationStatusAggregatedCount": {
        "Success": 3
    }
}
旧版本实验中,已有缓存的旧节点执行结果会显示为失败。本文使用的containerd 2.x在镜像已经存在时,ctr images pull直接返回成功,因此所有节点均显示为成功。
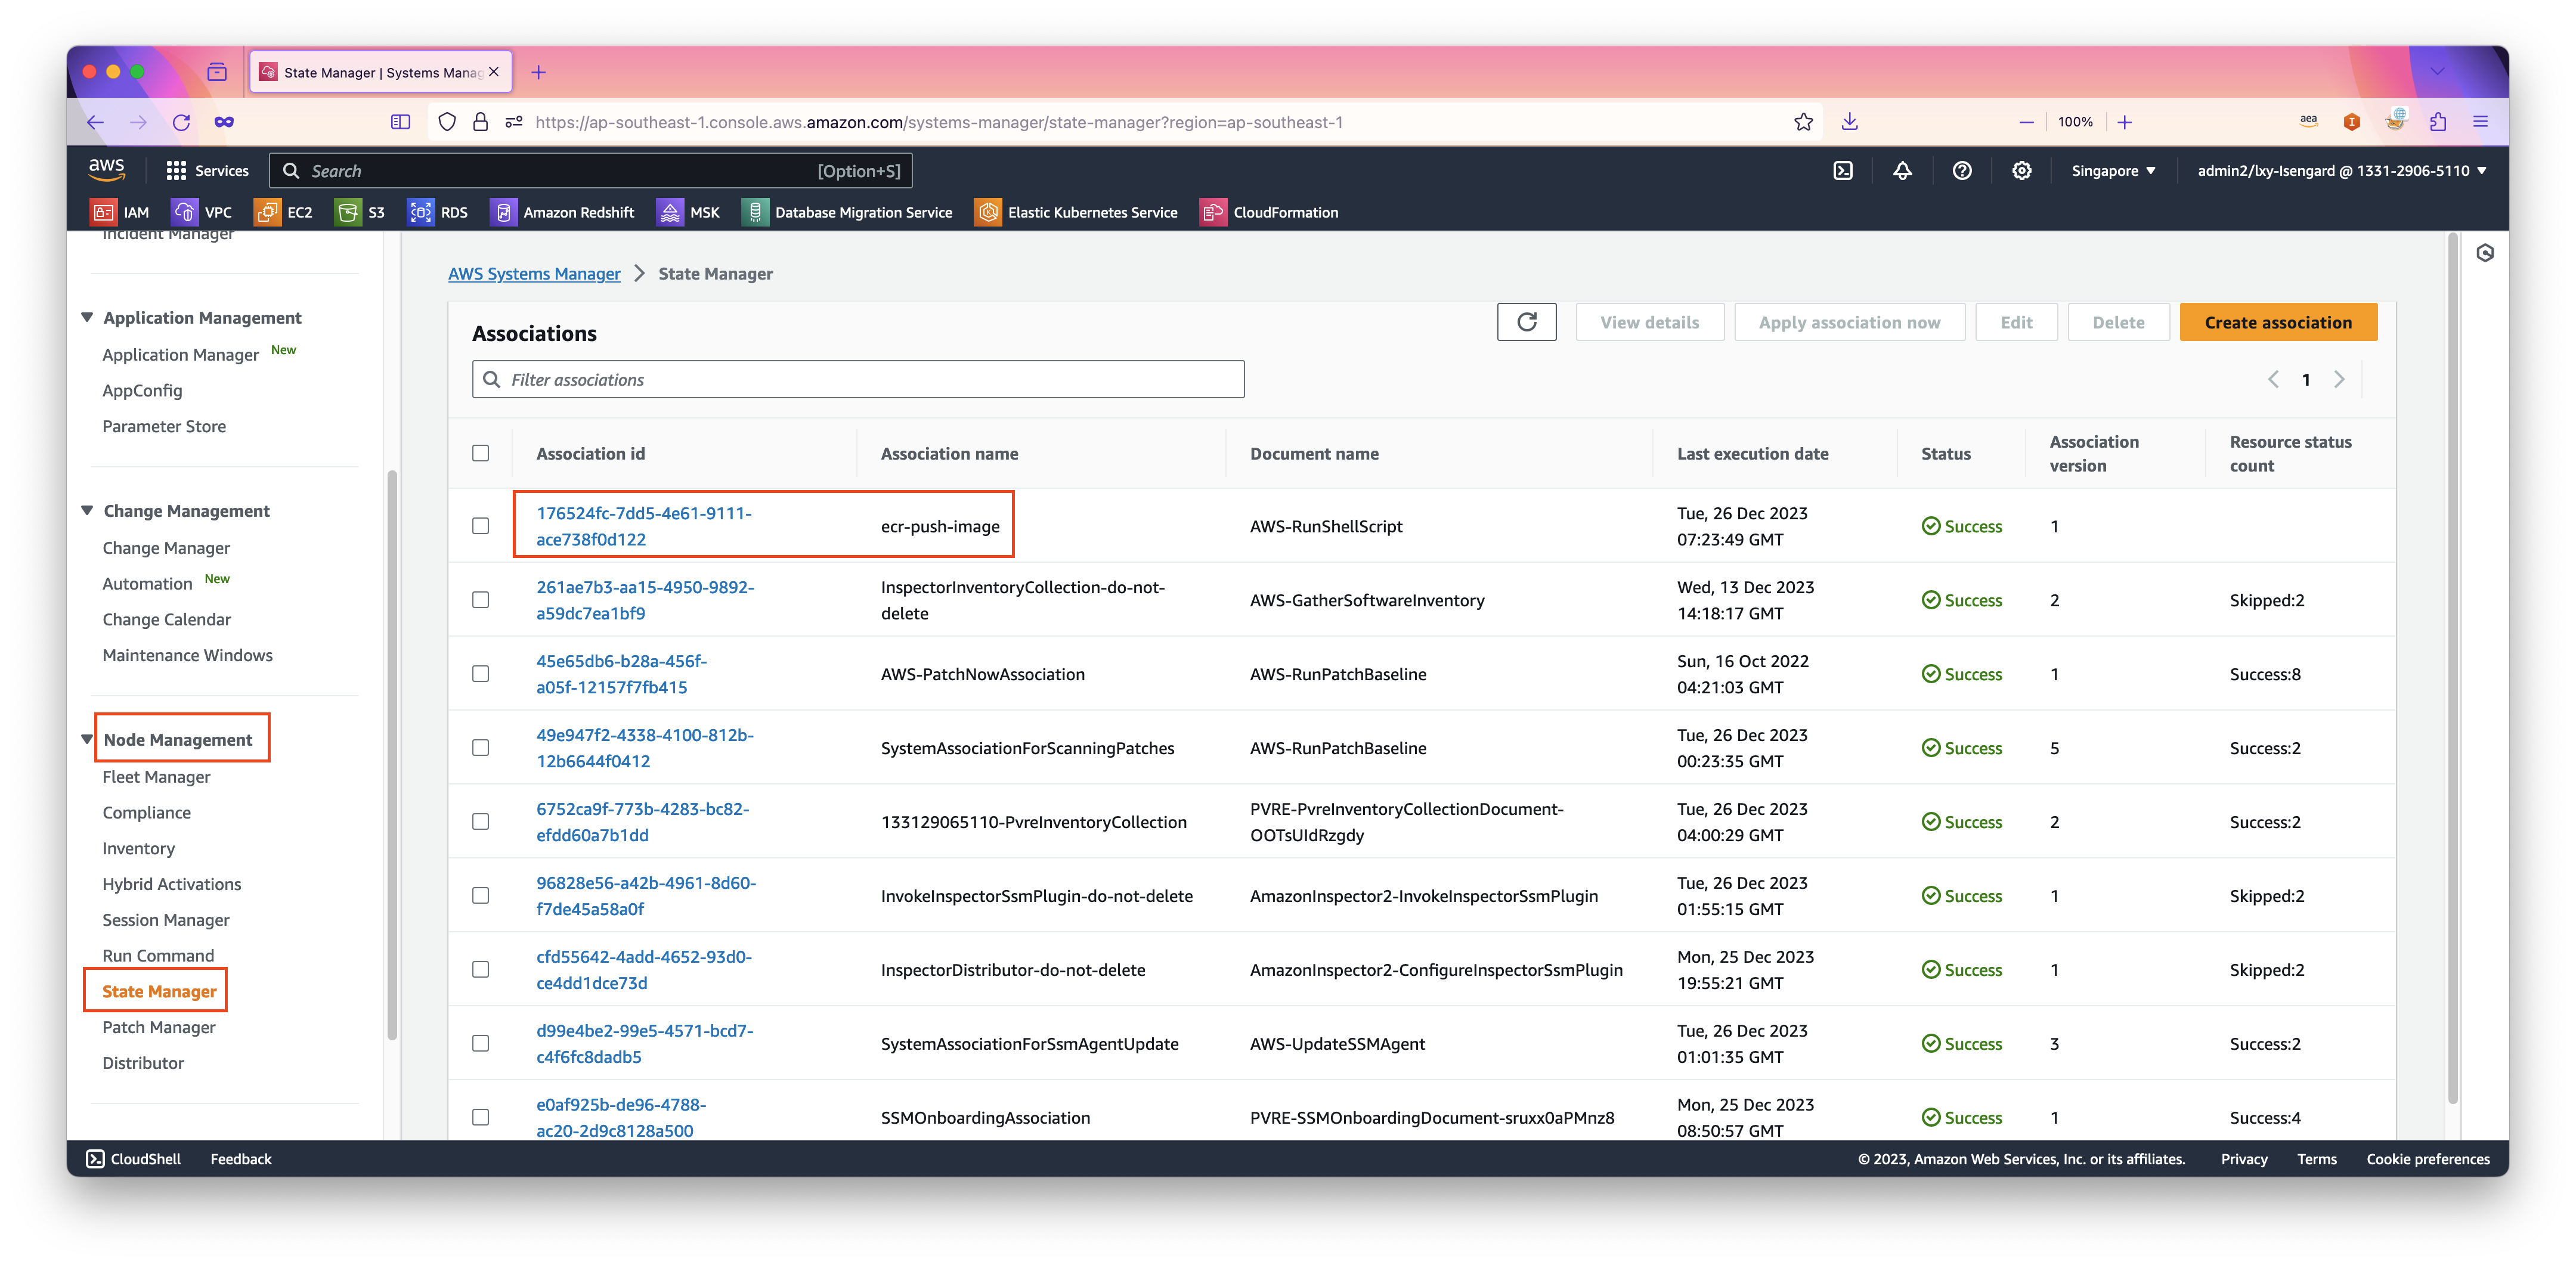
配置成功后,也可以在控制台上看到这一个任务。从AWS控制台左上角,搜索关键字Systems Manager,点击服务进入。从左侧菜单中,找到Node Tools,点击State Manager,右侧清单中可看到名为ecr-push-image的任务。这个名称是上一步JSON文件中指定的。如下截图。
至此配置完成。现在来验证整个机制工作正常。
五、验证预缓存机制生效
这里验证两个场景:
- 1、现有EC2 Nodegroup不变,之前启动过旧版本,现在发布新版镜像到ECR,观察所有节点是否会自动获取新镜像作为缓存;
- 2、集群扩容增加新的EC2节点,观察新节点是否会自动获取最新镜像作为缓存。
1、新发布新版镜像到ECR后查看预加载
在构建环境上执行如下命令,以BUILD_ID=2重新构建镜像,生成4个全新的1 GiB镜像层,并以Tag2推送到ECR:
docker build --build-arg BUILD_ID=2 -t bigimage:2 .
docker tag bigimage:2 133129065110.dkr.ecr.ap-southeast-1.amazonaws.com/bigimage:2
docker push 133129065110.dkr.ecr.ap-southeast-1.amazonaws.com/bigimage:2
推送完成后,执行如下命令查看EventBridge触发的Run Command:
aws ssm list-commands --region ap-southeast-1 --max-items 2 \
    --query 'Commands[].[CommandId,RequestedDateTime,Status,TargetCount]' --output text
返回结果如下。镜像索引的推送时间为20:31:10,Run Command在1秒后即被触发,目标节点数为3:
ac8690fc-51db-4366-a23d-e5b0ef1f771c	2026-09-29T20:31:11.327000+08:00	InProgress	3
5039de1e-4929-46a8-acde-350866a221d1	2026-09-29T20:27:33.250000+08:00	Success	3
虽然一次推送在ECR上产生了3条镜像记录,但实测中每次推送只触发了一次Run Command,不会重复拉取。
等待约1分钟后,执行如下命令查看每个节点的执行结果,请替换其中的CommandId:
aws ssm list-command-invocations --region ap-southeast-1 \
    --command-id ac8690fc-51db-4366-a23d-e5b0ef1f771c --details \
    --query 'CommandInvocations[].[InstanceId,Status,CommandPlugins[0].ResponseStartDateTime,CommandPlugins[0].ResponseFinishDateTime]' \
    --output text
返回结果如下,3个节点均在60至72秒内完成了4.1 GiB镜像的预加载:
i-0b02630e9566d7da8	Success	2026-09-29T20:31:11.704000+08:00	2026-09-29T20:32:19.522000+08:00
i-0e7275666a52c20f0	Success	2026-09-29T20:31:11.648000+08:00	2026-09-29T20:32:14.319000+08:00
i-00c1b0a868824b4b2	Success	2026-09-29T20:31:11.689000+08:00	2026-09-29T20:32:23.383000+08:00
如果返回的列表为空,表示规则没有触发或Target配置错误,请检查规则的事件模式、Target的角色权限与节点标签。去掉--query参数可以看到完整的命令输出,其中Output字段为ctr images ls的结果,StandardErrorContent中containerd关于bin_dir配置项即将废弃的告警(DEPRECATION)可以忽略:
REF                                                          TYPE                                    DIGEST                                                                  SIZE    PLATFORMS   LABELS
133129065110.dkr.ecr.ap-southeast-1.amazonaws.com/bigimage:2 application/vnd.oci.image.index.v1+json sha256:be0dd7dcde4558de3addaec0e53ebaf8e8285f6999f401aa454b41dc90ebf749 4.1 GiB linux/amd64 -
接下来确认节点上的缓存。旧版本实验通过aws ssm start-session逐台登录节点查询,需要交互式会话。本文改为通过Run Command一次查询全部节点,执行如下命令:
aws ssm send-command --region ap-southeast-1 --document-name AWS-RunShellScript \
    --targets Key=tag:eks:cluster-name,Values=eksworkshop \
    --parameters '{"commands":["ctr -n k8s.io images ls -q 2>/dev/null | grep bigimage"]}' \
    --query Command.CommandId --output text
返回CommandId后,执行如下命令查看结果,请替换其中的CommandId:
aws ssm list-command-invocations --region ap-southeast-1 \
    --command-id 351e06d9-cc65-4128-be7c-4556c8fdfc0b --details \
    --query 'CommandInvocations[].[InstanceId,Status,CommandPlugins[0].Output]' --output text
返回结果如下,每个节点上都同时缓存了Tag1与Tag2两个版本:
i-0b02630e9566d7da8	Success	133129065110.dkr.ecr.ap-southeast-1.amazonaws.com/bigimage:1
133129065110.dkr.ecr.ap-southeast-1.amazonaws.com/bigimage:2
133129065110.dkr.ecr.ap-southeast-1.amazonaws.com/bigimage@sha256:67804948f6fd5f2b0eb748fd8edf5fca33f7aaeff08bddc0c0d525966fb0506c
i-0e7275666a52c20f0	Success	133129065110.dkr.ecr.ap-southeast-1.amazonaws.com/bigimage:1
133129065110.dkr.ecr.ap-southeast-1.amazonaws.com/bigimage:2
133129065110.dkr.ecr.ap-southeast-1.amazonaws.com/bigimage@sha256:67804948f6fd5f2b0eb748fd8edf5fca33f7aaeff08bddc0c0d525966fb0506c
i-00c1b0a868824b4b2	Success	133129065110.dkr.ecr.ap-southeast-1.amazonaws.com/bigimage:1
133129065110.dkr.ecr.ap-southeast-1.amazonaws.com/bigimage:2
133129065110.dkr.ecr.ap-southeast-1.amazonaws.com/bigimage@sha256:67804948f6fd5f2b0eb748fd8edf5fca33f7aaeff08bddc0c0d525966fb0506c
也可以在EC2控制台选中节点,点击Connect按钮,通过Session Manager登录节点后执行sudo ctr -n k8s.io images ls | grep bigimage查询,效果相同。
现在使用Tag2的镜像,在另一个Namespace下启动一个全新的应用。配置文件见本仓库的21/bigimage-new.yaml,其中镜像为bigimage:2、Namespace为bigimage-new。执行如下命令:
kubectl apply -f bigimage-new.yaml
./get-pod-boot-time.sh bigimage-new
返回结果如下:
It took approximately 1 seconds for bigimage-new-946f94d6f-27tcs to boot up on ip-192-168-69-155.ap-southeast-1.compute.internal
It took approximately 1 seconds for bigimage-new-946f94d6f-rbkwv to boot up on ip-192-168-30-108.ap-southeast-1.compute.internal
It took approximately 1 seconds for bigimage-new-946f94d6f-w9bkq to boot up on ip-192-168-54-190.ap-southeast-1.compute.internal
对应事件显示Container image "133129065110.dkr.ecr.ap-southeast-1.amazonaws.com/bigimage:2" already present on machine。由此可见,新版本镜像从未被任何Pod使用过,但首次启动即命中了预加载的缓存,启动时间由60至70秒缩短到约1秒。
2、集群扩容增加新的EC2节点后查看预加载
在集群扩容场景下,现有应用在现存节点是有缓存的,但Nodegroup中新生成的EC2是没有下载过任何一个镜像的,因此对于这些新节点,所有启动都是冷启动,需要从ECR加载镜像。按照本文配置过Systems Manager State Manager之后,新扩容出来的节点,也会自动缓存最新的镜像。
首先进行节点扩容。请替换Cluster名称、Nodegroup名称和区域代号三个参数,然后执行如下命令。本文环境的Nodegroup名称为podsubnet-ng,由3个节点扩容到4个节点:
eksctl scale nodegroup \
  --cluster eksworkshop \
  --name podsubnet-ng \
  --nodes 4 \
  --nodes-min 3 \
  --nodes-max 6 \
  --region ap-southeast-1
返回结果如下:
2026-09-29 20:33:18 [ℹ]  scaling nodegroup "podsubnet-ng" in cluster eksworkshop
2026-09-29 20:33:21 [ℹ]  initiated scaling of nodegroup
2026-09-29 20:33:21 [ℹ]  to see the status of the scaling run `eksctl get nodegroup --cluster eksworkshop --region ap-southeast-1 --name podsubnet-ng`
新节点在约1分钟后变为Ready。为了确认是否触发了State Manager,执行如下命令查看关联在各节点上的执行情况,请替换其中的AssociationId:
aws ssm describe-association-executions --region ap-southeast-1 \
    --association-id 9c46f543-b357-4a42-adbf-a1d334f3ea33 \
    --query 'AssociationExecutions[0].ExecutionId' --output text
aws ssm describe-association-execution-targets --region ap-southeast-1 \
    --association-id 9c46f543-b357-4a42-adbf-a1d334f3ea33 \
    --execution-id <上一条命令返回的ExecutionId> \
    --query 'AssociationExecutionTargets[].[ResourceId,Status,LastExecutionDate,OutputSource.OutputSourceId]' \
    --output text
返回结果如下。新节点i-05100de21fe76bb2e已被自动纳入关联并执行成功,其余3个节点为创建关联时的执行记录:
i-05100de21fe76bb2e	Success	2026-09-29T20:35:33.549000+08:00	97127484-fc66-4538-93f9-ffb652244fe6
i-00c1b0a868824b4b2	Success	2026-09-29T20:27:36.687000+08:00	5039de1e-4929-46a8-acde-350866a221d1
i-0e7275666a52c20f0	Success	2026-09-29T20:27:35.914000+08:00	5039de1e-4929-46a8-acde-350866a221d1
i-0b02630e9566d7da8	Success	2026-09-29T20:27:35.738000+08:00	5039de1e-4929-46a8-acde-350866a221d1
使用最后一列的CommandId查询新节点的执行详情,可看到预加载从20:34:03开始、20:35:15结束,耗时72秒,拉取的是当前最新的Tag2:
REF                                                          TYPE                                    DIGEST                                                                  SIZE    PLATFORMS   LABELS
133129065110.dkr.ecr.ap-southeast-1.amazonaws.com/bigimage:2 application/vnd.oci.image.index.v1+json sha256:be0dd7dcde4558de3addaec0e53ebaf8e8285f6999f401aa454b41dc90ebf749 4.1 GiB linux/amd64 io.cri-containerd.image=managed
现在将应用扩展到4个副本,使新副本调度到新节点上:
kubectl scale deployment bigimage-new -n bigimage-new --replicas 4
./get-pod-boot-time.sh bigimage-new bigimage-new-946f94d6f-fdzsq
返回结果如下:
It took approximately 1 seconds for bigimage-new-946f94d6f-fdzsq to boot up on ip-192-168-60-172.ap-southeast-1.compute.internal
对应事件同样显示镜像already present on machine。至此验证配置成功。
需要注意,State Manager的执行时机是节点SSM Agent注册上线之后,与kubelet注册到集群、Pod被调度到节点这两个动作是并行的。如果节点刚一Ready就有Pod被调度上来,kubelet会与预加载命令同时拉取同一个镜像,此时Pod的启动时间不会缩短。本方案更适合节点扩容与Pod调度之间存在时间差的场景,例如预先扩容节点以应对计划中的流量高峰。如果需要新节点在Ready时镜像即已存在,可参考第一章提到的Bottlerocket数据卷快照方案。
以下录屏为旧版本实验(EKS 1.28)的录制内容,操作流程与本文一致:
注意:新拉起的节点全新加载一个较大的镜像,耗时主要取决于节点的网络带宽和EBS磁盘吞吐。本文t3.2xlarge配合默认gp3(3000 IOPS、125MB/s吞吐)加载4.1 GiB镜像约需60至72秒。如果EC2 Nodegroup使用网络带宽更高的c/m/r系列机型,并为gp3磁盘配置更高的IOPS与吞吐,或者启用SOCI并行拉取模式,加载时间可进一步缩短。
3、清理环境
实验完成后,执行如下命令删除测试应用与预加载配置。请替换其中的AssociationId与集群参数:
kubectl delete -f bigimage-new.yaml
kubectl delete -f bigimage2.yaml
kubectl delete -f bigimage.yaml
aws ssm delete-association --association-id 9c46f543-b357-4a42-adbf-a1d334f3ea33 --region ap-southeast-1
aws events remove-targets --rule ecr-push-cache --ids ecr-push-cache-run-command --region ap-southeast-1
aws events delete-rule --name ecr-push-cache --region ap-southeast-1
aws iam delete-role-policy --role-name ecr-push-cache --policy-name ecr-push-cache-ssm-policy
aws iam delete-role --role-name ecr-push-cache
eksctl scale nodegroup --cluster eksworkshop --name podsubnet-ng --nodes 3 --nodes-min 3 --nodes-max 6 --region ap-southeast-1
节点上缓存的镜像会占用磁盘空间,kubelet会在磁盘使用率超过镜像回收阈值(默认85%)时自动清理未被使用的镜像。预加载的镜像在被Pod使用之前同样属于“未被使用”的镜像,如果节点磁盘紧张,可能会在Pod调度之前被回收,因此需要为节点预留足够的磁盘空间。ECR仓库中每个4 GiB的镜像版本也会产生持续的存储费用,建议为仓库配置生命周期策略(Lifecycle Policy)只保留最近的若干个版本。
六、参考文档
Start Pods faster by prefetching images
https://aws.amazon.com/blogs/containers/start-pods-faster-by-prefetching-images/
Improve container startup time by caching images
https://github.com/aws-samples/containers-blog-maelstrom/tree/main/prefetch-data-to-EKSnodes
Amazon ECR events and EventBridge
https://docs.aws.amazon.com/AmazonECR/latest/userguide/ecr-eventbridge.html
Restricting Run Command access based on tags
https://docs.aws.amazon.com/systems-manager/latest/userguide/run-command-setting-up.html
Amazon EKS Best Practices - Application Scaling and Performance(AI/ML)
https://docs.aws.amazon.com/eks/latest/best-practices/aiml-performance.html
Introducing Seekable OCI Parallel Pull mode for Amazon EKS
https://aws.amazon.com/blogs/containers/introducing-seekable-oci-parallel-pull-mode-for-amazon-eks/
Reduce container startup time on Amazon EKS with Bottlerocket data volume
Reducing AWS Fargate Startup Times with zstd Compressed Container Images
最后修改于 2026-09-29