
一、背景
Amazon Bedrock Inference Profile功能是2024年底推出的一项功能,在诞生之初,主要用于实现跨Region推理,而通过给Profile增加Tag的方式,即可实现费用追踪。
过去,在应用程序代码中调用模型,通常是直接指定模型的版本,例如anthropic.claude-3-5-sonnet-20240620-v1:0:200k。这样的模型调用没将只发送到当前目标Region(单一Region)。如果此时并发过大,本Region的Token Limit遇到上限,那么将触发限流。使用Inference Profile功能即可解决这一问题。Inference Profile预定义了一组模型推理节点,例如使用US Anthropic Claude 3.5 Sonnet这个Profile的话,将包含一组2个推理Region,即us-east-1 and us-west-2。同样,使用以EU开头的Profile,就是在欧洲的几个Region之间分配推理流量。这样,就通过多个Region的GPU容量,显著提升了推理能力。这一过程对用户而言是透明的,应用程序无需调整,只需要使用Inference Profile即可。
Inference Profile除了用于多Region推理外,还可以实现成本分配。Inference Profile有两种类型,分别是用于多Region推理的系统类型即默认的Profile,还有自定义的名为应用程序类型。使用时,为不同的应用程序创建自己专有的应用程序类型的Inference Profile,创建时候需要以某个系统类型的Profile为基准,然后创建自定义类型。创建成功后,在Inference Profile上绑定不同的Tag标签,这样即可实现Inference Profile与应用的映射关系。
注意:
- Inference Profile的创建是By region的,需要切换到使用Bedrock服务的Region
- 自己创建的Inference Profile也是支持Cross-region调用的,以创建时候使用的基础Profile为准
- 仅使用Inference Profile是不够的,计费账单与原先无差别,必须对Profile额外打Tag并分析Tag,才能实现费用分拆
下面进行配置。
二、使用AWSCLI命令行查询现有Inference Profile
执行如下命令查询系统默认的Inference Profile:
aws bedrock list-inference-profiles --query 'inferenceProfileSummaries[].[{name:inferenceProfileName,arn:inferenceProfileArn,id:inferenceProfileId,type:type}]' --output table执行后显示返回结果如下:
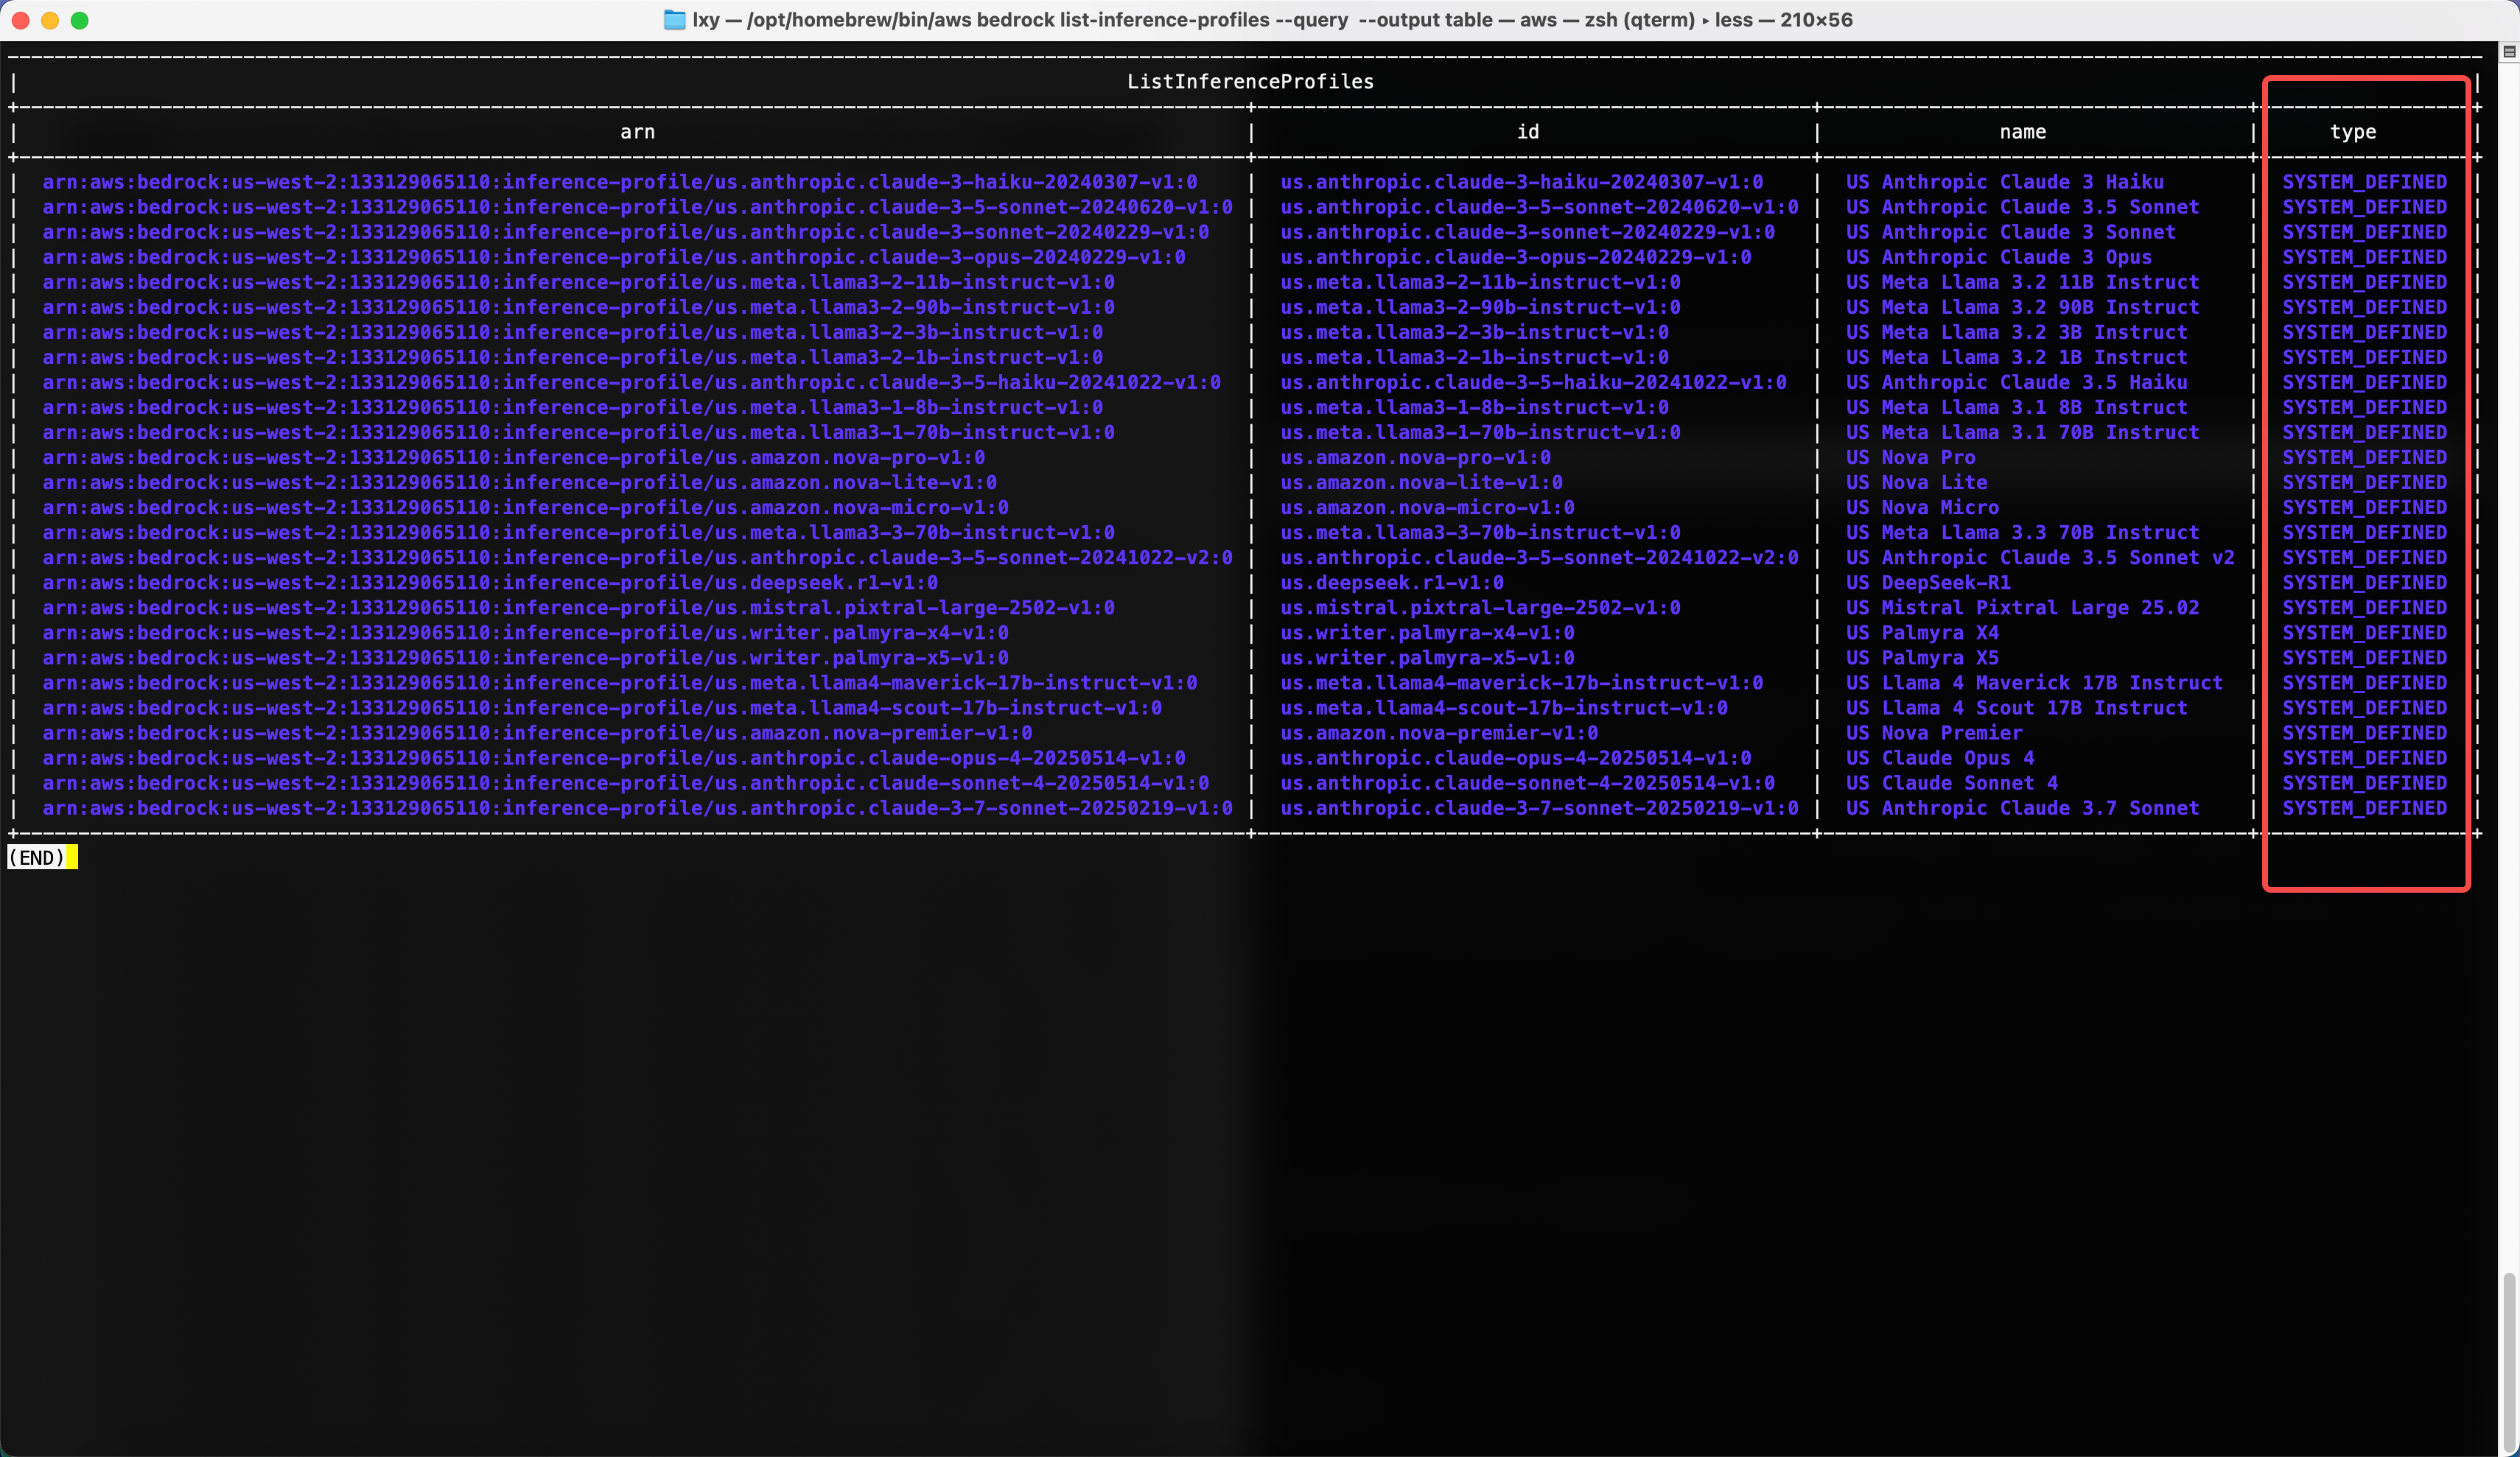
以上结果可以看到,在type类型这一列,所有Profile的类型都是SYSTEM_DEFINED,也就是系统内置的。这些不是接下来要使用的,下一步还要创建类型是Application的。
要查询手工创建的,需要在其基础上,增加--type参数。命令如下:
aws bedrock list-inference-profiles --type-equals APPLICATION --query 'inferenceProfileSummaries[].[{name:inferenceProfileName,description:description,arn:inferenceProfileArn,id:inferenceProfileId,type:type}]' --output table现在返回结果中,可以看到所有Profile的类型都是APPLICATION了。
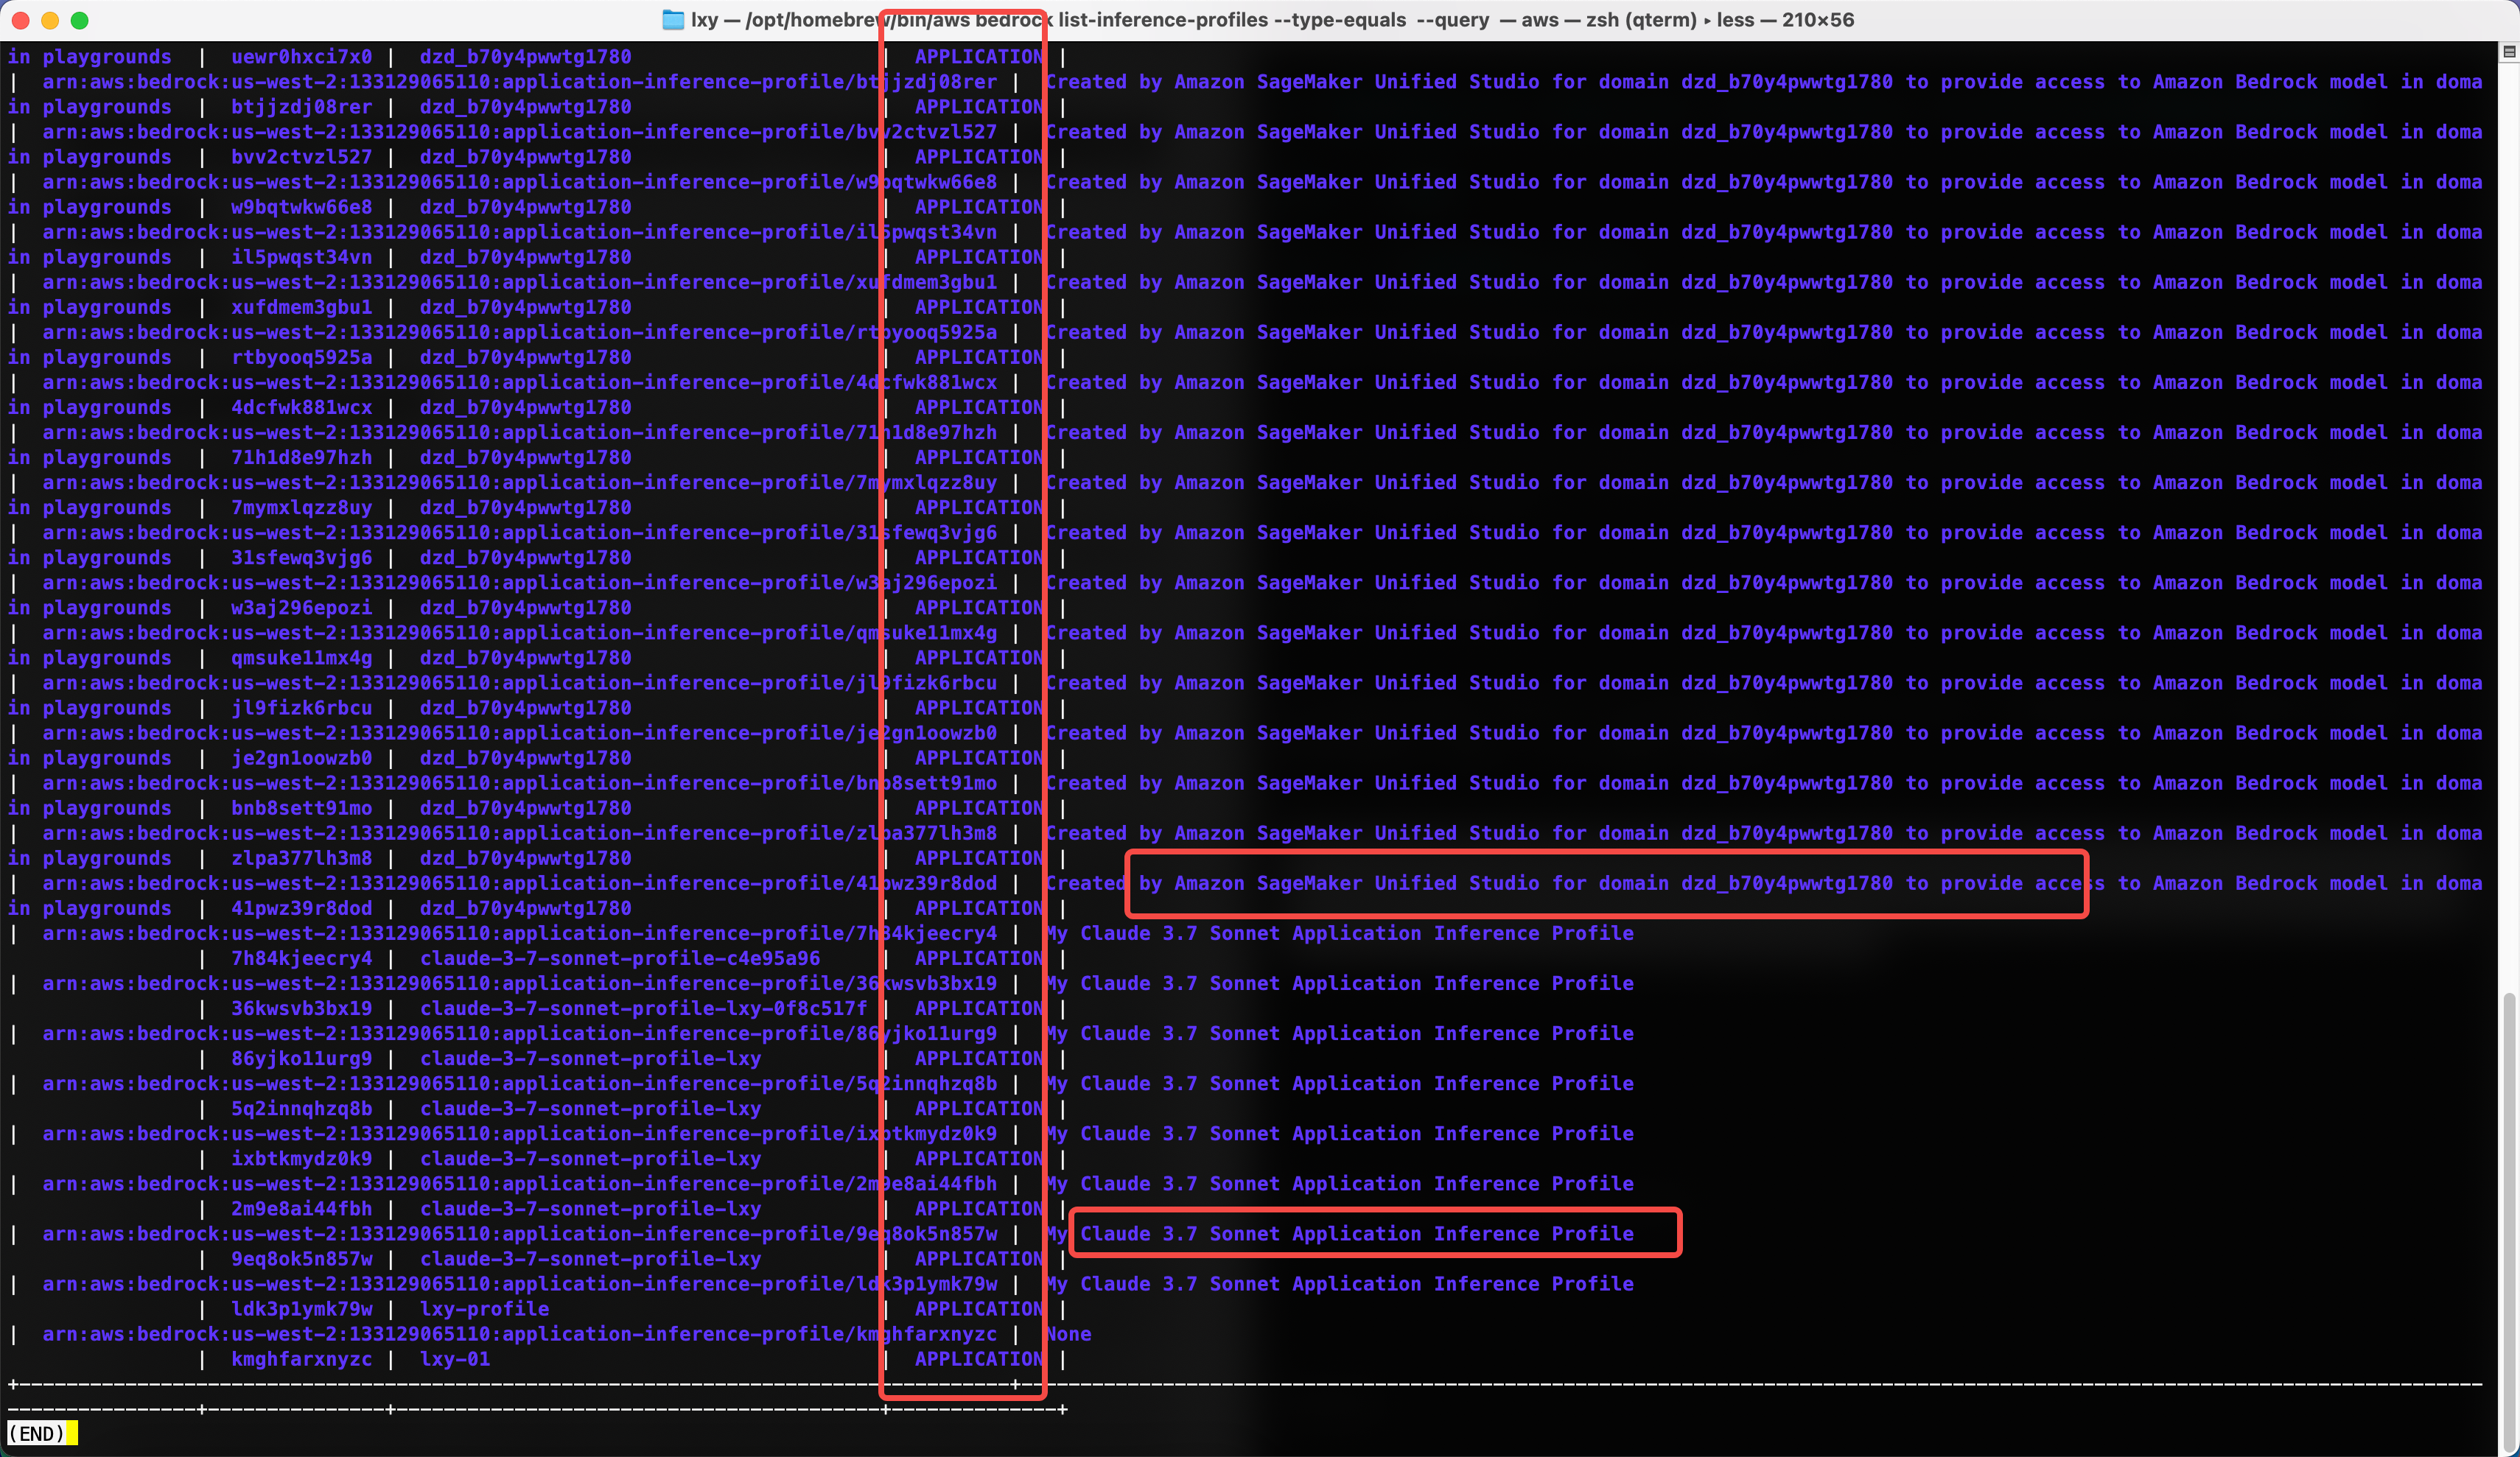
在以上类型是Application的Profile中,查看其描述字段,又有一部分是SageMaker Studio自行创建和管理的,这样的不要删除。
三、使用AWSCLI创建新的Inference Profile
1、确认要使用的基础Profile
Amazon Bedrock Inference Profile并不是从零创建的,而是基于上一步查询出来的系统内置的Profile基础上定制的。因此首先选择基础模型和其对应的系统Profile。这个过程可以通过上一步的AWSCLI命令查询现有Inference Profile,也可以通过AWS控制台。使用AWSCLI查询方法在上一个章节已经介绍过了,从AWS Bedrock控制台查看Profile的位置,这里需要使用ARN作为下一步参数。如下截图。
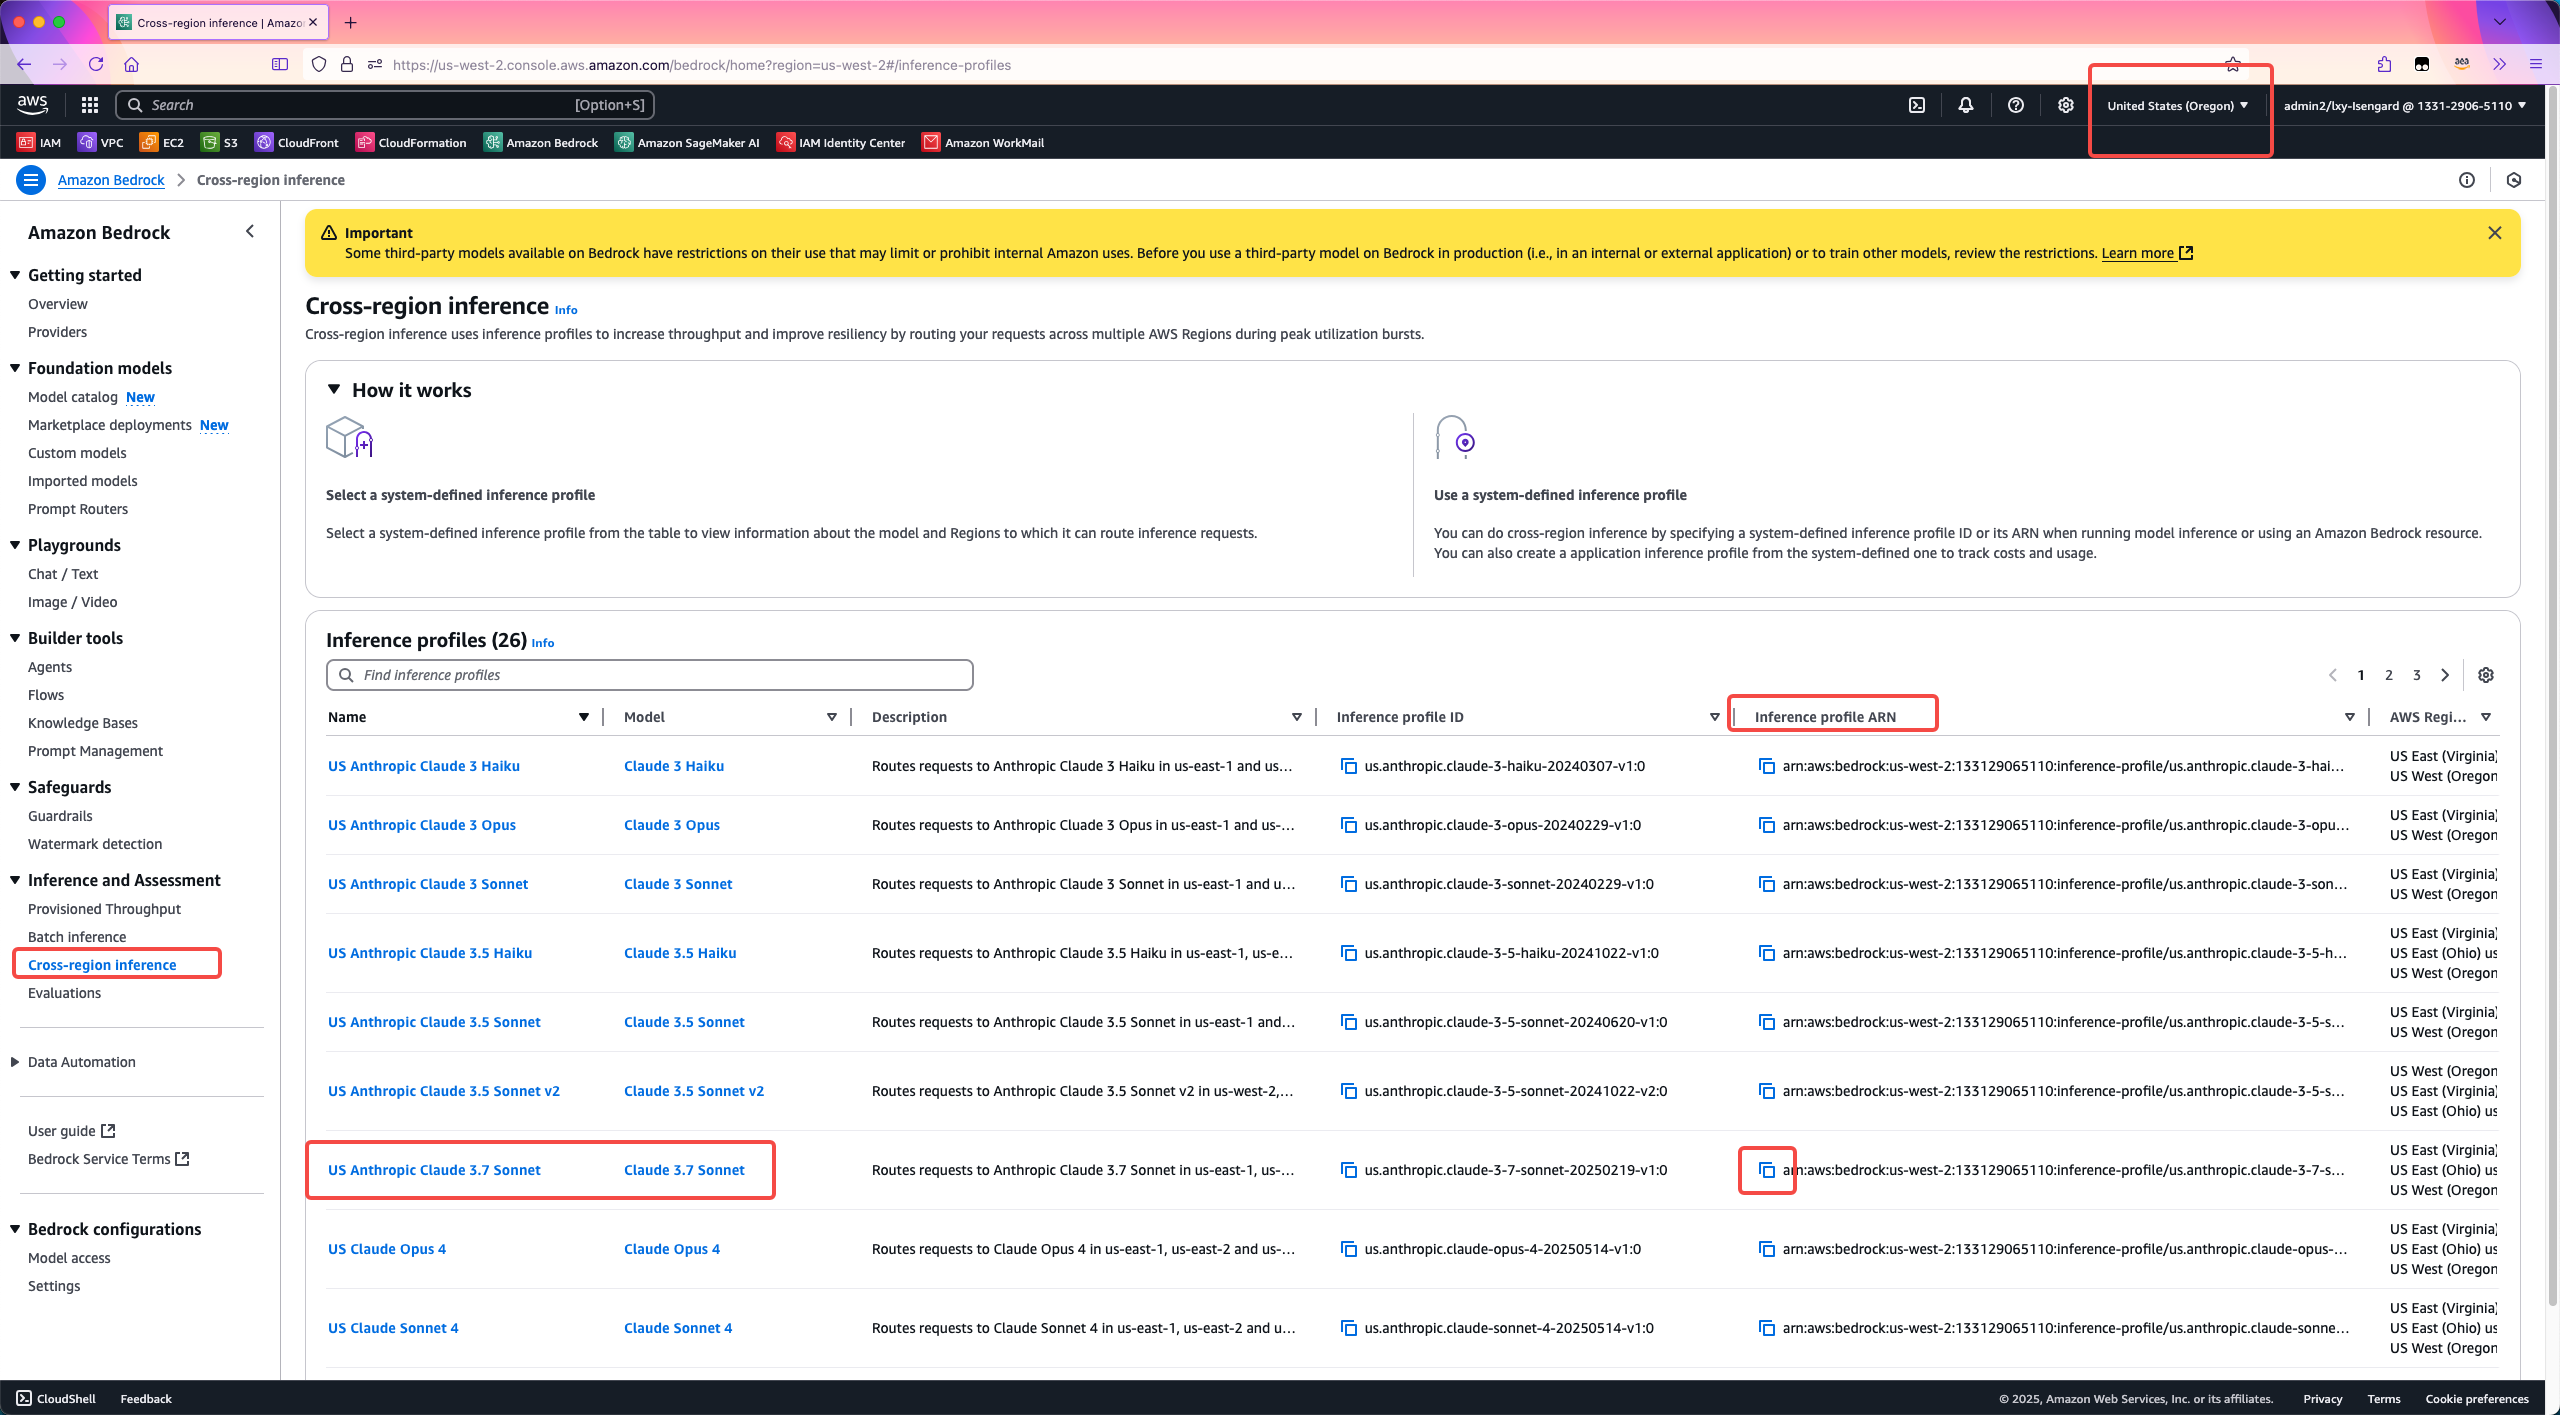
将ARN其复制下来arn:aws:bedrock:us-west-2:133129065110:inference-profile/us.anthropic.claude-3-7-sonnet-20250219-v1:0。然后拼接命令。
2、使用AWSCLI创建新的Inference Profile
执行如下命令。
aws bedrock create-inference-profile --inference-profile-name myapp-01 --model-source copyFrom="arn:aws:bedrock:us-west-2:133129065110:inference-profile/us.anthropic.claude-3-7-sonnet-20250219-v1:0"执行结果如下:
{
    "inferenceProfileArn": "arn:aws:bedrock:us-west-2:133129065110:application-inference-profile/bmcqrhwso453",
    "status": "ACTIVE"
}
(END)这就表示创建完成,且Bedrock还为其分配了唯一的ID叫做bmcqrhwso453。
3、使用AWSCLI查看创建好的Inference Profile
由于Bedrock控制台上只显示系统内置的Inference Profile,因此查看刚才创建的Inference Profile必须通过AWSCLI或者Bedrock API方式查询。执行如下命令:
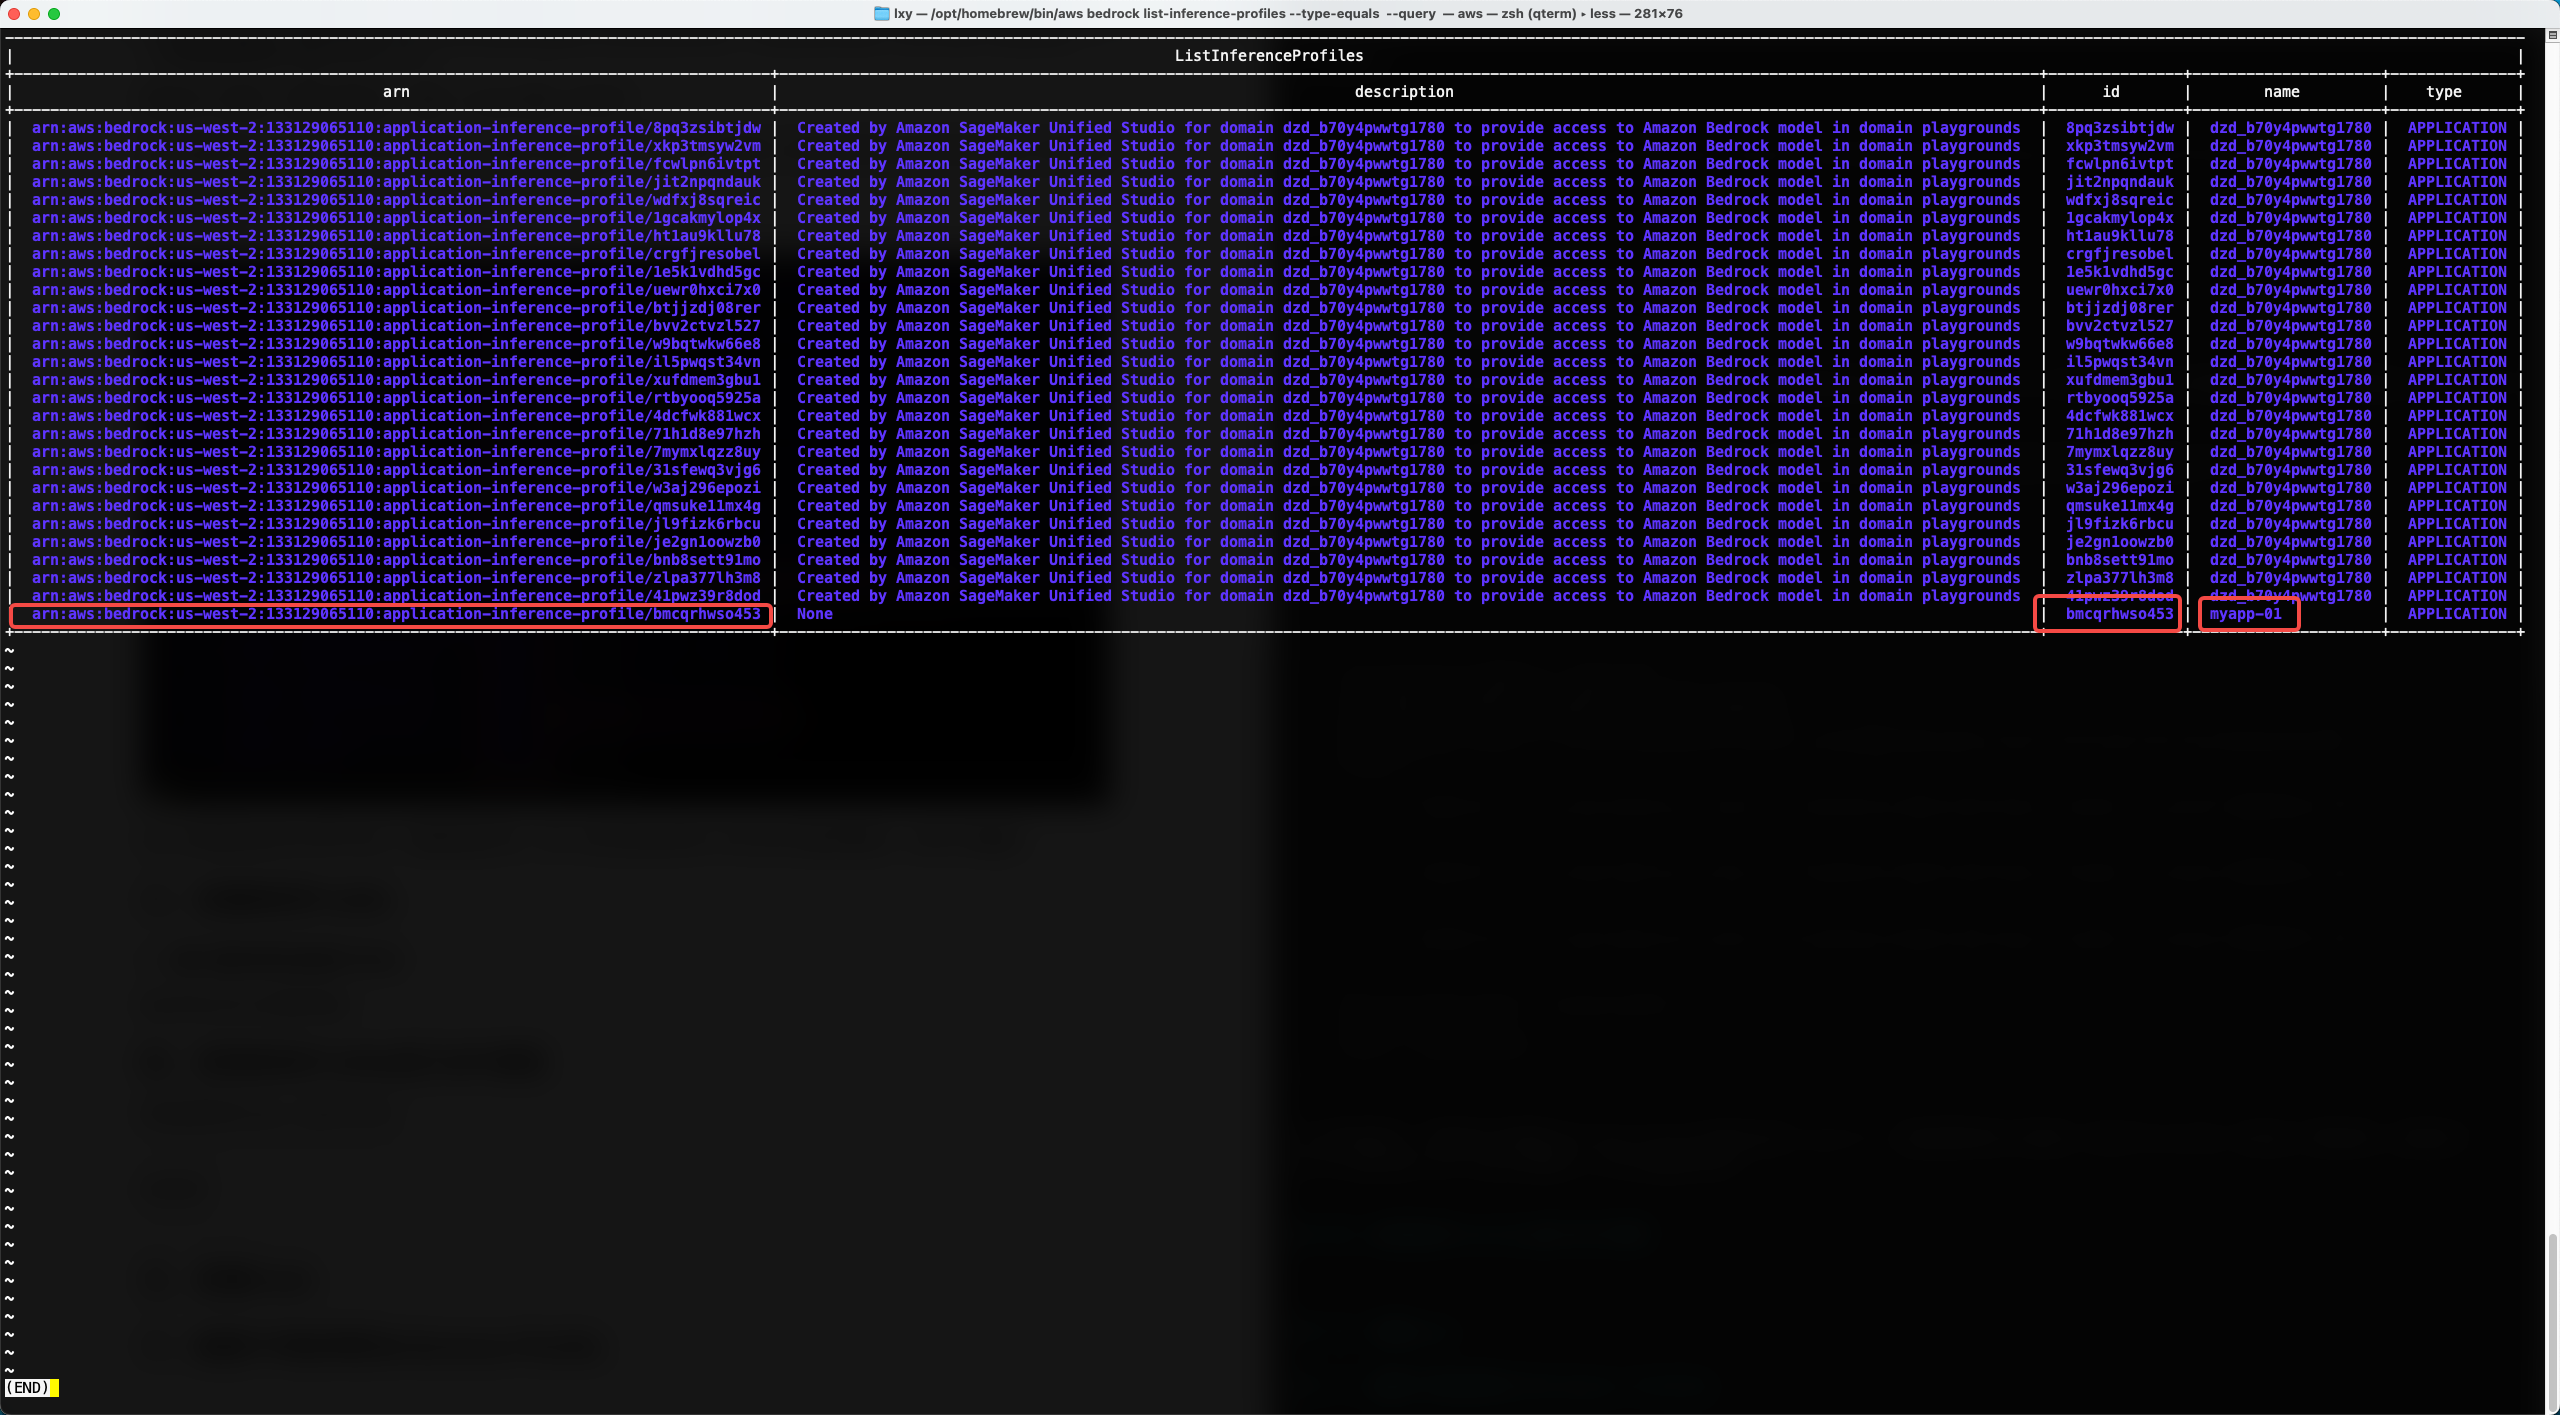
aws bedrock list-inference-profiles --type-equals APPLICATION --query 'inferenceProfileSummaries[].[{name:inferenceProfileName,arn:inferenceProfileArn,id:inferenceProfileId,type:type}]' --output table执行后反馈结果的最后一行,就是刚才手工创建的Profile。如下截图。
如果希望进一步查看刚创建好的Profile的详情,那么需要复制其ARN,然后拼接到如下命令:接下来可进一步查看其详情。拼接如下命令:
aws bedrock get-inference-profile --inference-profile-identifi arn:aws:bedrock:us-west-2:133129065110:application-inference-profile/bmcqrhwso45查看刚创建好的Profile的详情结果如下。
{
    "inferenceProfileName": "myapp-01",
    "createdAt": "2025-07-02T06:14:35.601701+00:00",
    "updatedAt": "2025-07-02T06:14:35.601701+00:00",
    "inferenceProfileArn": "arn:aws:bedrock:us-west-2:133129065110:application-inference-profile/bmcqrhwso453",
    "models": [
        {
            "modelArn": "arn:aws:bedrock:us-east-1::foundation-model/anthropic.claude-3-7-sonnet-20250219-v1:0"
        },
        {
            "modelArn": "arn:aws:bedrock:us-east-2::foundation-model/anthropic.claude-3-7-sonnet-20250219-v1:0"
        },
        {
            "modelArn": "arn:aws:bedrock:us-west-2::foundation-model/anthropic.claude-3-7-sonnet-20250219-v1:0"
        }
    ],
    "inferenceProfileId": "bmcqrhwso453",
    "status": "ACTIVE",
    "type": "APPLICATION"
}
以上查询结果中,可看到自己创建的Inference Profile的Name是myapp-01,这是创建时候手工指定的;在这个Profile内,有包含三个模型ARN,也就是这个Profile是支持Cross-region调用的。下方可以看到它的ID是bmcqrhwso453。在下一步完成打Tag后,即可使用这个ID在后续程序调用将会使用。
4、为Inference Profile添加Tag
在之前的这篇博客中,讲解过使用Tag分账的基本原理。本文中计划使用project和stage这两个tag,分别区分使用部分和环境用途。
添加tag的命令(请替换其中的Profile对应的ARN):
aws bedrock tag-resource --resource-arn "arn:aws:bedrock:us-west-2:133129065110:application-inference-profile/bmcqrhwso453" --tags key=project,value=app01 key=stage,value=test命令行没有给出报错的话就表示添加tag成功。这里我们打的tag是app01,稍后会在账单中检查这个结果
查看Tag的命令(请替换其中的Profile对应的ARN):
aws bedrock list-tags-for-resource --resource-arn arn:aws:bedrock:us-west-2:133129065110:application-inference-profile/bmcqrhwso453返回结果如下:
{
    "tags": [
        {
            "key": "stage",
            "value": "test"
        },
        {
            "key": "project",
            "value": "app01"
        }
    ]
}
如果要修改Tag,只要确保Tag的key也就是名称相同,再设置一个不同的Value就可以了。
aws bedrock tag-resource --resource-arn "arn:aws:bedrock:us-west-2:133129065110:application-inference-profile/bmcqrhwso453" --tags key=stage,value=uat删除tag的命令(请替换其中的Profile对应的ARN):
aws bedrock untag-resource --resource-arn "arn:aws:bedrock:us-west-2:133129065110:application-inference-profile/bmcqrhwso453" --tag-keys key=project stage命令执行后没有报错的话,表示配置成功。
四、启用账单管理中的Tag
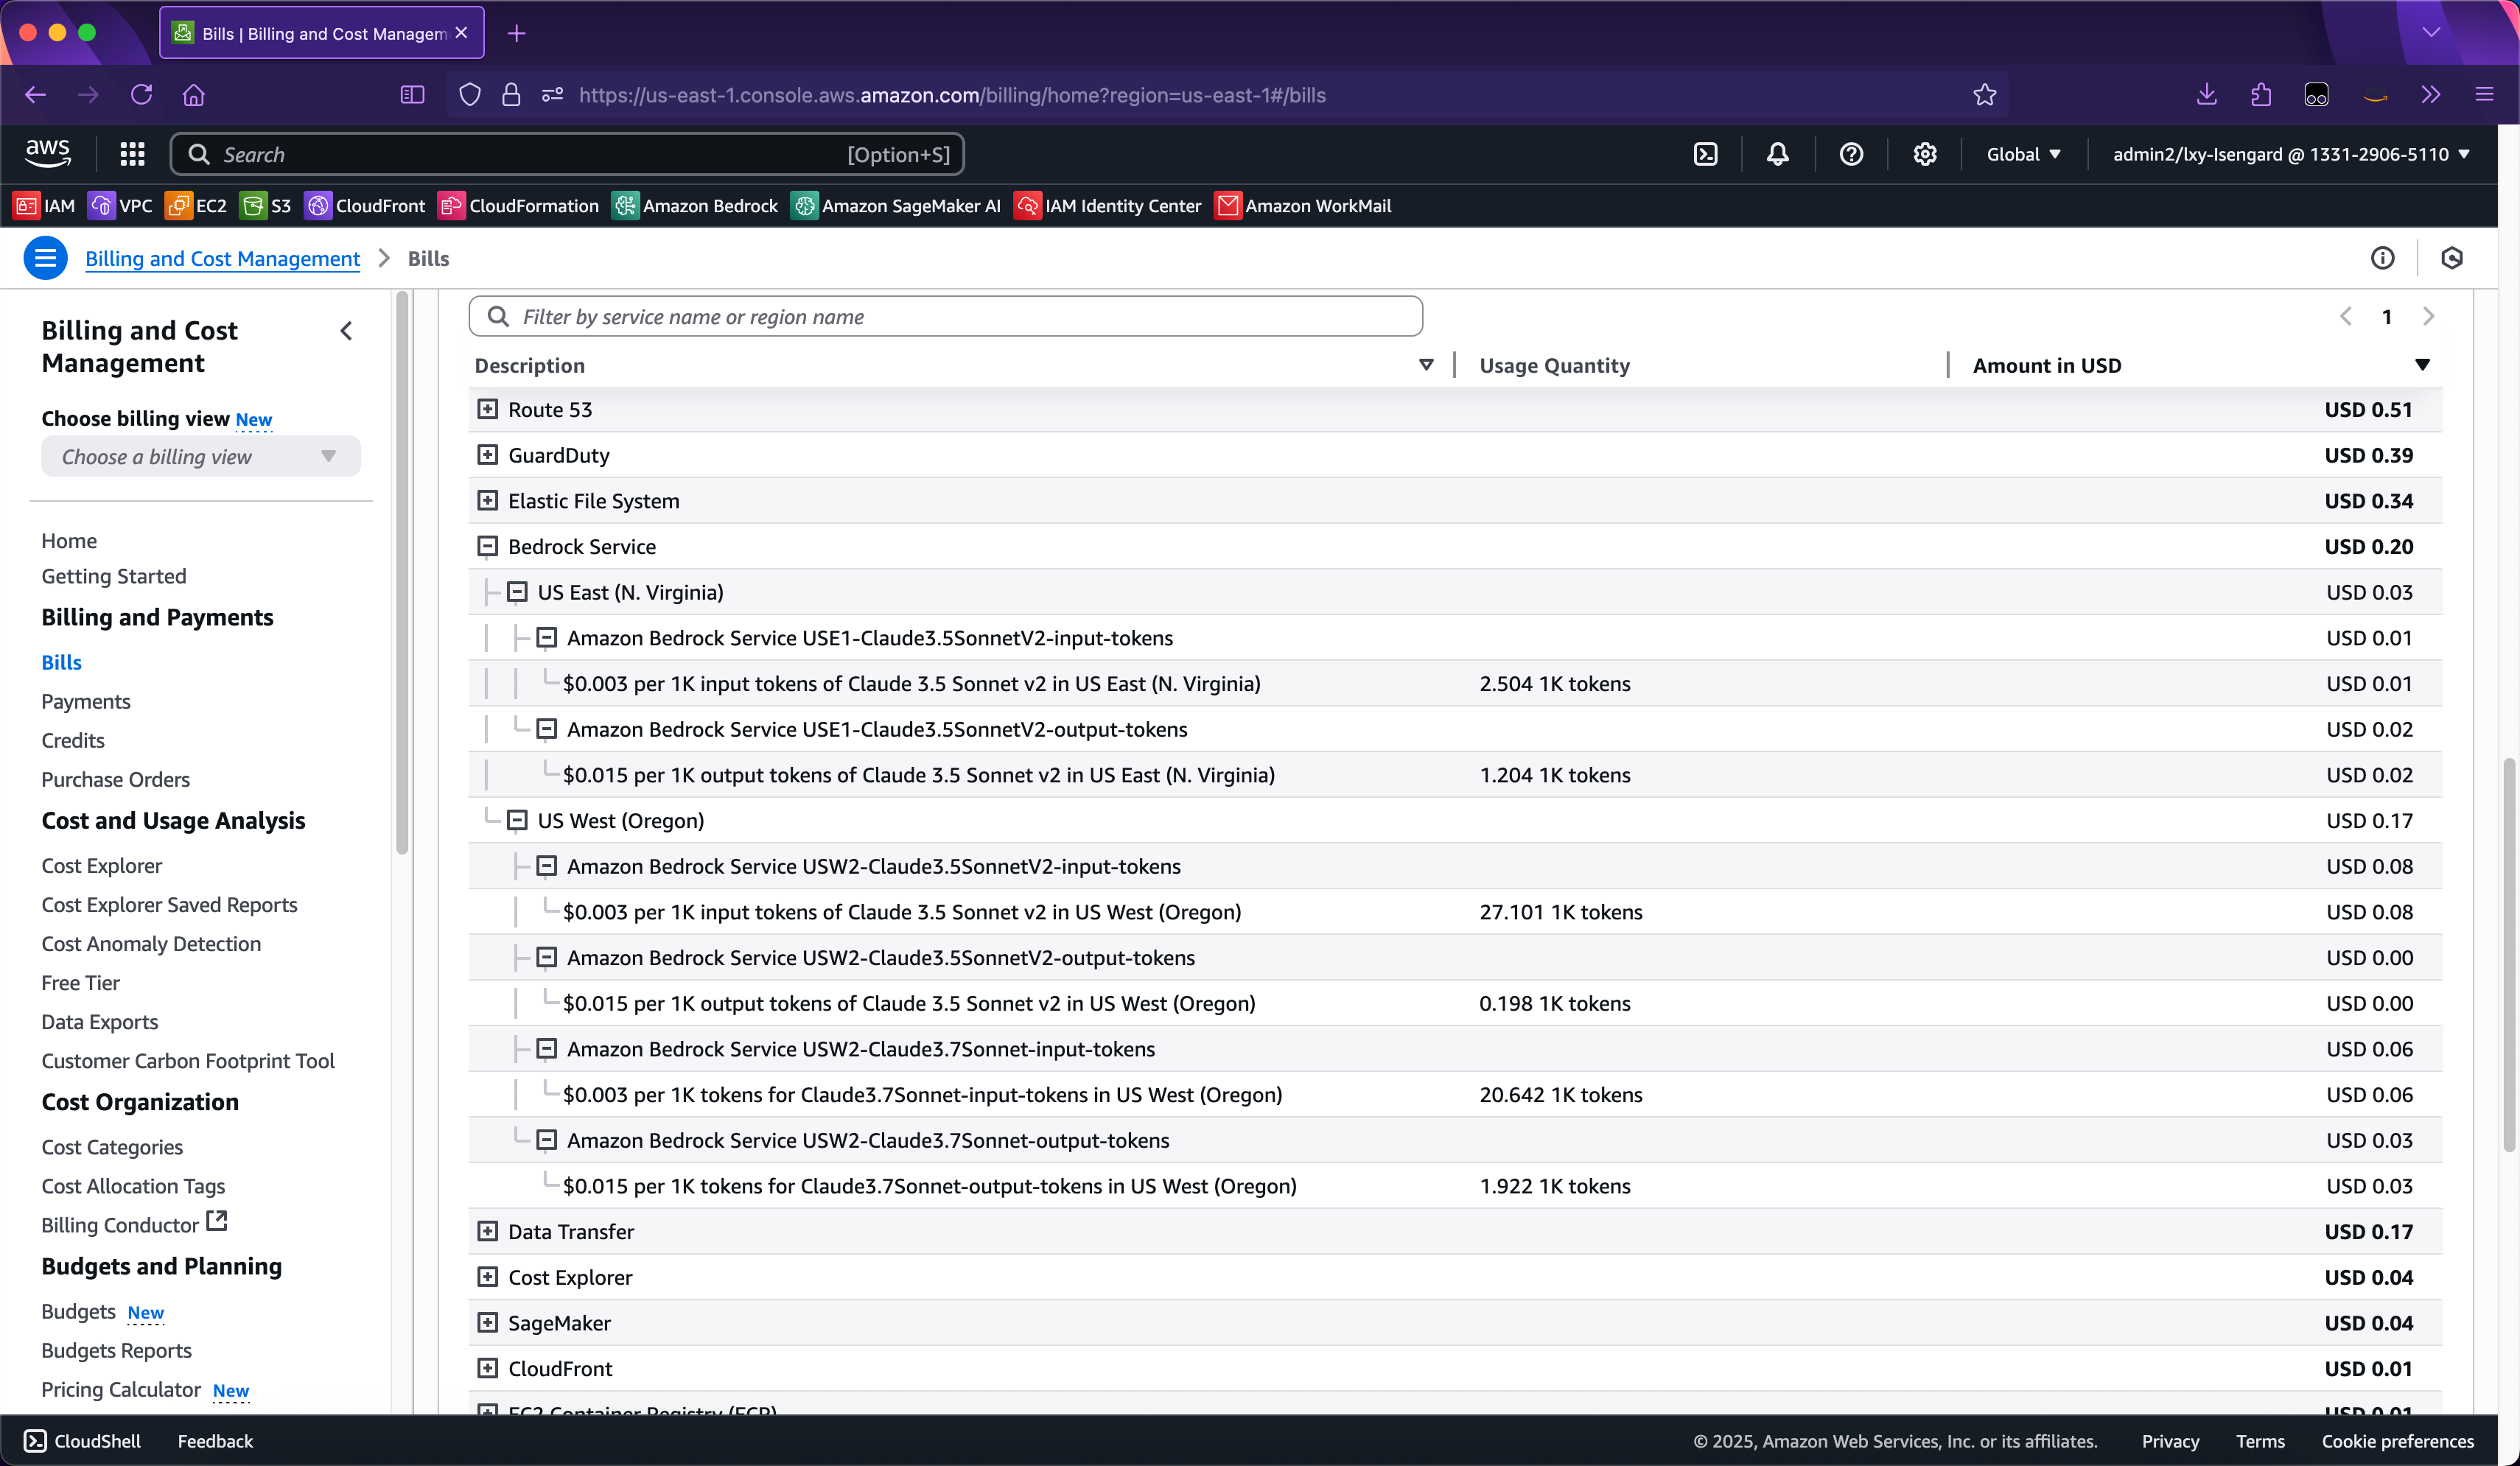
在使用Inference Profile进行调用后,在AWS控制台的Billing界面看到的只是Model API调用,分项是按照不同的模型,而不是按照不同的Tag。如下截图。
Tag的费用分拆是通过Cost Explorer可以看到,此外还将其导出到S3存储桶的CUR也可以看到。这里将描述怎么使用Cost Explorer的图形界面查看。
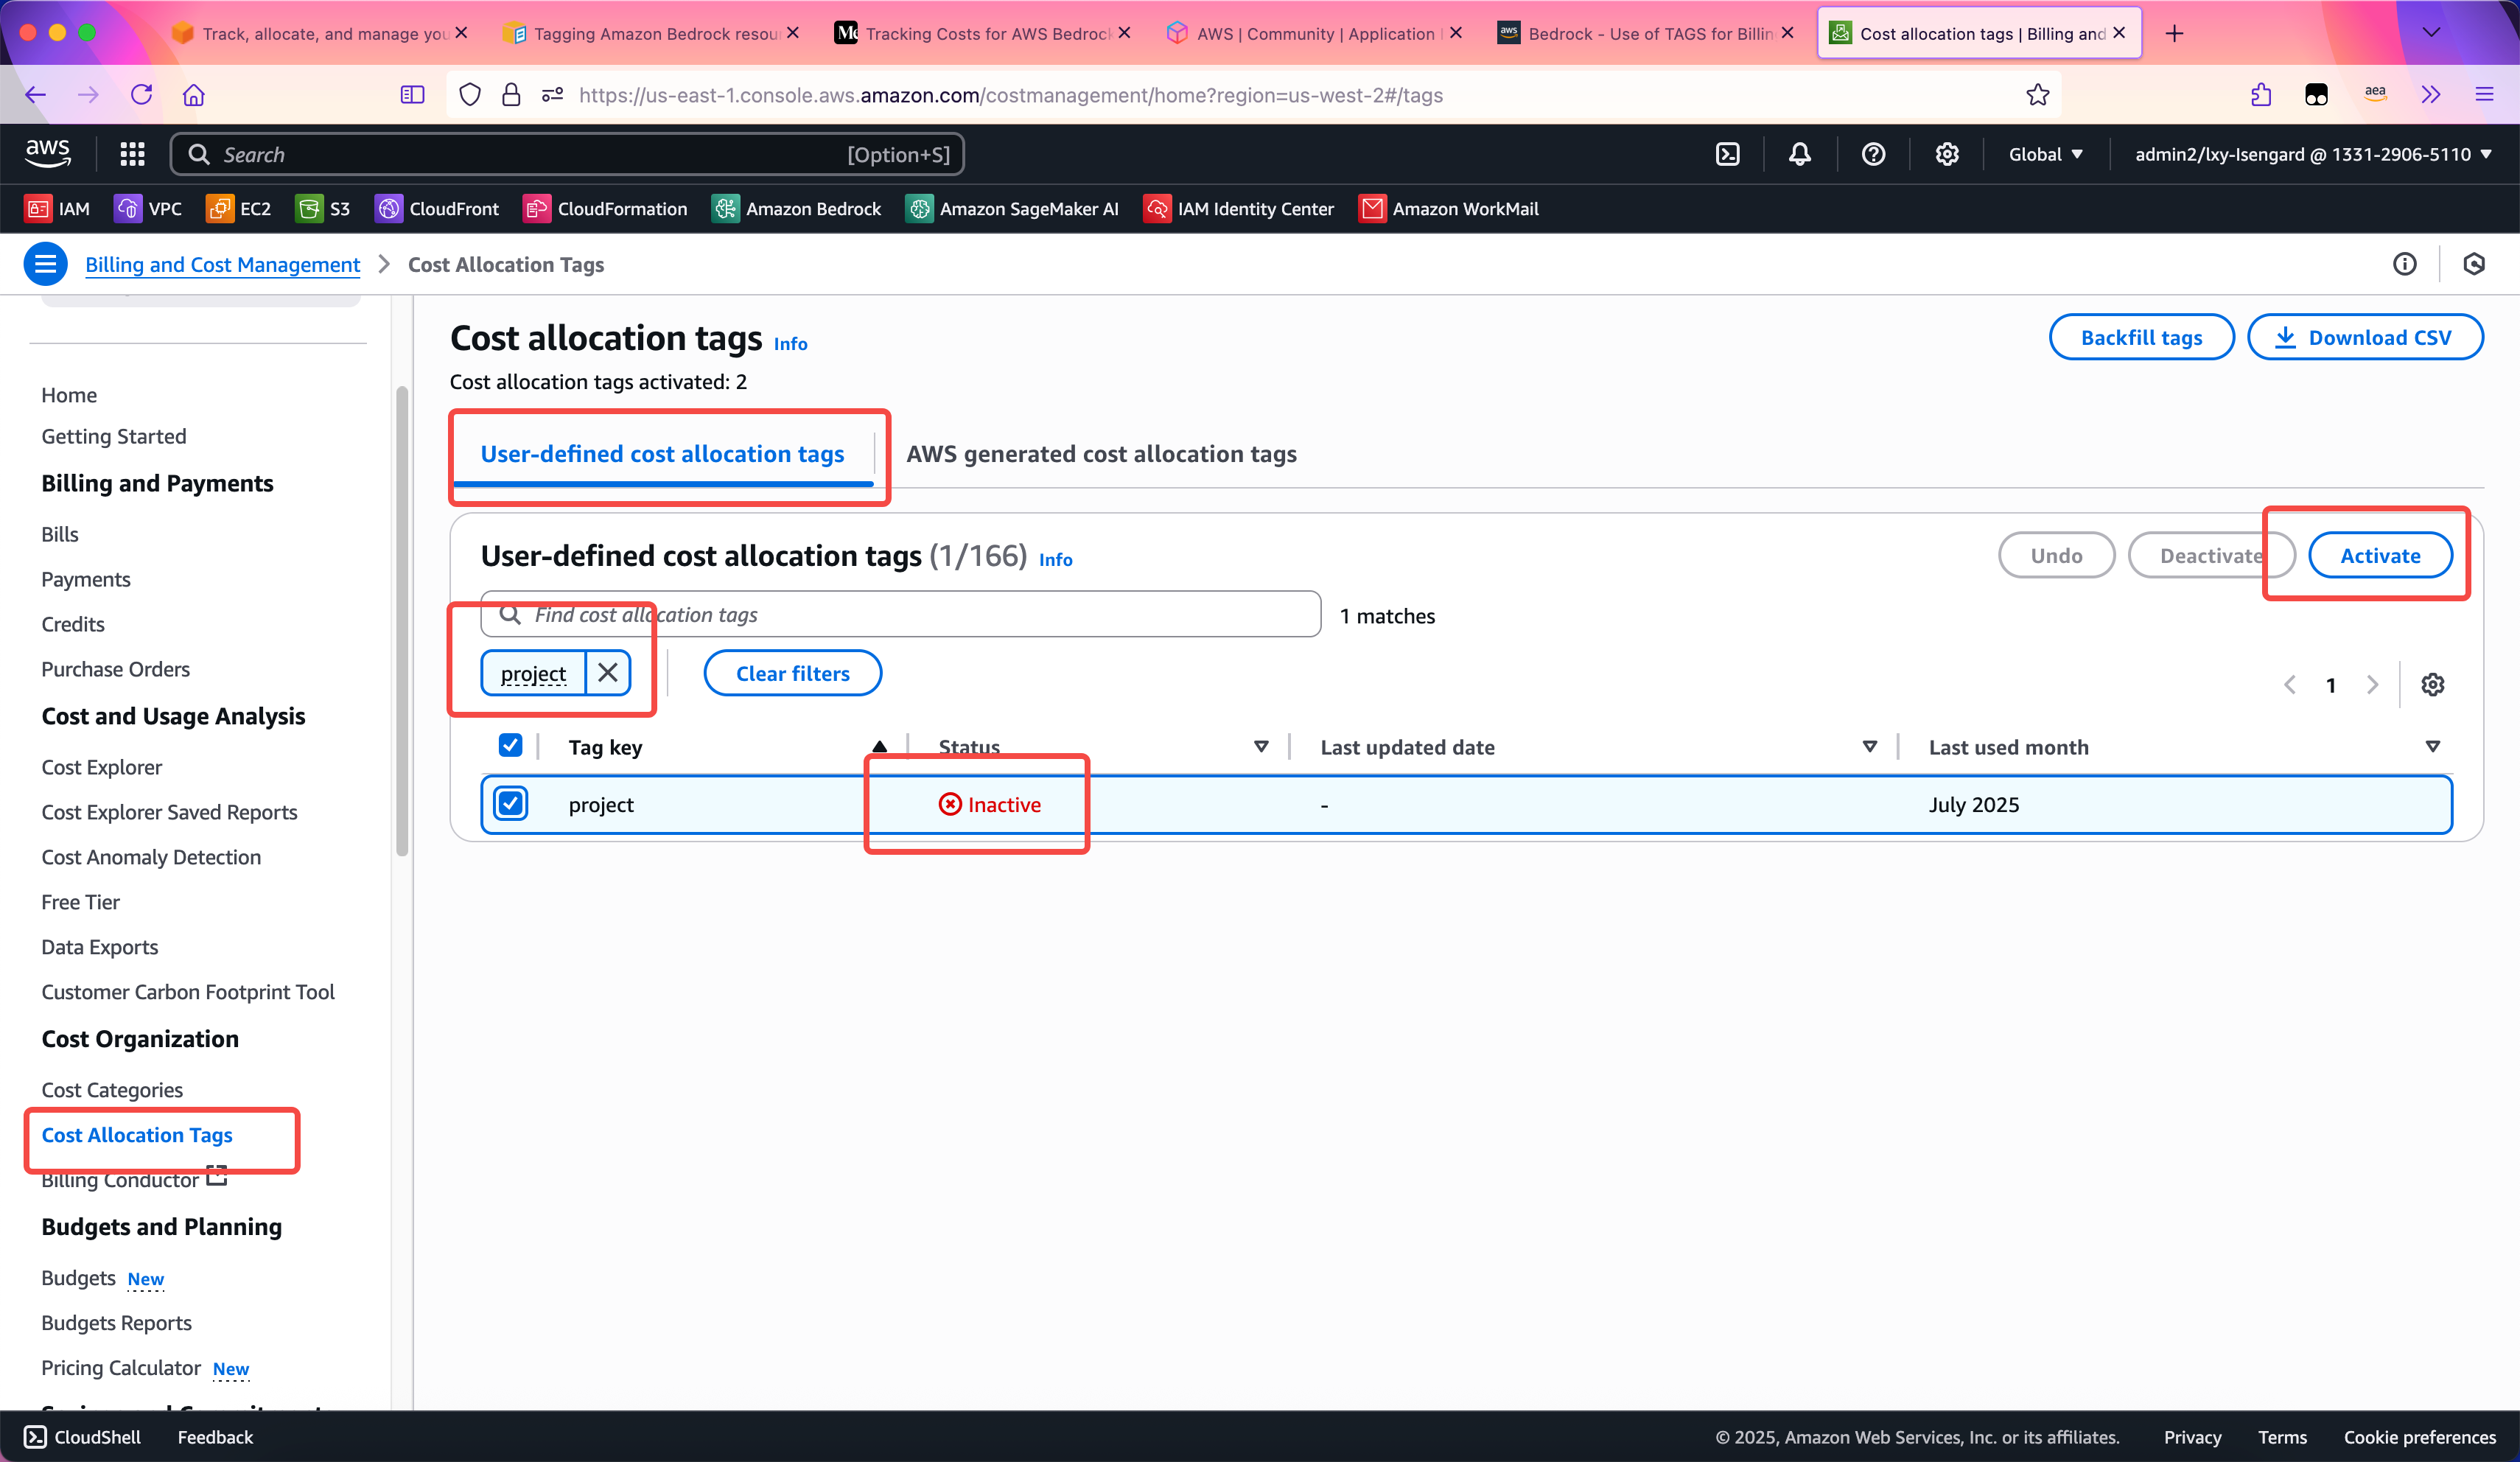
为了正确显示Tag,这里还需要在Cost Explorer服务中激活Tag设置。进入Cost Organization菜单中的Cost Allocation Tags,在第一个标签页User-defined cost allocation tags里边,用搜索框找到上一步设置的Project和Stage两个Tag标签,将其设置为Active状态。如下截图。
这个配置完成后,要24-48小时才能生效。不足48小时的话,在Cost Explorer服务中无法看到新的标签。在等待其生效的期间,Bedrock API对Inference Profile的调用可以正常访问,但是费用类型不会带有Tag,无法分拆。生效之后,调用Inference Profile的调用就回包含费用标签。
五、使用新的Profile进行API调用
在使用Inference Profile时候需要注意的是,不是所有客户端都支持使用Profile。一些基于Bedrock SDK开发的客户端,可能仅支持输入模型ARN,而不支持输入Inference Profile。此时如果在配置文件中,原来的模型ARN直接替换为Inference Profile,则程序运行会出现错误。因此,建议针对每个应用程序,从源代码层面进行调整。
例如如下是一个直接调用模型ARN的Python代码的例子。
import boto3
import json

region_name = 'us-west-2'
inference_profile_id = "arn:aws:bedrock:us-west-2:133129065110:application-inference-profile/bmcqrhwso453"

message_text = "你好,你是什么模型?请介绍一下你自己。"

system_prompt = [
        { "text": "你是聊天机器人,人类的好朋友,语气要温柔" }
    ]

session = boto3.Session(region_name= region_name)
bedrock = session.client(service_name="bedrock-runtime")

message_list = []
initial_message = {
    "role": "user",
    "content": [
        { "text": message_text }
    ],
}
message_list.append(initial_message)

response = bedrock.converse_stream(
    modelId = inference_profile_id ,
    system = system_prompt ,
    messages = message_list ,
    inferenceConfig={
        "maxTokens": 2000,
        "temperature": 0
    },
)

stream = response.get('stream')
if stream:
    for event in stream:

        if 'contentBlockDelta' in event:
            print(event['contentBlockDelta']['delta']['text'], end="")

        if 'metadata' in event:
            metadata = event['metadata']
            if 'usage' in metadata:
                print("\nToken usage")
                print(f"Input tokens: {metadata['usage']['inputTokens']}")
                print(
                    f":Output tokens: {metadata['usage']['outputTokens']}")
                print(f":Total tokens: {metadata['usage']['totalTokens']}")
            if 'metrics' in event['metadata']:
                print(
                    f"Latency: {metadata['metrics']['latencyMs']} milliseconds")
这样就可以使用刚才创建的Inference Profile进行调用了。
六、通过Cost Explorer图形界面查询Inference Profile的费用
前一步在Cost Explorer中激活标签的配置完成后,需要等待24-48小时才能生效。生效过后,进入Cost Explorer服务,在Cost and Usage Analysis菜单下找到Cost Explorer,点击进入。
首先将右上角的时间范围选择到正确的区间,然后在Group by菜单下,选择Dimension的选项为Tag,在从Tag下拉框中,选择前文创建的Project和Stage两个标签。这样即可看到费用。如下截图。
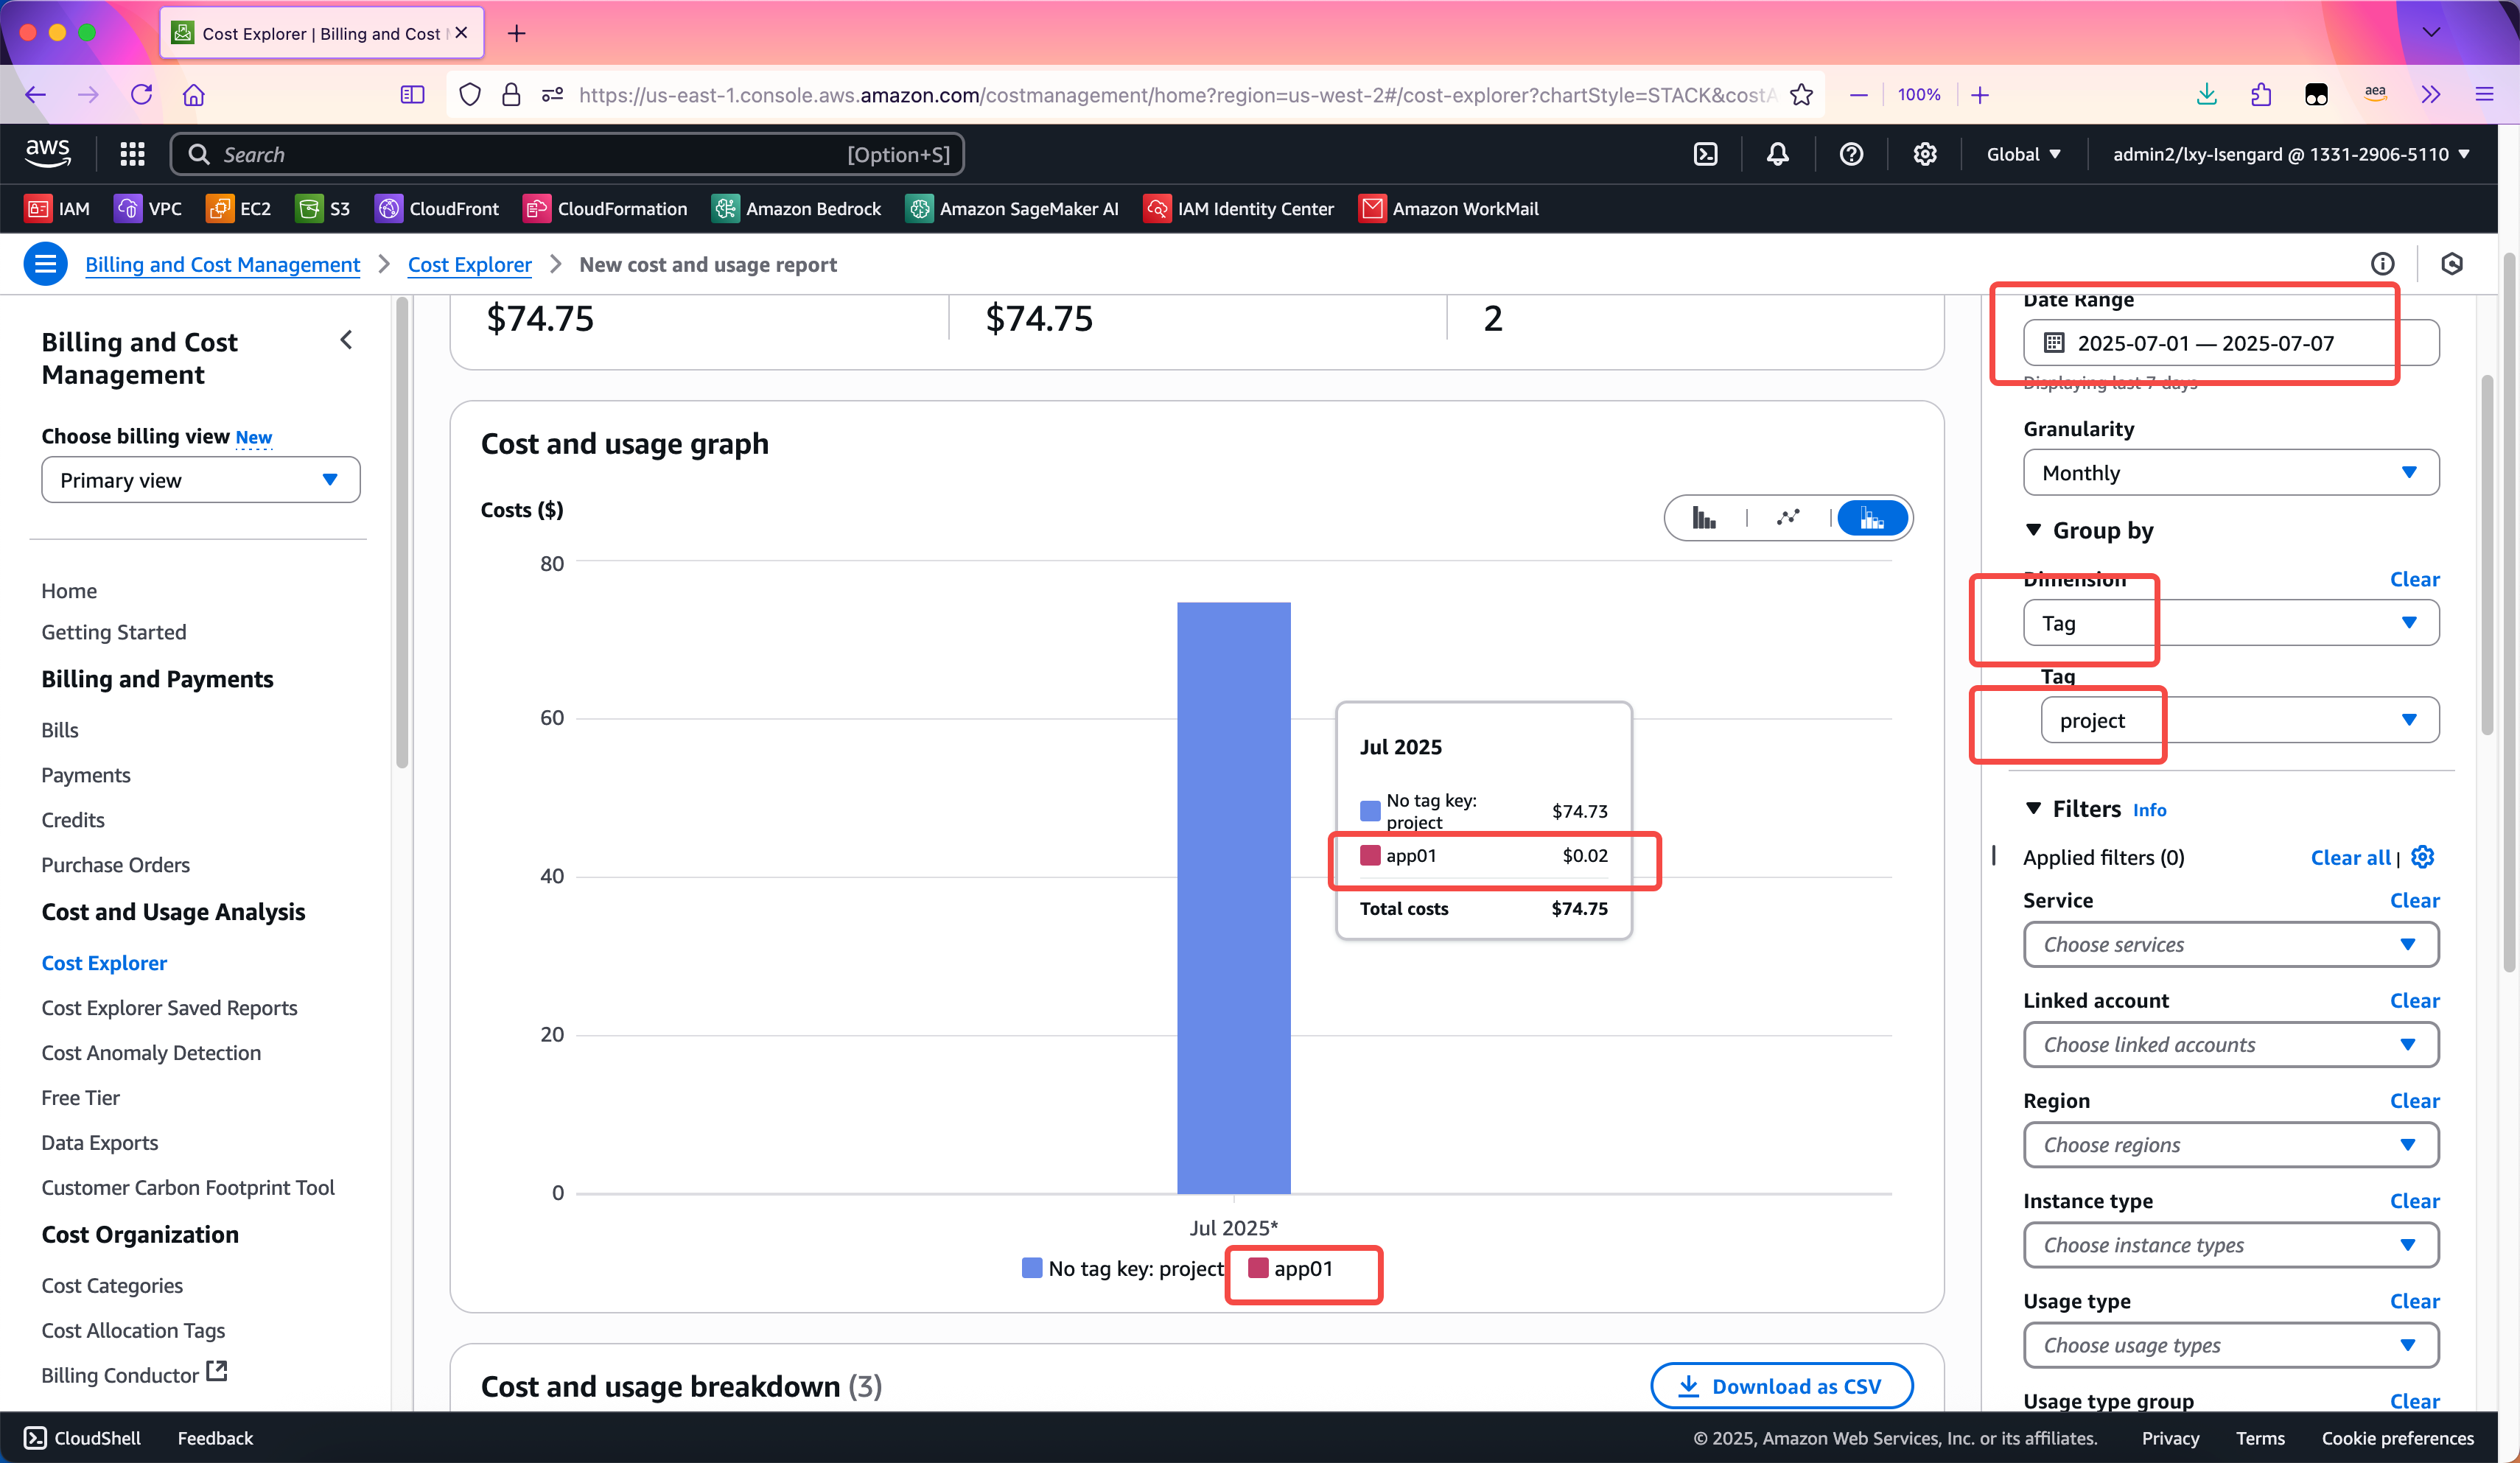
以上介绍了通过Cost Explorer服务查看带有Tag的Inference Profile费用构成。以上服务是通过AWS控制台查询,如果希望通过API查询,那么需要使用CUR服务将详单输出到S3存储桶进行查询。这种方法将在另外的博客文章中讲解。
七、删除不再使用的Inference Profile
删除不再使用的Inference Profile需要获取其ARN,然后拼接命令:
aws bedrock delete-inference-profile --inference-profile-identifier arn:aws:bedrock:us-west-2:133129065110:application-inference-profile/kmghfarxnyzcaws执行后不返回错误信息,直接返回命令行,就表示删除成功。此时可以用List查看列表的方式,确认Profile删除成功。
八、参考文档
使用AWSCLI操作Bedrock
https://docs.aws.amazon.com/cli/latest/reference/bedrock/#cli-aws-bedrock
AWS API Reference – CreateInferenceProfile
https://docs.aws.amazon.com/bedrock/latest/APIReference/API_CreateInferenceProfile.html