使用iperf2测试EC2网络优化机型的内网吞吐性能
本文介绍如何使用iperf2测试EC2网络优化型实例的内网吞吐性能。针对Amazon Linux 2023环境下iperf2安装复杂的挑战,提供了从Source RPM编译的解决方案,通过实际测试验证c6gn.8xlarge机型达到标称50Gbps带宽。
本文介绍如何测试EC2主机标称的内网性能。
一、背景
1、测试机型说明
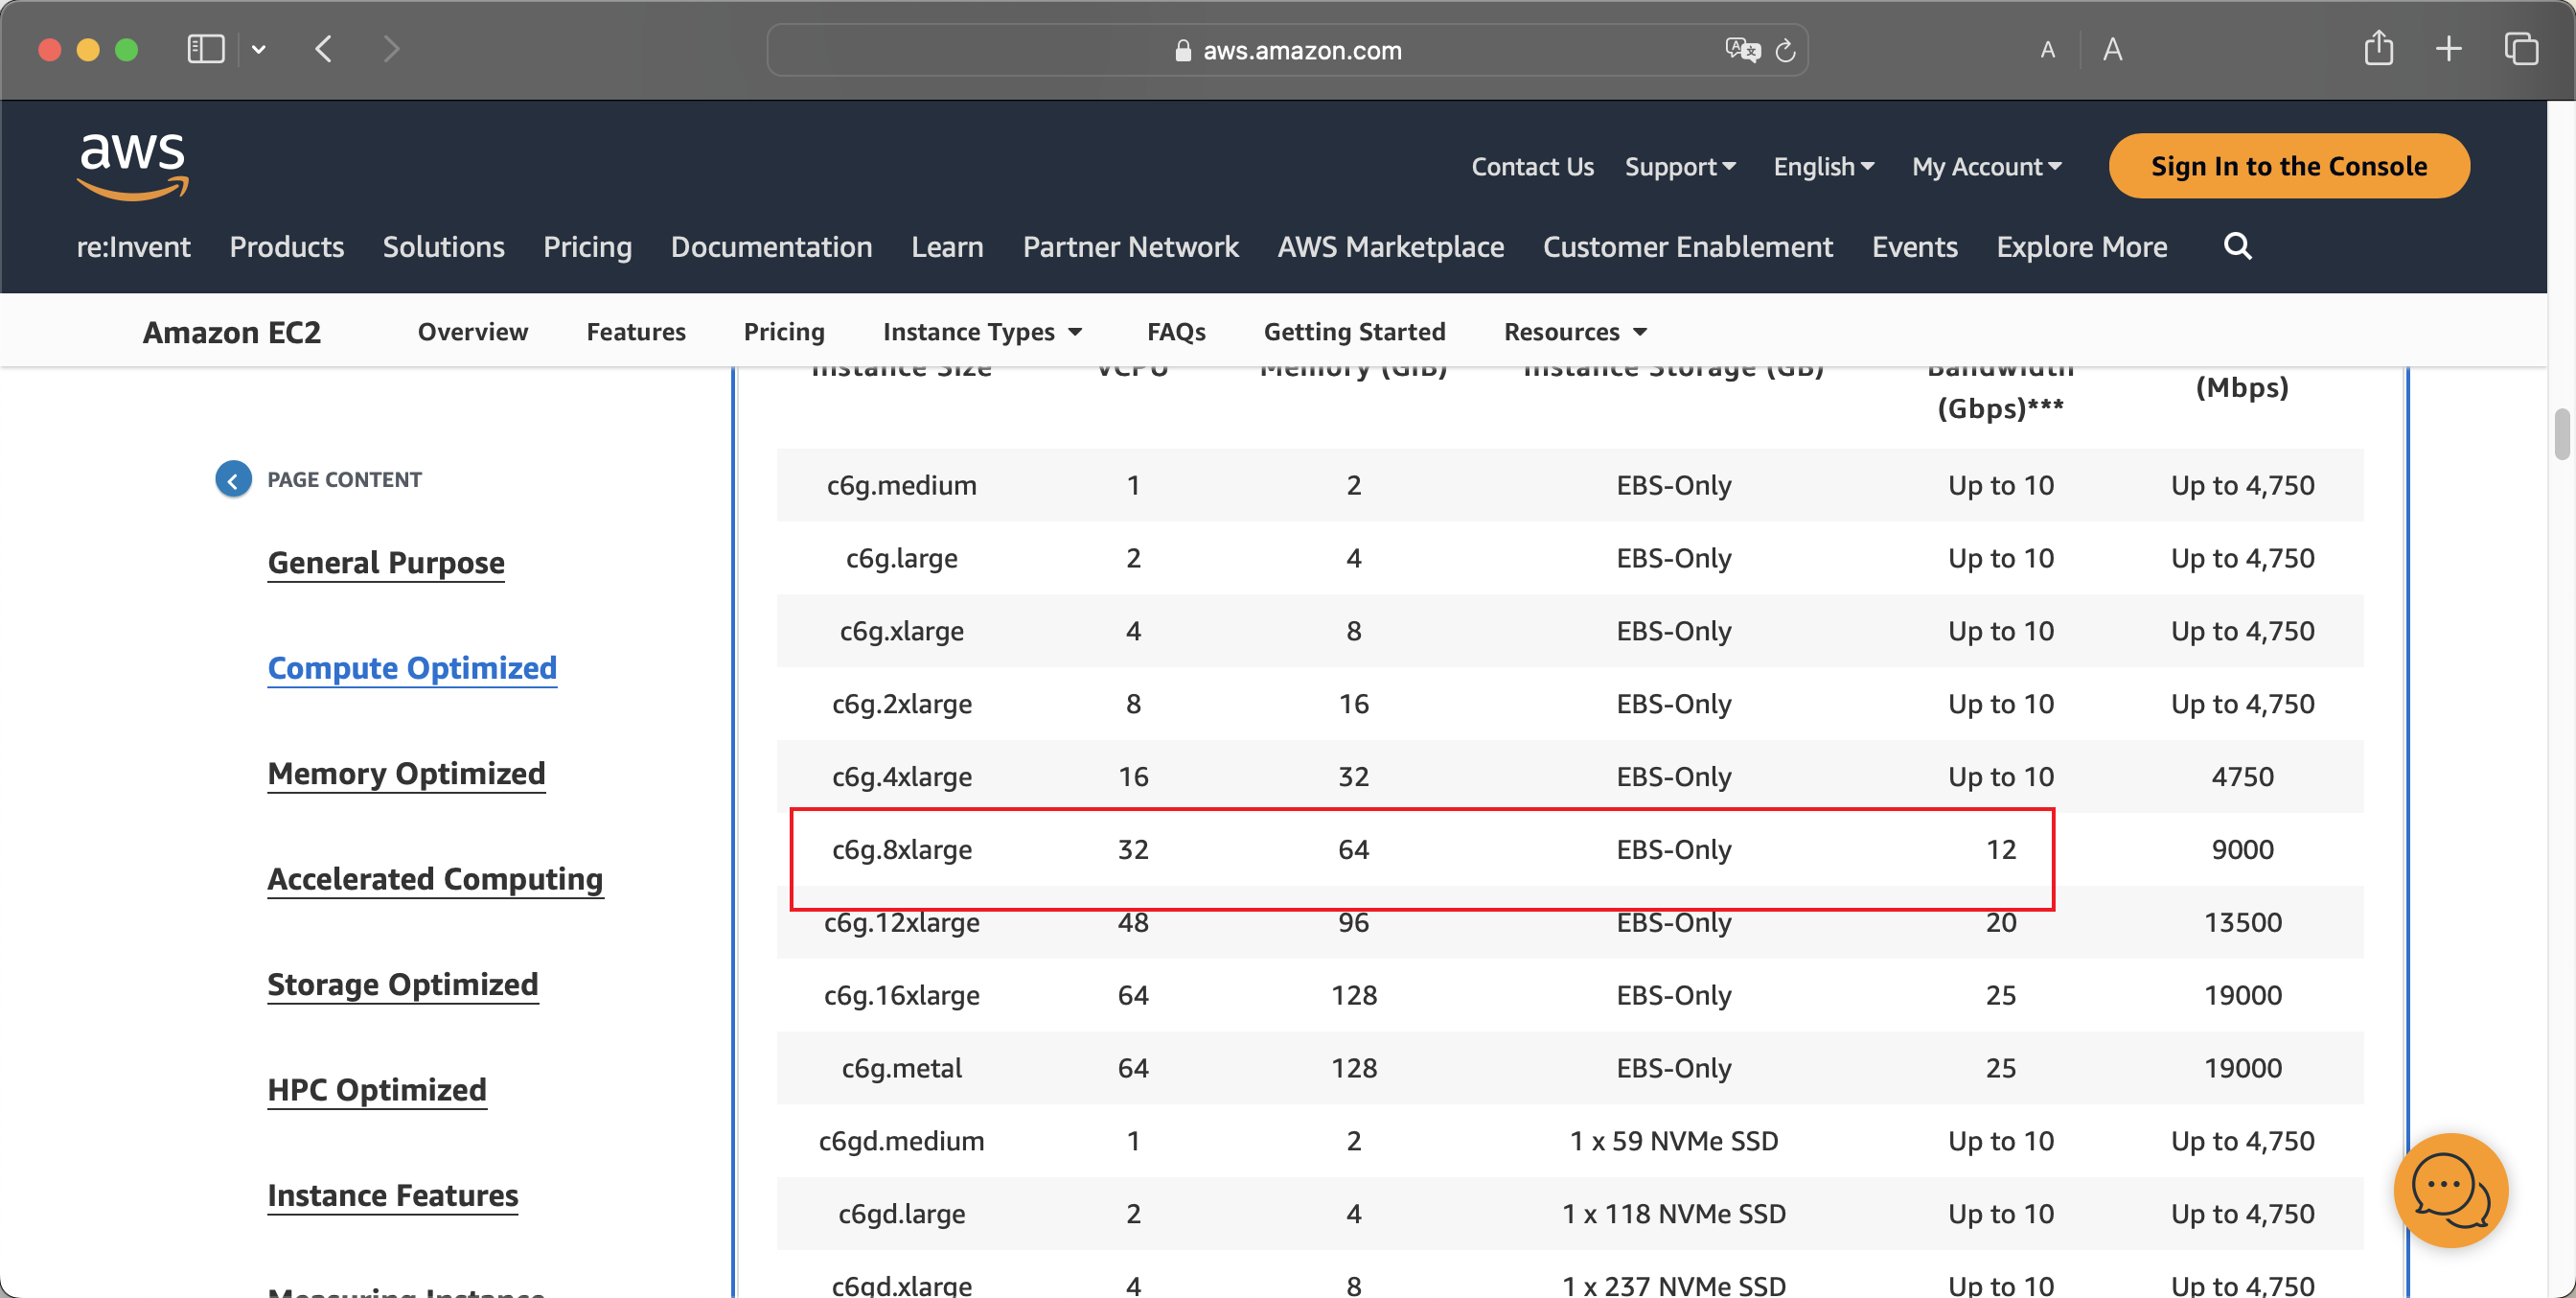
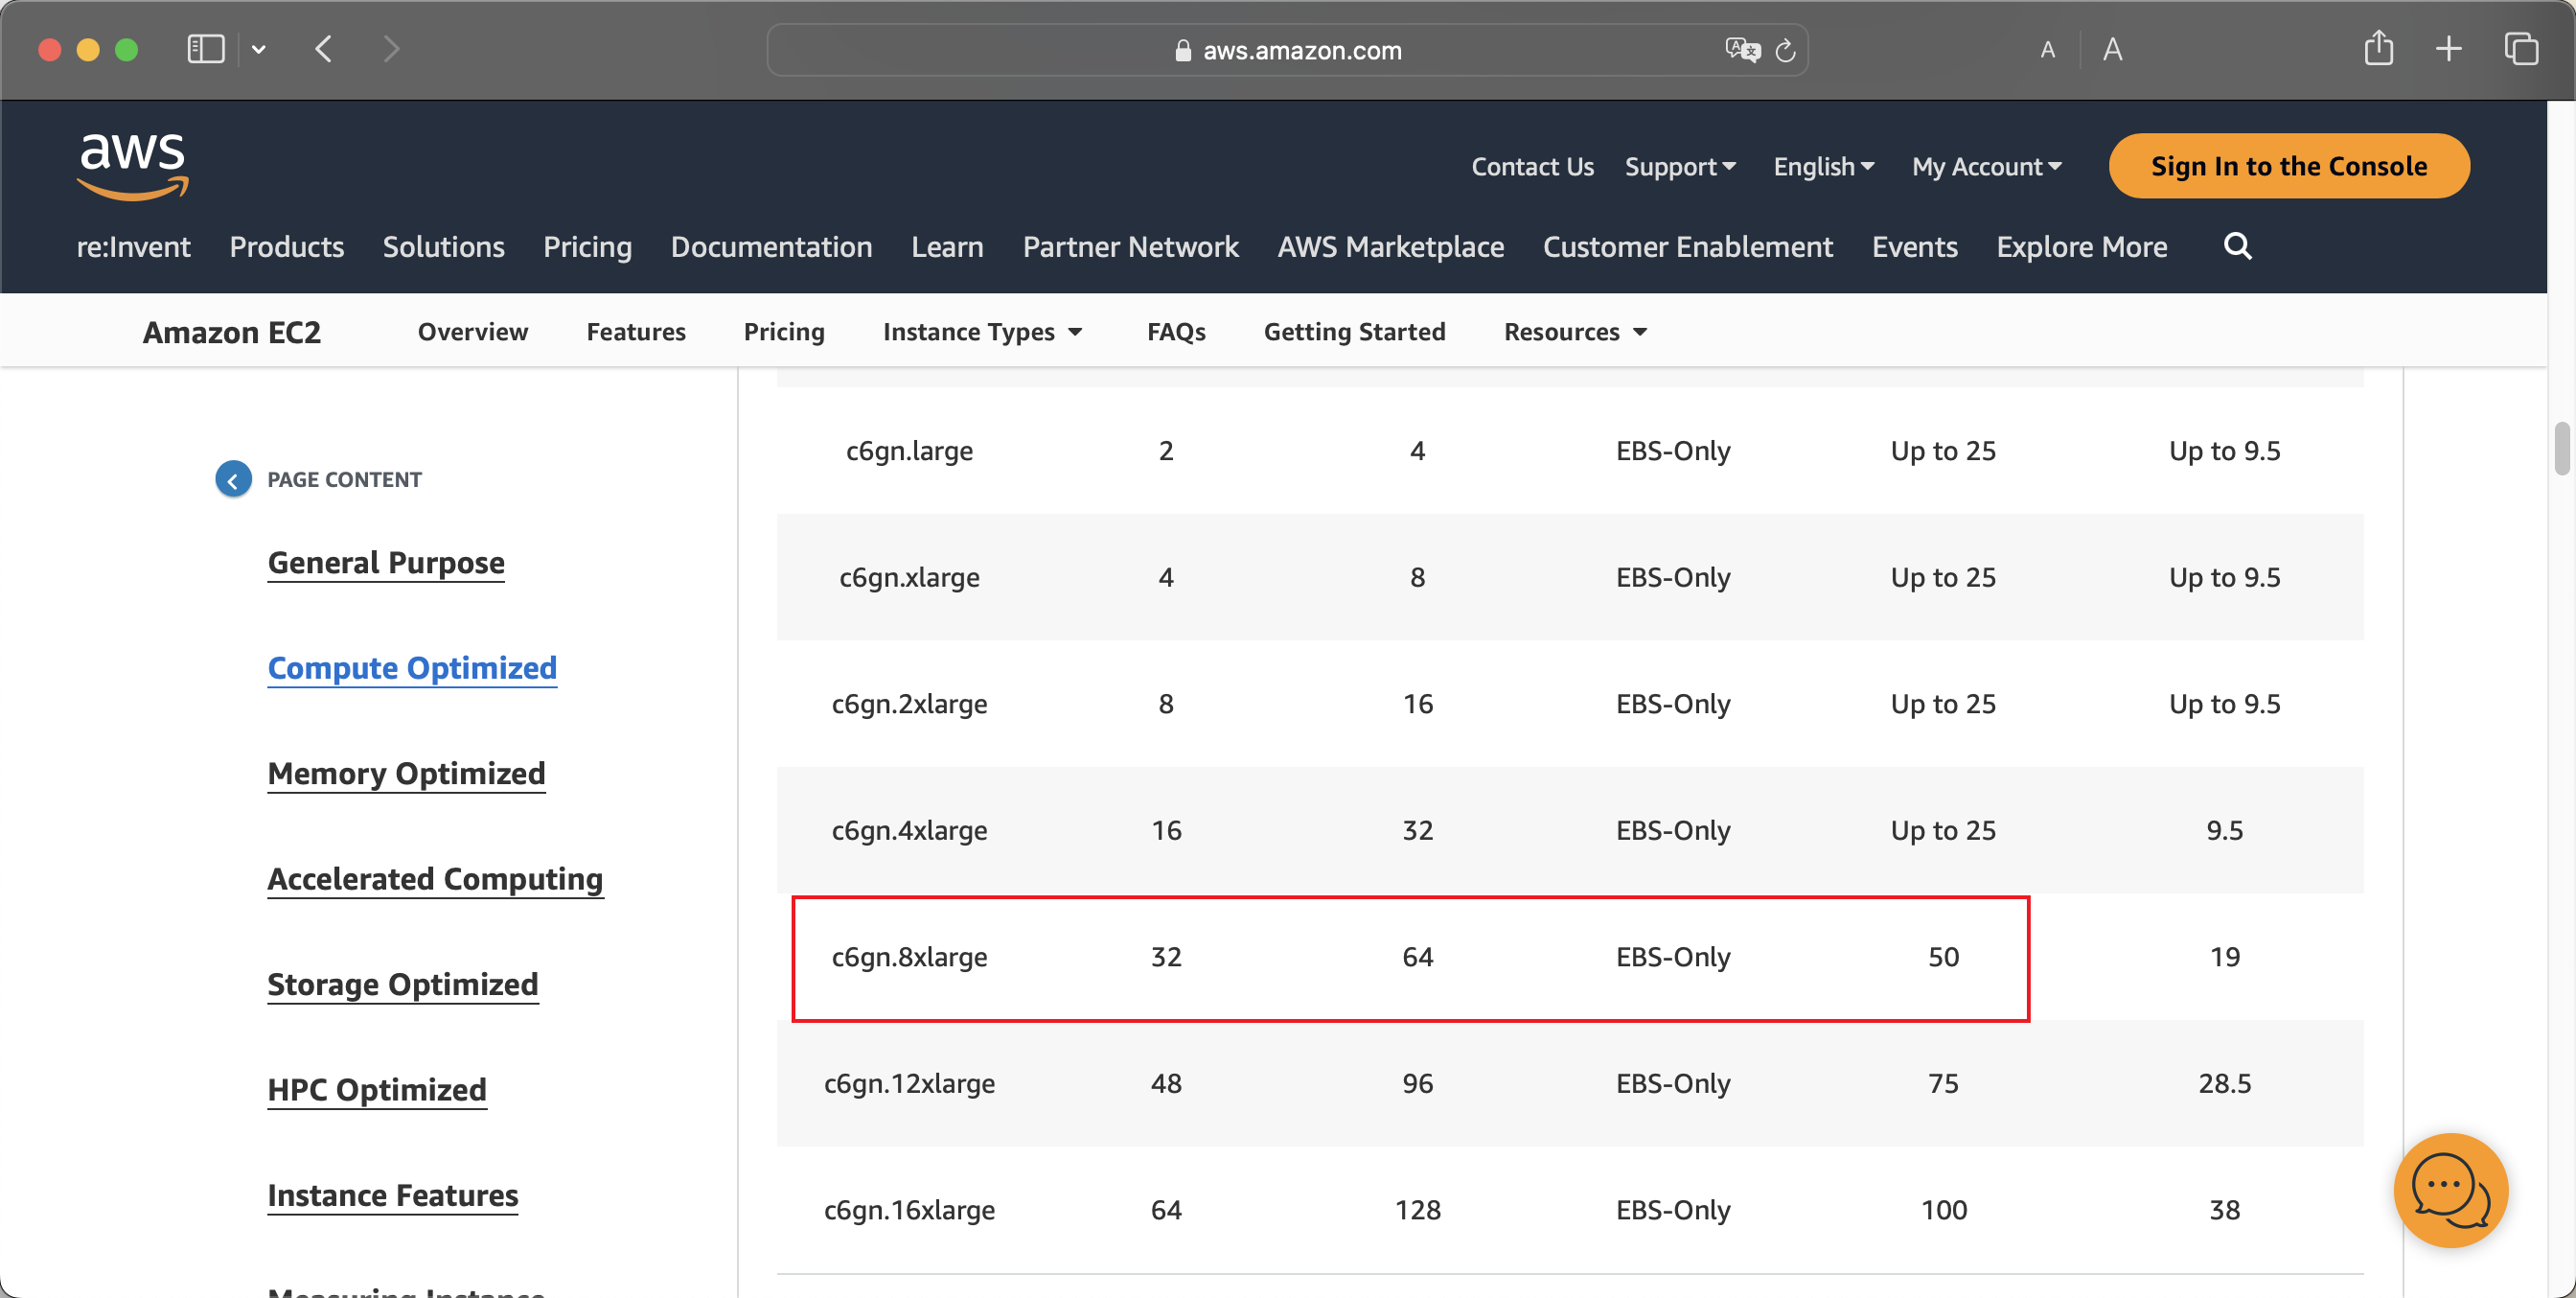
EC2网络优化型(尾号带字母n)表示比普通机型拥有更高的吞吐能力。例如c6g.8xlarge和c6gn.8xlarge,同样是采用Amazon Graviton 2处理器的机型,配置都是32vCPU/64GB内存,不过c6g.8xlarge内网吞吐是12Gbps,而c6gn.8xlarge内网吞吐是50Gbps。由此可看到,带有尾号g的机型,吞吐显著更高。
机型配置清单和网络指标请参考如下。
https://aws.amazon.com/ec2/instance-types/#Compute_Optimized
EC2 c6g.8xlarge内网指标如下截图。
EC2 c6gn.8xlarge内网指标如下截图。
2、通过AWSCLI快速查询各机型的网络吞吐
执行如下命令:
aws ec2 describe-instance-types --filters "Name=instance-type,Values=c6gn.*" --query "InstanceTypes[].[InstanceType, NetworkInfo.NetworkPerformance]" --output table
即可获得结果如下。
---------------------------------------
|        DescribeInstanceTypes        |
+----------------+--------------------+
|  c6gn.16xlarge |  100 Gigabit       |
|  c6gn.4xlarge  |  25 Gigabit        |
|  c6gn.xlarge   |  Up to 25 Gigabit  |
|  c6gn.12xlarge |  75 Gigabit        |
|  c6gn.medium   |  Up to 16 Gigabit  |
|  c6gn.large    |  Up to 25 Gigabit  |
|  c6gn.2xlarge  |  Up to 25 Gigabit  |
|  c6gn.8xlarge  |  50 Gigabit        |
+----------------+--------------------+
3、测试环境说明
本文测试环境采用两台c6gn.8xlarge,在同一个AZ可用区,同一个VPC内,使用iperf2发起测试。操作系统选择Amazon Linux 2023。
这里需要注意特殊型在于:选择最新的操作系统Amazon Linux 2023能发挥最好的Graviton2架构的网络性能,尤其是其最新Linux内核,包含了最新的ENA网卡驱动(执行modinfo ena命令可查看版本),例如在2.10以上版本,可充分发挥网络优化型EC2的性能。
测试环境构建难点:
- iperf2和iperf3两个版本,其多线程原理不一样,iperf2默认就是多线程,而iperf3默认是单线程,要跑满网络性能需要并发启动多个线程,测试流程编写脚本操作不便;因此这里选择iperf2;
- Amazon Linux 2是基于CentOS 7的,而Amazon Linux 2023是基于Fedore Core发行版的,因此不同的操作系统自带的软件库不一样;在Amazon Linux 2023使用系统自带的yum库安装的是iperf3版本,这一版本相对不好用,但Amazon Linux 2023又无法使用EPEL软件库,因此相对安装麻烦;
- 本文末尾的性能测试参考文档,安装在Amazon Linux 2023上安装iperf2的方法是从Github下载源代码,从Source Code编译,相对不够友好。本文采用从Source RPM直接编译获得针对aarm64架构Graviton处理器的RPM二进制包的方式,安装快捷方便由于Amazon Linux 2023会不断追随Fedore Core升级,因此这个构建好的二进制包,在一段时间内兼容可用,未来可能需要再进行升级。
现在开始构建环境。
4、本次测试环境版本
- Time: UTC 12:00-13:00, Dec 08, 2023
- Region: ap-southeast-1, AZ1
- EC2: c6gn.8xlarge
- OS: Amazon Linux 2023
- Kernel: 6.1.61-85.141.amzn2023.aarch64
- ENA Driver: 2.10.0g, /lib/modules/6.1.61-85.141.amzn2023.aarch64/kernel/drivers/amazon/net/ena/ena.ko
- iperf2: iperf-2.1.9-1.amzn2023.aarch64.rpm
二、创建EC2
1、创建Placement group放置组
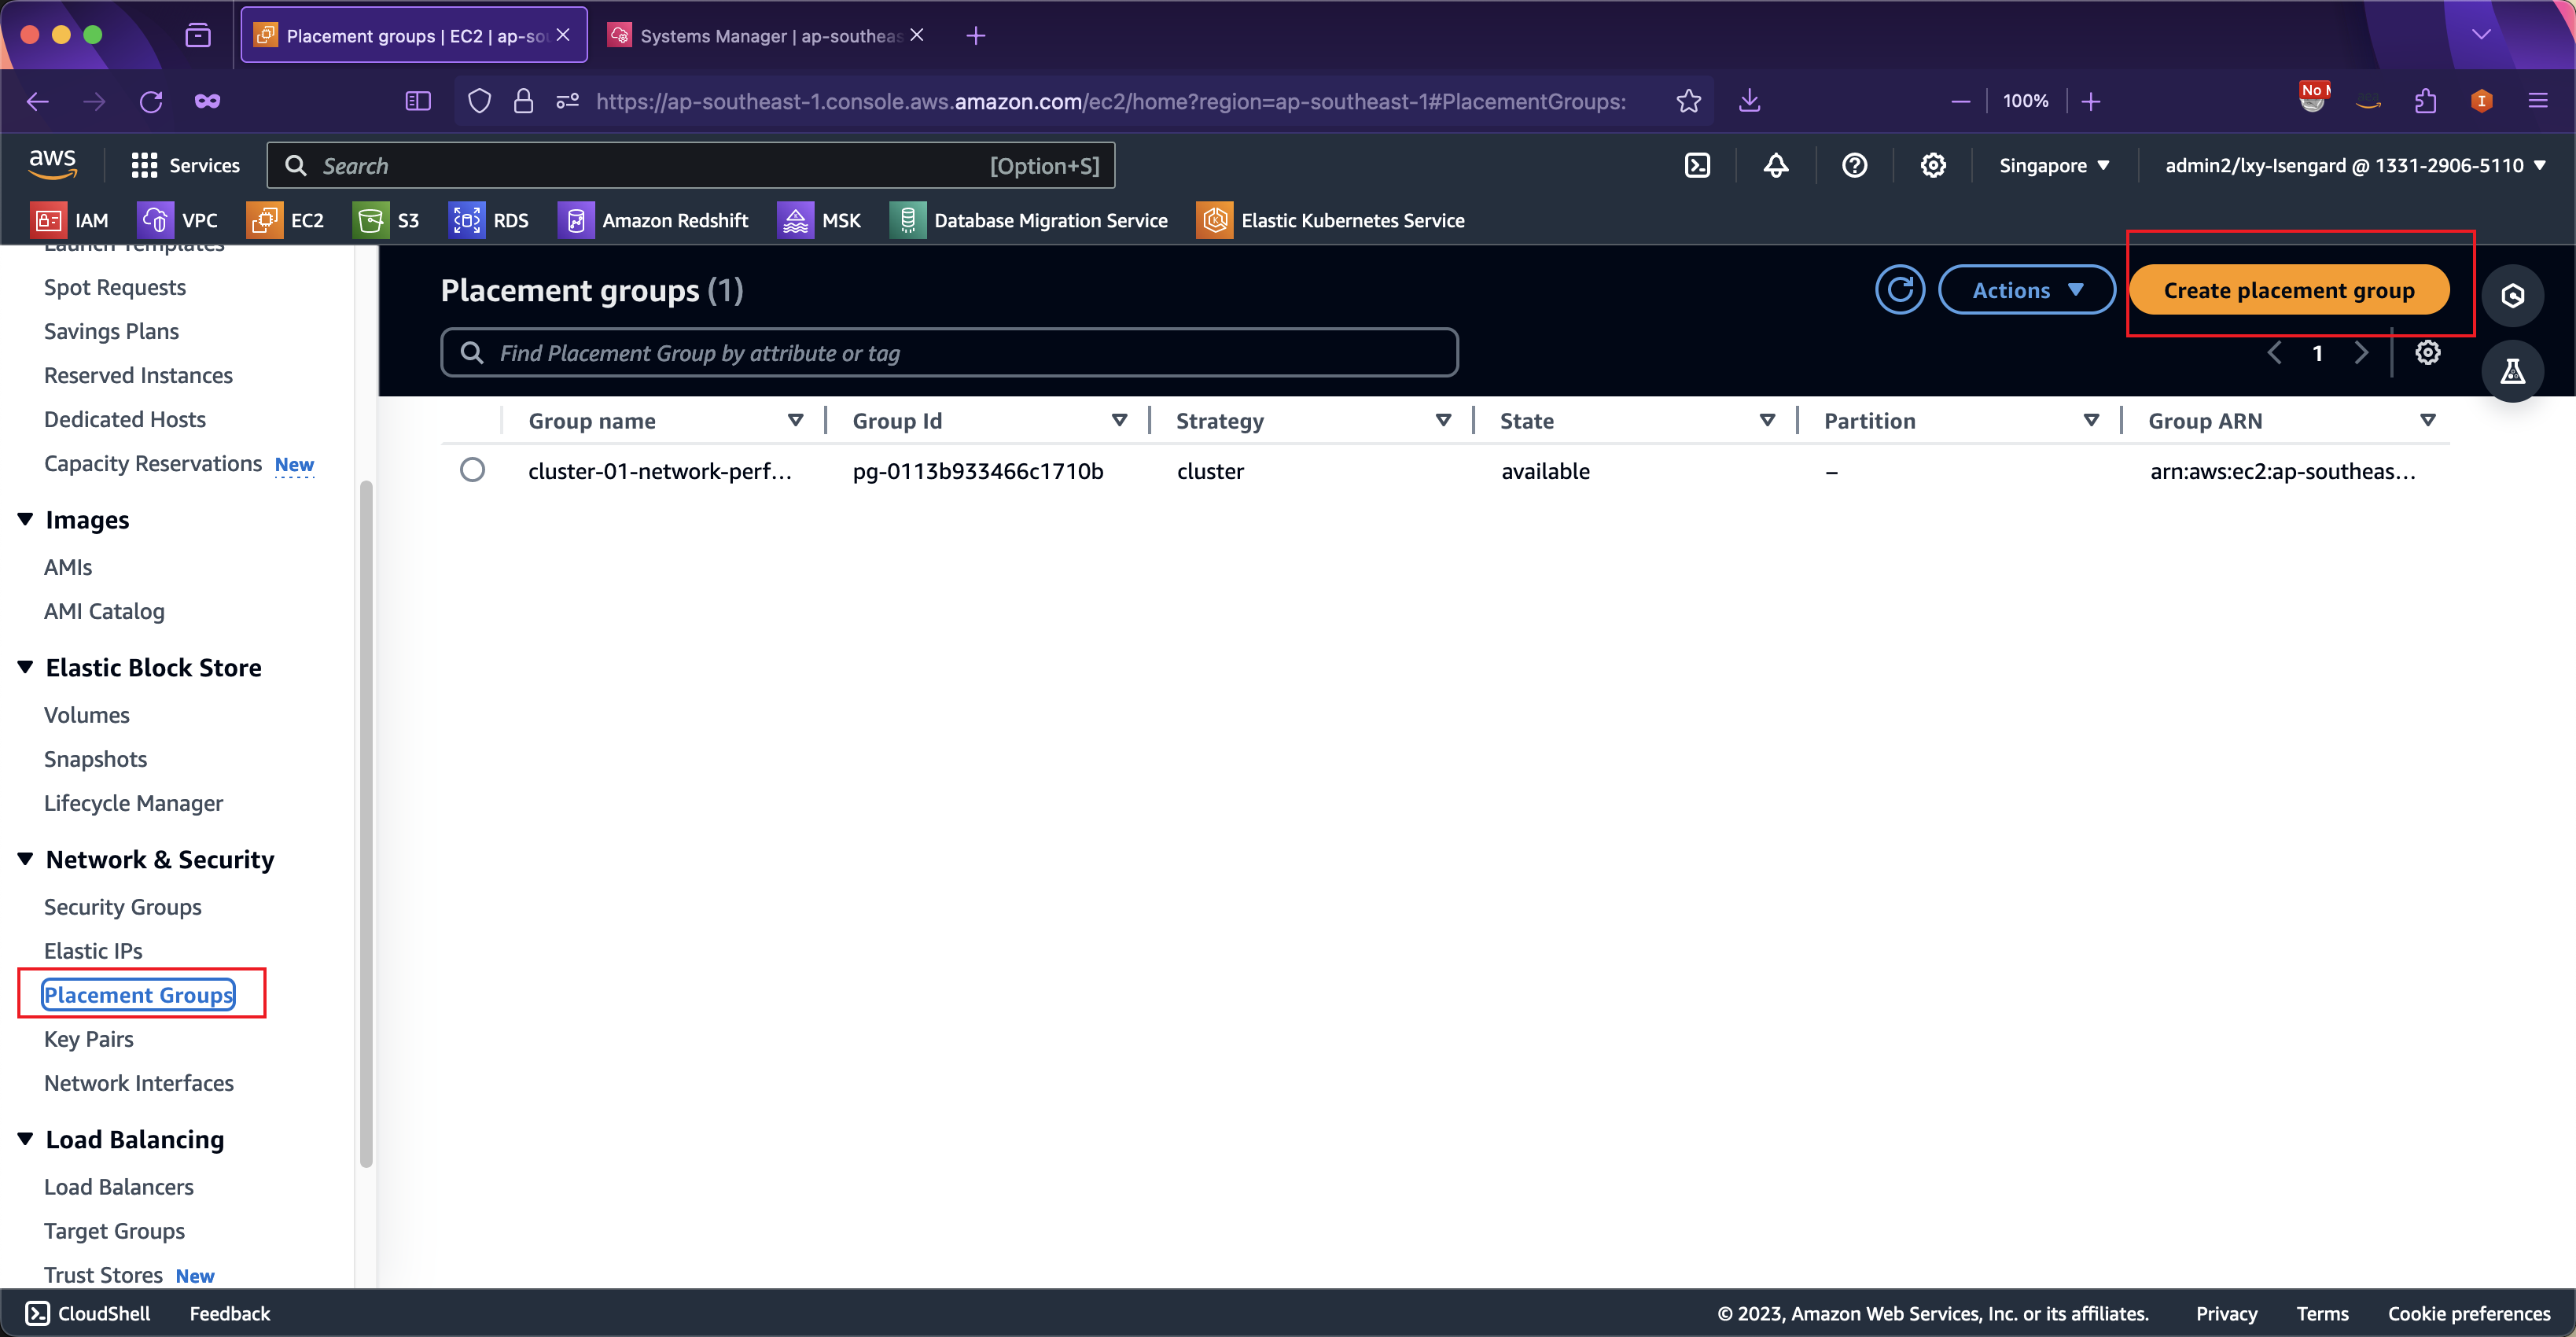
进入EC2服务界面,从左侧找到Placement Groups,点击创建新的。如下截图。
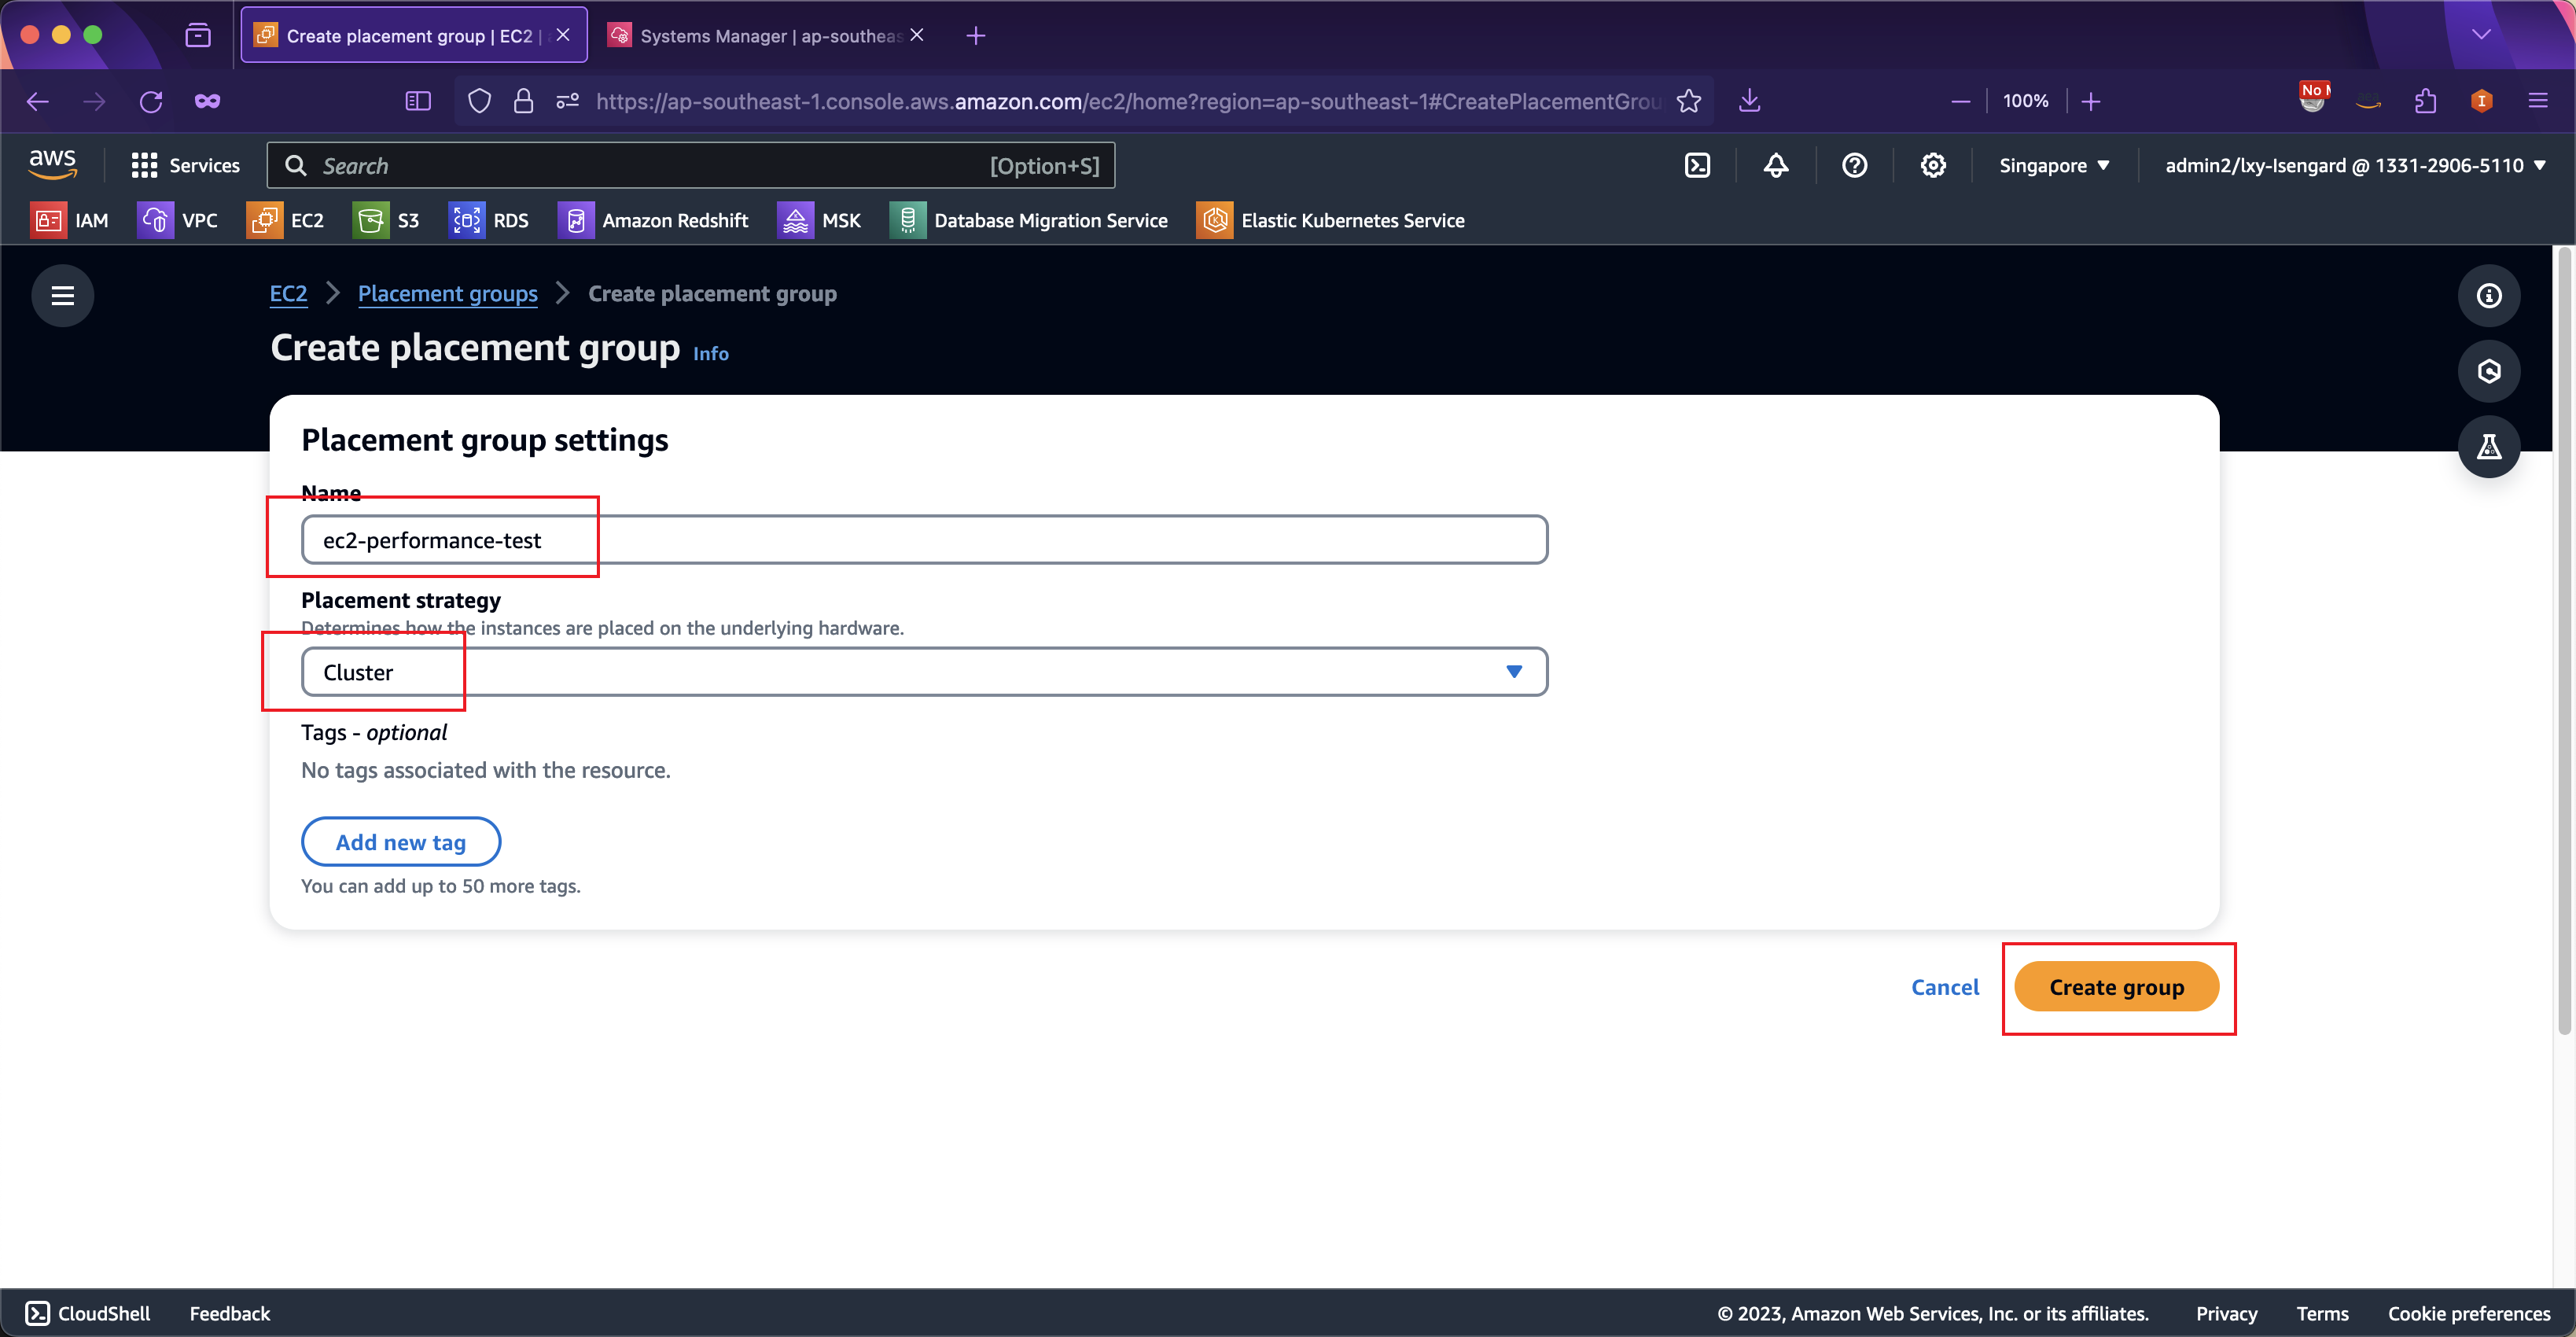
在创建界面,输入名称,然后选择类型是Cluster,这表示这一组EC2会在地理位置上聚集和接近。如下截图。
2、创建EC2并使用放置组
创建EC2时候,注意两点。一是使用放置组,让两个EC2尽可能接近;二是对安全规则组配置相互信任访问。
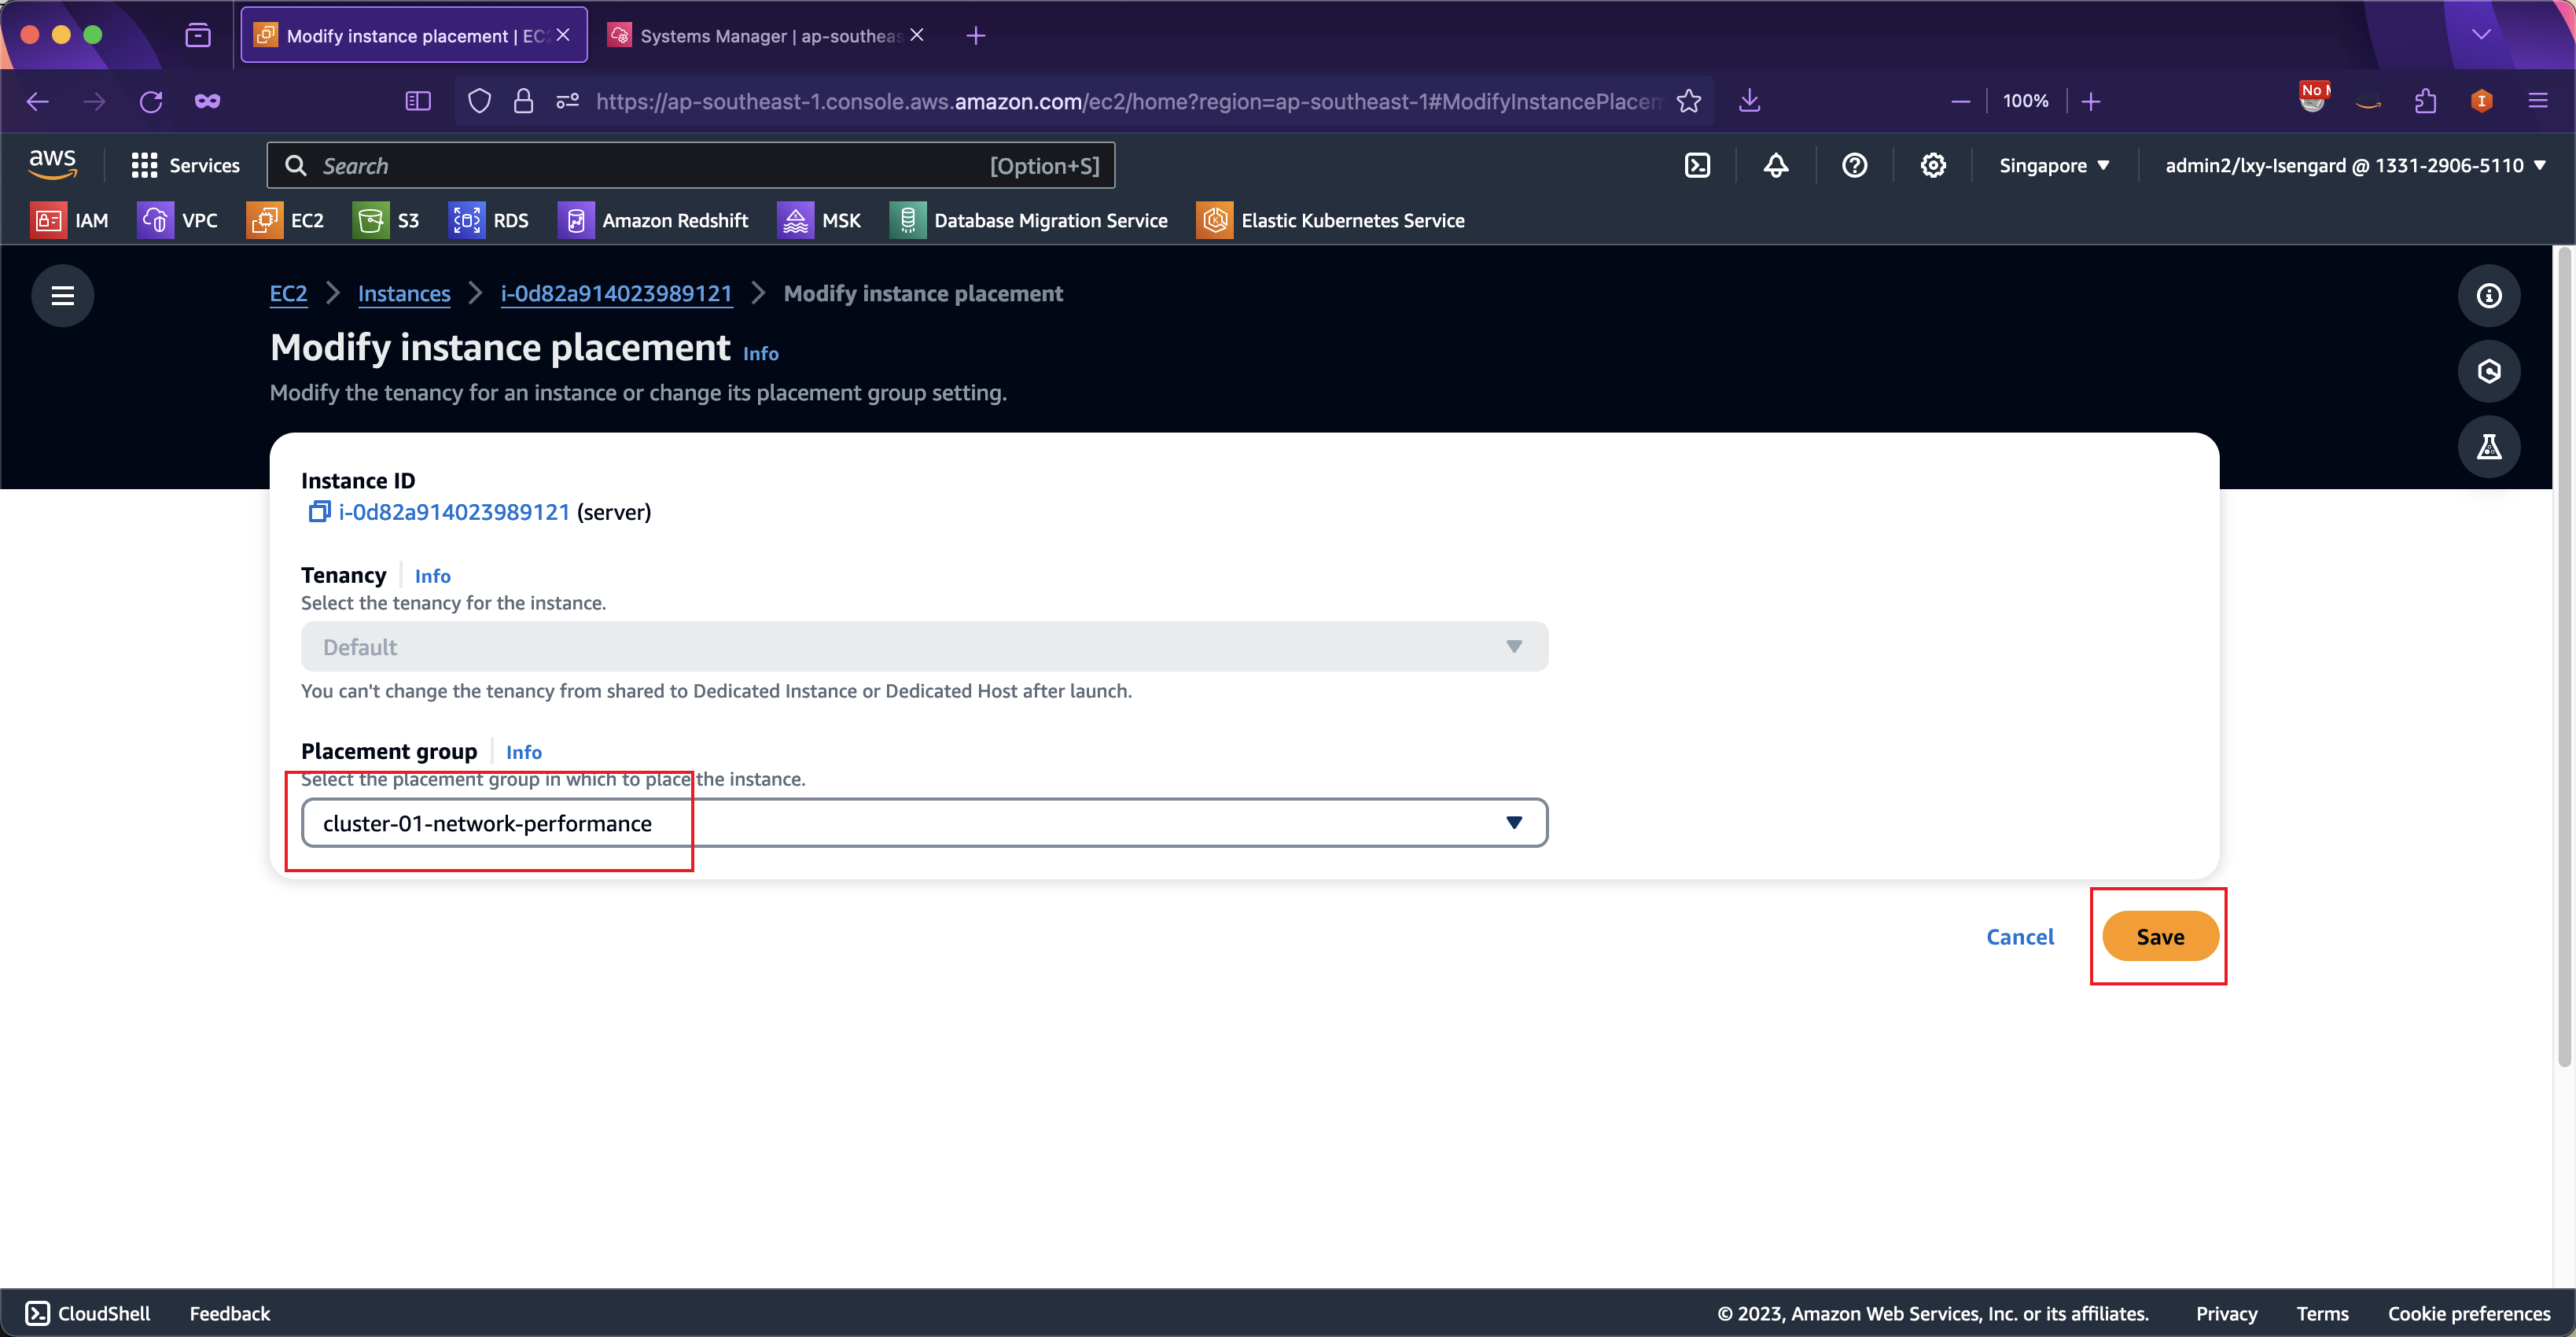
关于放置组,如果在创建EC2时候高级选项中没有指定放置组,那么后期也可以对已经创建好的EC2修改放置组。修改放置组需要事先关闭EC2(Shutdown)。在关闭EC2后,可以通过实例设置菜单,修改其放置组。如下截图。
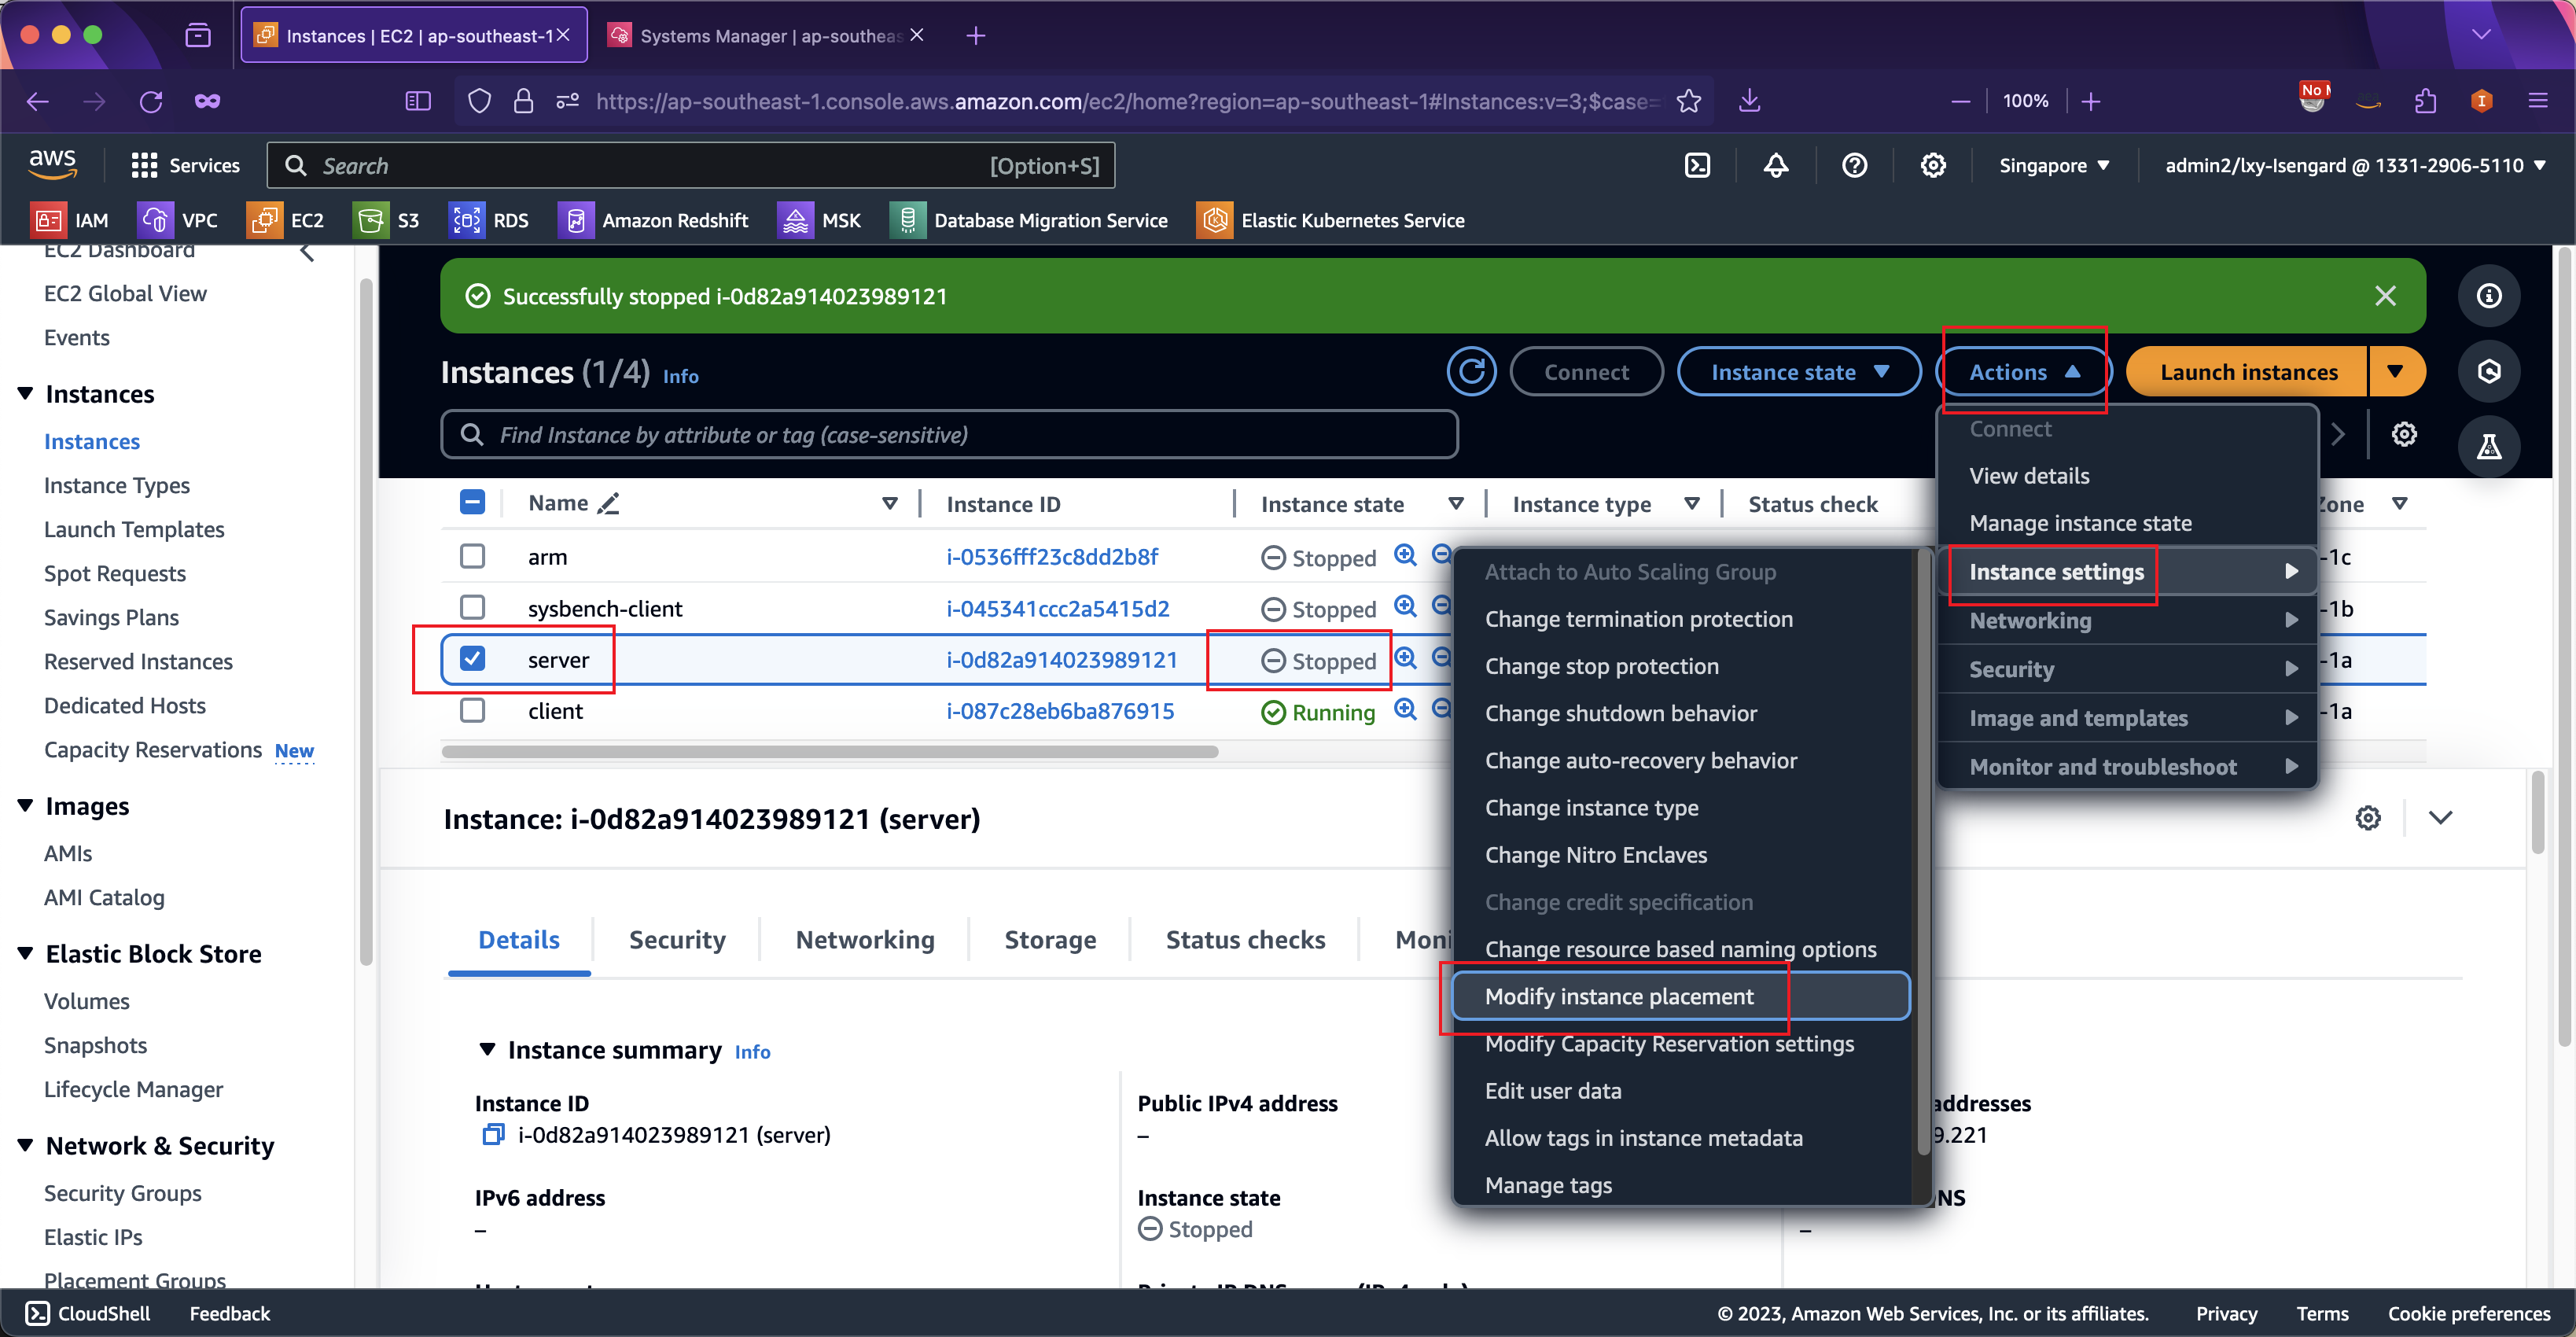
将客户端和服务器端两个EC2都修改为同一个放置组。然后点击保存按钮。如下截图。
修改放置组完毕,启动EC2。
3、关于安全规则组
关于安全规则组,确保服务器和客户端二者互相授权,允许客户端访问服务器端的TCP和UDP协议的所有端口。这是由于iperf调用的端口较多,虽然可以通过-p参数指定端口,但是相对麻烦。这里推荐将两个EC2绑定同一个安全规则组,然后在这个安全规则组中加入一条规则,允许所有流量访问并限定来源是本安全组。这样即可允许绑定这个安全组的两个机器之间完全互信。
4、安装iperf2
在服务器端和客户端两个EC2上,都安装iperf软件包。
### Graviton机型安装包
wget https://blogimg.bitipcman.com/workshop/EC2-iperf2/iperf-2.1.9-1.amzn2023.aarch64.rpm

### x86_64机型安装包
# wget https://blogimg.bitipcman.com/workshop/EC2-iperf2/iperf-2.1.9-1.amzn2023.x86_64.rpm

# 本文以ARM机型为例
rpm -ivh iperf-2.1.9-1.amzn2023.aarch64.rpm
三、发起测试
1、Server服务器启动
在扮演服务器端的EC2上启动后台进程:
iperf -s
2、Client客户端启动
在扮演客户端的EC2上生成压力:
iperf -c 172.31.49.221 --parallel 32 -i 1
在上述命令中,--parallel 32表示32线程,与本机具有32个vCPU相对应,-i 1表示每条打印一条压力测试情况。在不添加其他参数的情况下,压力默认使用tcp协议发起,持续时间10秒。
返回结果如下:
------------------------------------------------------------
Client connecting to 172.31.49.221, TCP port 5001
TCP window size: 20.0 KByte (default)
------------------------------------------------------------
[ 13] local 172.31.50.193 port 51678 connected with 172.31.49.221 port 5001 (icwnd/mss/irtt=87/8949/187)
[ 18] local 172.31.50.193 port 51680 connected with 172.31.49.221 port 5001 (icwnd/mss/irtt=87/8949/202)
[ 14] local 172.31.50.193 port 51720 connected with 172.31.49.221 port 5001 (icwnd/mss/irtt=87/8949/248)
[ 20] local 172.31.50.193 port 51898 connected with 172.31.49.221 port 5001 (icwnd/mss/irtt=87/8949/195)
[ 21] local 172.31.50.193 port 51804 connected with 172.31.49.221 port 5001 (icwnd/mss/irtt=87/8949/191)
[ 17] local 172.31.50.193 port 51664 connected with 172.31.49.221 port 5001 (icwnd/mss/irtt=87/8949/225)
[  7] local 172.31.50.193 port 51684 connected with 172.31.49.221 port 5001 (icwnd/mss/irtt=87/8949/218)
[  2] local 172.31.50.193 port 51682 connected with 172.31.49.221 port 5001 (icwnd/mss/irtt=87/8949/223)
[ 11] local 172.31.50.193 port 51686 connected with 172.31.49.221 port 5001 (icwnd/mss/irtt=87/8949/230)
[  3] local 172.31.50.193 port 51670 connected with 172.31.49.221 port 5001 (icwnd/mss/irtt=87/8949/224)
[  8] local 172.31.50.193 port 51712 connected with 172.31.49.221 port 5001 (icwnd/mss/irtt=87/8949/215)
[ 23] local 172.31.50.193 port 51922 connected with 172.31.49.221 port 5001 (icwnd/mss/irtt=87/8949/99)
[  5] local 172.31.50.193 port 51666 connected with 172.31.49.221 port 5001 (icwnd/mss/irtt=87/8949/248)
[ 15] local 172.31.50.193 port 51722 connected with 172.31.49.221 port 5001 (icwnd/mss/irtt=87/8949/240)
[ 25] local 172.31.50.193 port 51928 connected with 172.31.49.221 port 5001 (icwnd/mss/irtt=87/8949/102)
[ 31] local 172.31.50.193 port 52004 connected with 172.31.49.221 port 5001 (icwnd/mss/irtt=87/8949/79)
[ 30] local 172.31.50.193 port 51990 connected with 172.31.49.221 port 5001 (icwnd/mss/irtt=87/8949/72)
[ 29] local 172.31.50.193 port 51976 connected with 172.31.49.221 port 5001 (icwnd/mss/irtt=87/8949/68)
[ 16] local 172.31.50.193 port 51668 connected with 172.31.49.221 port 5001 (icwnd/mss/irtt=87/8949/201)
[ 10] local 172.31.50.193 port 51662 connected with 172.31.49.221 port 5001 (icwnd/mss/irtt=87/8949/217)
[ 26] local 172.31.50.193 port 51934 connected with 172.31.49.221 port 5001 (icwnd/mss/irtt=87/8949/104)
[ 24] local 172.31.50.193 port 51910 connected with 172.31.49.221 port 5001 (icwnd/mss/irtt=87/8949/117)
[ 32] local 172.31.50.193 port 52008 connected with 172.31.49.221 port 5001 (icwnd/mss/irtt=87/8949/93)
[  1] local 172.31.50.193 port 51714 connected with 172.31.49.221 port 5001 (icwnd/mss/irtt=87/8949/250)
[ 28] local 172.31.50.193 port 51960 connected with 172.31.49.221 port 5001 (icwnd/mss/irtt=87/8949/71)
[ 12] local 172.31.50.193 port 51676 connected with 172.31.49.221 port 5001 (icwnd/mss/irtt=87/8949/203)
[ 19] local 172.31.50.193 port 51698 connected with 172.31.49.221 port 5001 (icwnd/mss/irtt=87/8949/230)
[  9] local 172.31.50.193 port 51724 connected with 172.31.49.221 port 5001 (icwnd/mss/irtt=87/8949/218)
[  4] local 172.31.50.193 port 51672 connected with 172.31.49.221 port 5001 (icwnd/mss/irtt=87/8949/205)
[  6] local 172.31.50.193 port 51674 connected with 172.31.49.221 port 5001 (icwnd/mss/irtt=87/8949/223)
[ 22] local 172.31.50.193 port 51846 connected with 172.31.49.221 port 5001 (icwnd/mss/irtt=87/8949/185)
[ 27] local 172.31.50.193 port 51948 connected with 172.31.49.221 port 5001 (icwnd/mss/irtt=87/8949/100)
[ ID] Interval       Transfer     Bandwidth

....(中间省略若干行)

[ 25] 0.00-10.02 sec  3.70 GBytes  3.18 Gbits/sec
[ 29] 0.00-10.02 sec   961 MBytes   804 Mbits/sec
[ 22] 0.00-10.02 sec  1.01 GBytes   867 Mbits/sec
[  8] 0.00-10.02 sec   806 MBytes   675 Mbits/sec
[ 17] 0.00-10.02 sec  2.53 GBytes  2.17 Gbits/sec
[ 24] 0.00-10.02 sec  2.33 GBytes  2.00 Gbits/sec
[  6] 0.00-10.02 sec   781 MBytes   653 Mbits/sec
[  2] 10.00-11.02 sec   128 KBytes  1.03 Mbits/sec
[  2] 0.00-11.02 sec  1.01 GBytes   788 Mbits/sec
[ 12] 10.00-11.02 sec   128 KBytes  1.03 Mbits/sec
[ 12] 0.00-11.02 sec  1.20 GBytes   933 Mbits/sec
[SUM] 0.00-10.00 sec  57.8 GBytes  49.7 Gbits/sec
从返回结果最后一条可以看到,在默认10秒内(约10秒),一共传输了57.8 GBytes的数据,速度是49.7 Gbits/sec,这个速度与本机型c6gn.8xlarge,32vCPU/64GB内存所标称的50Gbps内网带宽基本是相符的。
四、结论
通过以上测试,可以看出iperf2多线程参数基本达到标称性能。
另外,如果测试施压的EC2机型的,其带宽在50Gbps或者更低,例如c6gn.8xlarge机型(32vCPU/64GB,50Gbps带宽),即便不使用放置组功能,网络吞吐测试一样可以跑满50Gbps。对于网卡更高规格的机型,建议实际
关于iperf3版本使用多线程指定CPU内核的操作方式,本文不在赘述,请参考本文末尾的相关链接。
五、附录:在从Source RPM构建RPM的方法(可选)
本文测试使用已经构建好的RPM二进制包,可直接使用。如果希望从零构建,那么方法如下:
yum groupinstall "Development Tools" -y
wget https://blogimg.bitipcman.com/workshop/EC2-iperf2/iperf-2.1.9-1.fc38.src.rpm
rpm -ivh iperf-2.1.9-1.fc38.src.rpm
cd /root/rpmbuild/SPECS
rpmbuild -ba iperf.spec
由此即可在/root/rpmbuild/RPMS/x86_64/目录下获得二进制包,在/root/rpmbuild/SRPMS目录下获得本系统的原始Source RPM包。
六、参考文档
EC2网络性能
https://docs.aws.amazon.com/AWSEC2/latest/UserGuide/ec2-instance-network-bandwidth.html
如何在同一 Amazon VPC 中的 Amazon EC2 Linux 实例之间进行网络吞吐量基准测试?
https://repost.aws/zh-Hans/knowledge-center/network-throughput-benchmark-linux-ec2
Extra Packages for Enterprise Linux (EPEL)
https://docs.aws.amazon.com/linux/al2023/ug/compare-with-al2.html#epel
iperf2 / iperf3 参数对比(英文)
https://fasterdata.es.net/performance-testing/network-troubleshooting-tools/iperf/
iperf2的RPM和Source RPM软件包下载
https://rpmfind.net/linux/RPM/fedora/38/x8664/i/iperf-2.1.9-1.fc38.x8664.html
最后修改于 2023-12-09