Bedrock Agentcore 入手 (一) 之Code Interpreter代码沙箱
本文介绍Bedrock AgentCore的Code Interpreter沙盒功能,展示如何创建Public类型沙盒解决大模型应用中代码执行隔离和外部资源访问的挑战,包含实战代码示例和计费说明。
一、背景
Bedrock AgentCore是AWS推出的服务于大模型和智能体应用的一组工具的集合。在构建智能体过程中,遇到了调用外部资源需要沙盒、托管MCP Server、托管智能体、长时间对话记录保存等多种挑战,通过各种技术栈手工搭建固然可以实现,但开发周期、实现成本、维护难度较高。由此可使用Bedrock AgentCore的一系列组建来解决这些挑战。AgentCore主要包括的套件如下。
Agent功能开发:
- AgentCore Code Interpreter:在沙盒中运行代码,底层由MicroVM技术FireCracker支持;
- AgentCore Browse:提供浏览器交互;
- AgentCore Memory:提供多轮对话记忆和可在会话间共享的长时记忆;
- AgentCore Gateway:为智能体提供兼容的API服务;
Agent部署:
- AgentCore Runtime:无服务器的运行时,可支持多种对话开源框架包括LangGraph、CrewAI和Strands Agent等,为他们提供运行环境、快速冷启动、会话隔离、认证等功能;
- AgentCore Identity:身份认证;
Agent监控:
- AgentCore Observability:可观察性相关功能。
在以上功能中,使用场景比较广泛的主要是沙盒、运行时等功能,可以用于开发自己的MCP Server,并允许MCP Server使用沙盒安全的访问外部网络获取资源;开发完毕的Agent又可以托管在AgentCore上,形成一整个闭环。
在开发过程中,Bedrock AgentCore的调用可使用HTTPS形式的API调用,或者使用AWS SDK(如Python的Boto3)、或者使用AgentCore自己的SDK,以及使用Strands Agents SDK。本文以Strands Agents SDK为例,辅以AWS SDK进行额外配置来展示例子。
下面介绍其中几个关键服务的使用。
二、Code Interpreter介绍
1、Code Interpreter介绍
Code interpreter有三种类型,分别是:
- Sandbox:私密的黑盒,有限的权限和加密的环境下运行程序(没有网络)
- Public:有访问外部网络的权限,可以从外部互联网获取资源
- VPC:接入特定VPC环境,获取VPC内资源
Code interpreter可以在AWS Bedrock AgentCore服务的图形页面上创建,也可以使用AWS SDK的API创建。创建完毕后会获取到沙盒的ID,将这个ID提供给Agent智能体调用。Bedrock AgentCore提供了一个默认存在的Code interpreter沙盒,类型是Sandbox,代号是aws.codeinterpreter.v1。这个沙盒无须创建即可使用,但是不支持对这个沙盒配置修改,也不能删除。
本实验后续需要安装Python相关依赖库。
uv init agentcore-demo
cd agentcore-demo
uv venv
source .venv/bin/activate
uv add strands-agents strands-agents-tools bedrock-agentcore bedrock-agentcore-starter-toolkit boto3 ddgs mcp playwright
虚拟环境准备完毕。
2、使用AgentCore默认的Sandbox类型的沙盒例子
根据上一章节介绍的三种类型的沙盒,本章节演示第一种完全隔离的Sandbox方式的使用。注意:当前不接入任何Agent,只是运行一个沙盒。准备如下一段代码,将其保存为default-sandbox.py。代码如下。
from bedrock_agentcore.tools.code_interpreter_client import CodeInterpreter
import json

region='us-west-2'

# Configure and Start the code interpreter session
code_client = CodeInterpreter(region)
code_client.start()

# Execute the hello world code
response = code_client.invoke("executeCode", {
    "language": "python",
    "code": 'print("Hello World!!!")'
})

# Process and print the response
for event in response["stream"]:
    print(json.dumps(event["result"], indent=2))

# Clean up and stop the code interpreter session
code_client.stop()
执行这段代码:
uv run default-sandbox.py
返回结果如下:
{
  "content": [
    {
      "type": "text",
      "text": "Hello World!!!"
    }
  ],
  "structuredContent": {
    "stdout": "Hello World!!!",
    "stderr": "",
    "exitCode": 0,
    "executionTime": 0.011064529418945312
  },
  "isError": false
}
可看到Python程序正常执行。由于本实验目的是从外部网络获取信息,因此默认的Sandbox不满足需求,还需要创建Public类型的沙盒。
三、创建Public类型的沙盒并从外部获取信息
1、创建类型为Public的沙盒
Bedrock AgentCore默认存在的Code interpreter沙盒是Sandbox类型,是没有外部网络访问权限的。因此对于要抓取外部网络信息的场景,需要创建新的沙盒。创建沙盒的命令需要使用AWS SDK调用API,这里构建程序create-code-Interpreter.py。代码如下。
import boto3

region="us-west-2"

# Initialize the boto3 client
cp_client = boto3.client(
    'bedrock-agentcore-control',
    region_name=region,
    endpoint_url="https://bedrock-agentcore-control."+region+".amazonaws.com"
)

# Create a Code Interpreter
response = cp_client.create_code_interpreter(
    name="myTestSandbox1",
    description="Test code sandbox for development",
    # executionRoleArn="arn:aws:iam::123456789012:role/my-execution-role", # 可选,这里不调用其他AWS服务的话可以不配置IAM Role
    networkConfiguration={
        "networkMode": "PUBLIC"
    }
)

# Print the Code Interpreter ID
code_interpreter_id = response["codeInterpreterId"]
print(f"Code Interpreter ID: {code_interpreter_id}")
运行后返回结果如下:
Code Interpreter ID: myTestSandbox1-VbMl9Hi8I4
则表示创建成功。此时通过Bedrock的AgentCore控制台图形界面上,在Build Tools里边也可以看到这个沙盒的ID了。记住这个ID,下一步要继续调用。
2、为沙盒创建Session
Session的作用是在一个沙盒启动后会保留一段时间,比如某个程序从外部获取资源时候,需要比较长的时间下载外部资源或者请求API;或者是一条命令执行完毕,还需要连续执行多个命令,此时可输入相同的Session ID继续操作。Session一但到期,就会自动关闭,数据也会清空。一个沙盒可创建多个Session供业务并发调用,因此在上一步创建好的沙盒ID加载到代码中,在创建Session时候不需要自己命令Session ID规则,而是Bedrock AgentCore会自动为Session分配唯一的ID。
接下来为这个沙盒创建运行Session。将如下内容保存为create-session.py。
import boto3

region="us-west-2"

# 输入上一步创建沙盒的ID
codetool_id = "myTestSandbox1-VbMl9Hi8I4"

# Initialize the boto3 client
dp_client = boto3.client(
    'bedrock-agentcore',
    region_name=region,
    endpoint_url="https://bedrock-agentcore."+region+".amazonaws.com"
)

# Start a Code Interpreter session
response = dp_client.start_code_interpreter_session(
    codeInterpreterIdentifier=codetool_id,
    name="mysandbox-session-01",
    sessionTimeoutSeconds=600
)

# Print the session ID
session_id = response["sessionId"]
print(f"Session created: {session_id}")
在以上代码中,设定了Session的超时时间是600秒,超时的话会沙盒会关闭,需要重新启动。执行uv run create-session.py。运行后返回Session ID如下。
Session created: 01K71KR8C71VPQFKFZX3RRA1J3
记录下这个Session ID,下一步将要使用。
3、使用AWS控制台图形界面查看沙盒id和Session ID
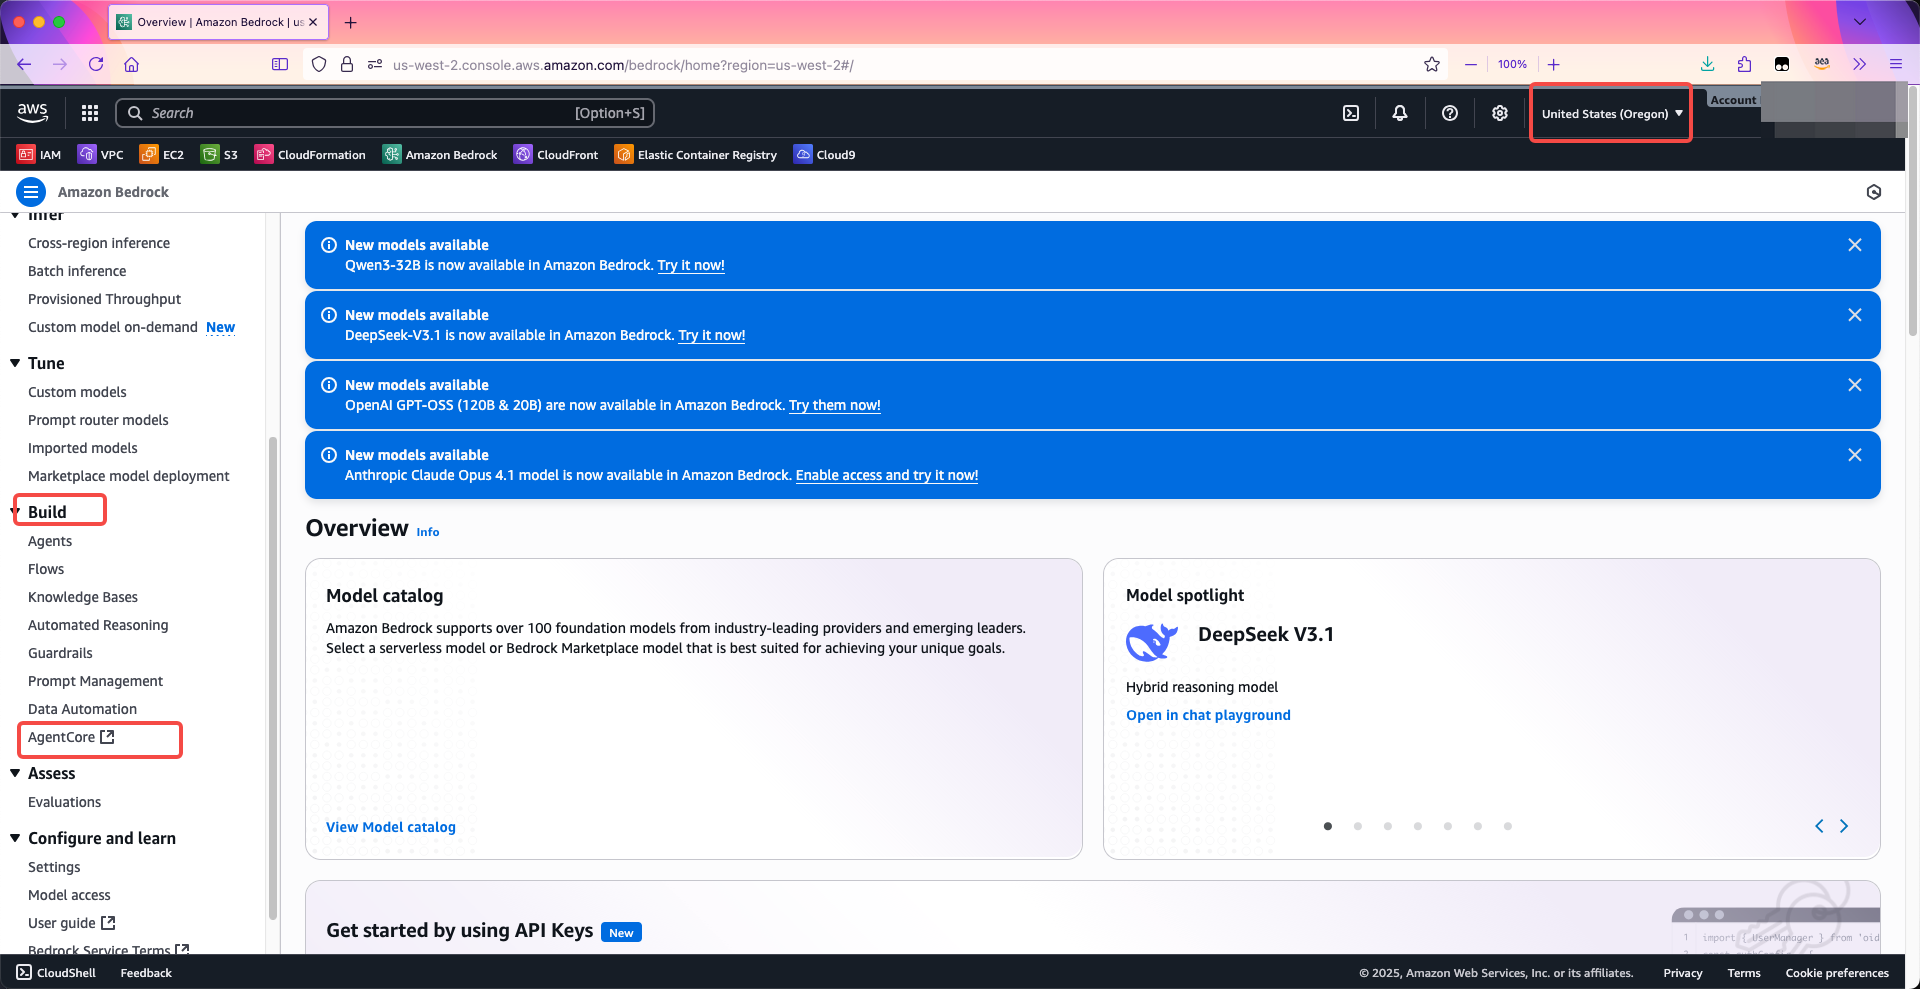
登陆到AWS控制台,切换到要操作的Region,进入Bedrock服务,从左侧Build菜单下可找到AgentCore的链接,点击进入。如下截图。
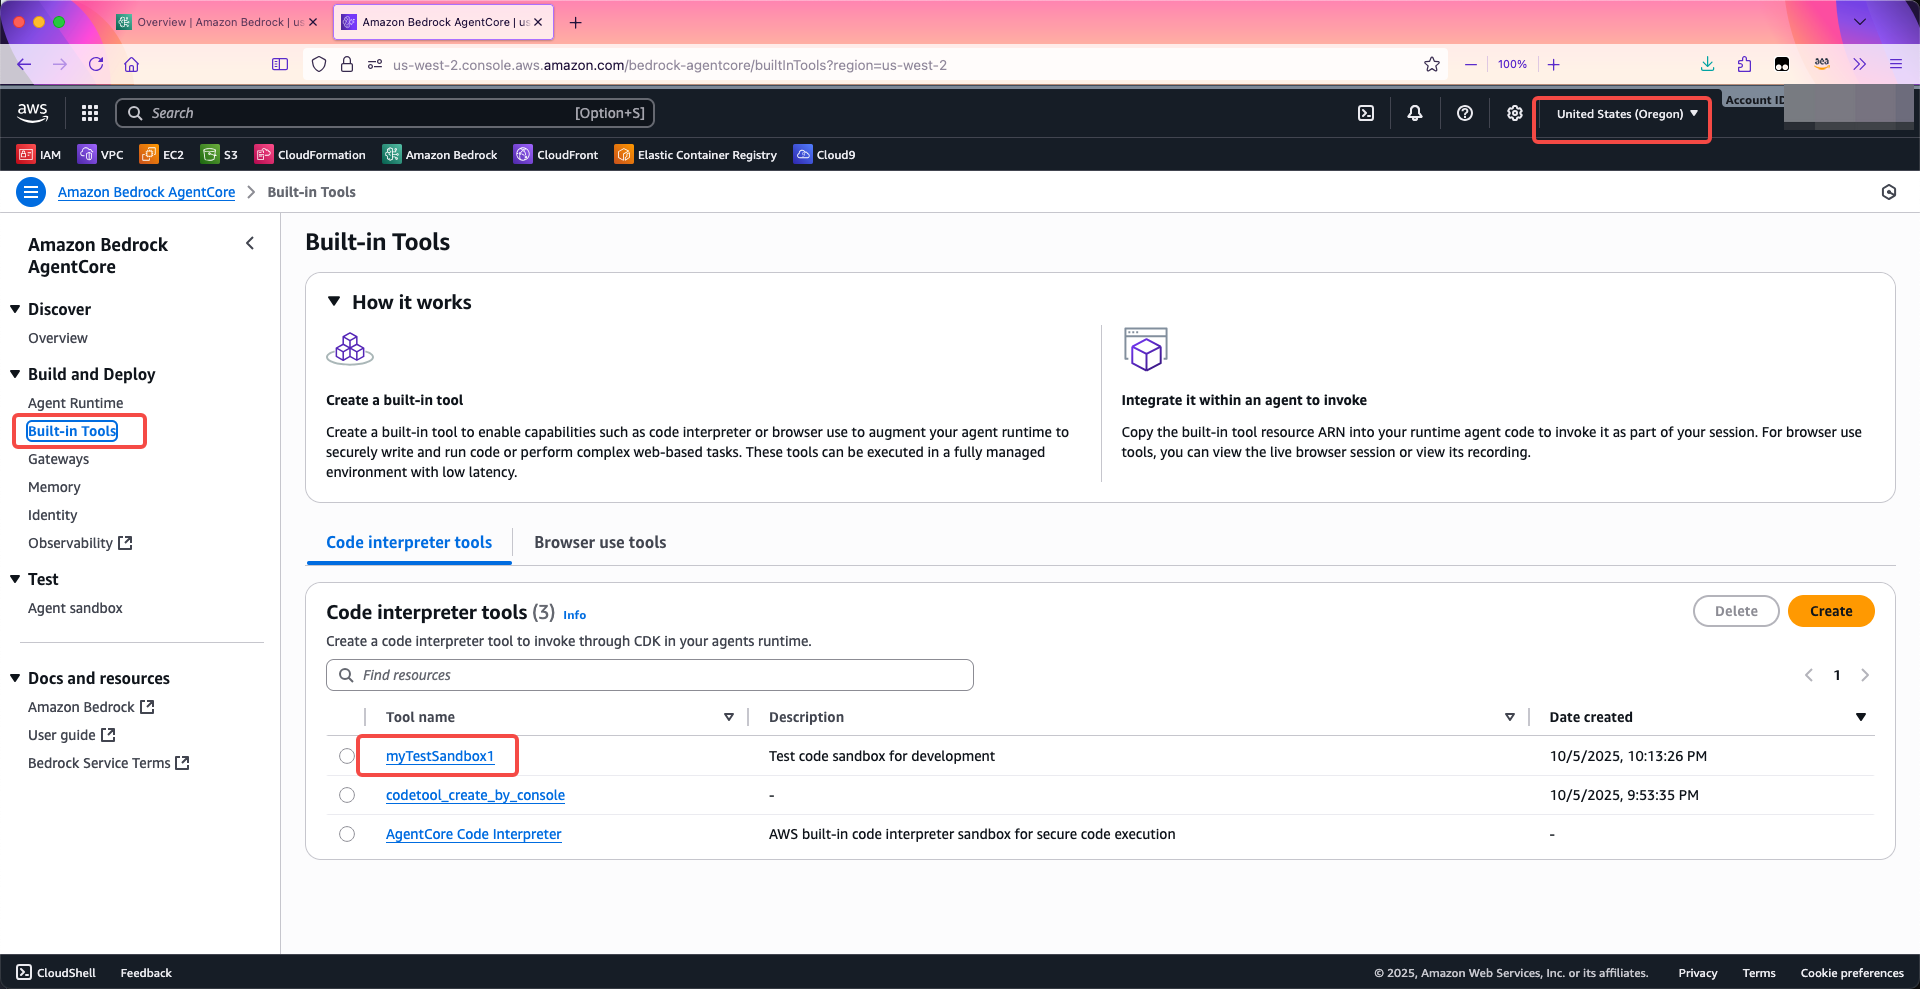
在新打开的AgentCore控制台中,从左侧菜单找到Build-In Tools的按钮,点击进入。在右侧可以找到第一个标签页Code interpreter tools,点击对应的沙盒名字进入查看详情。如下截图。
在沙盒详情界面,中间可以看到是沙盒ID,下方可以看到是Session ID。如果是活跃的Session,右侧还有一个Terminate按钮可以终止正在活跃状态的沙盒。
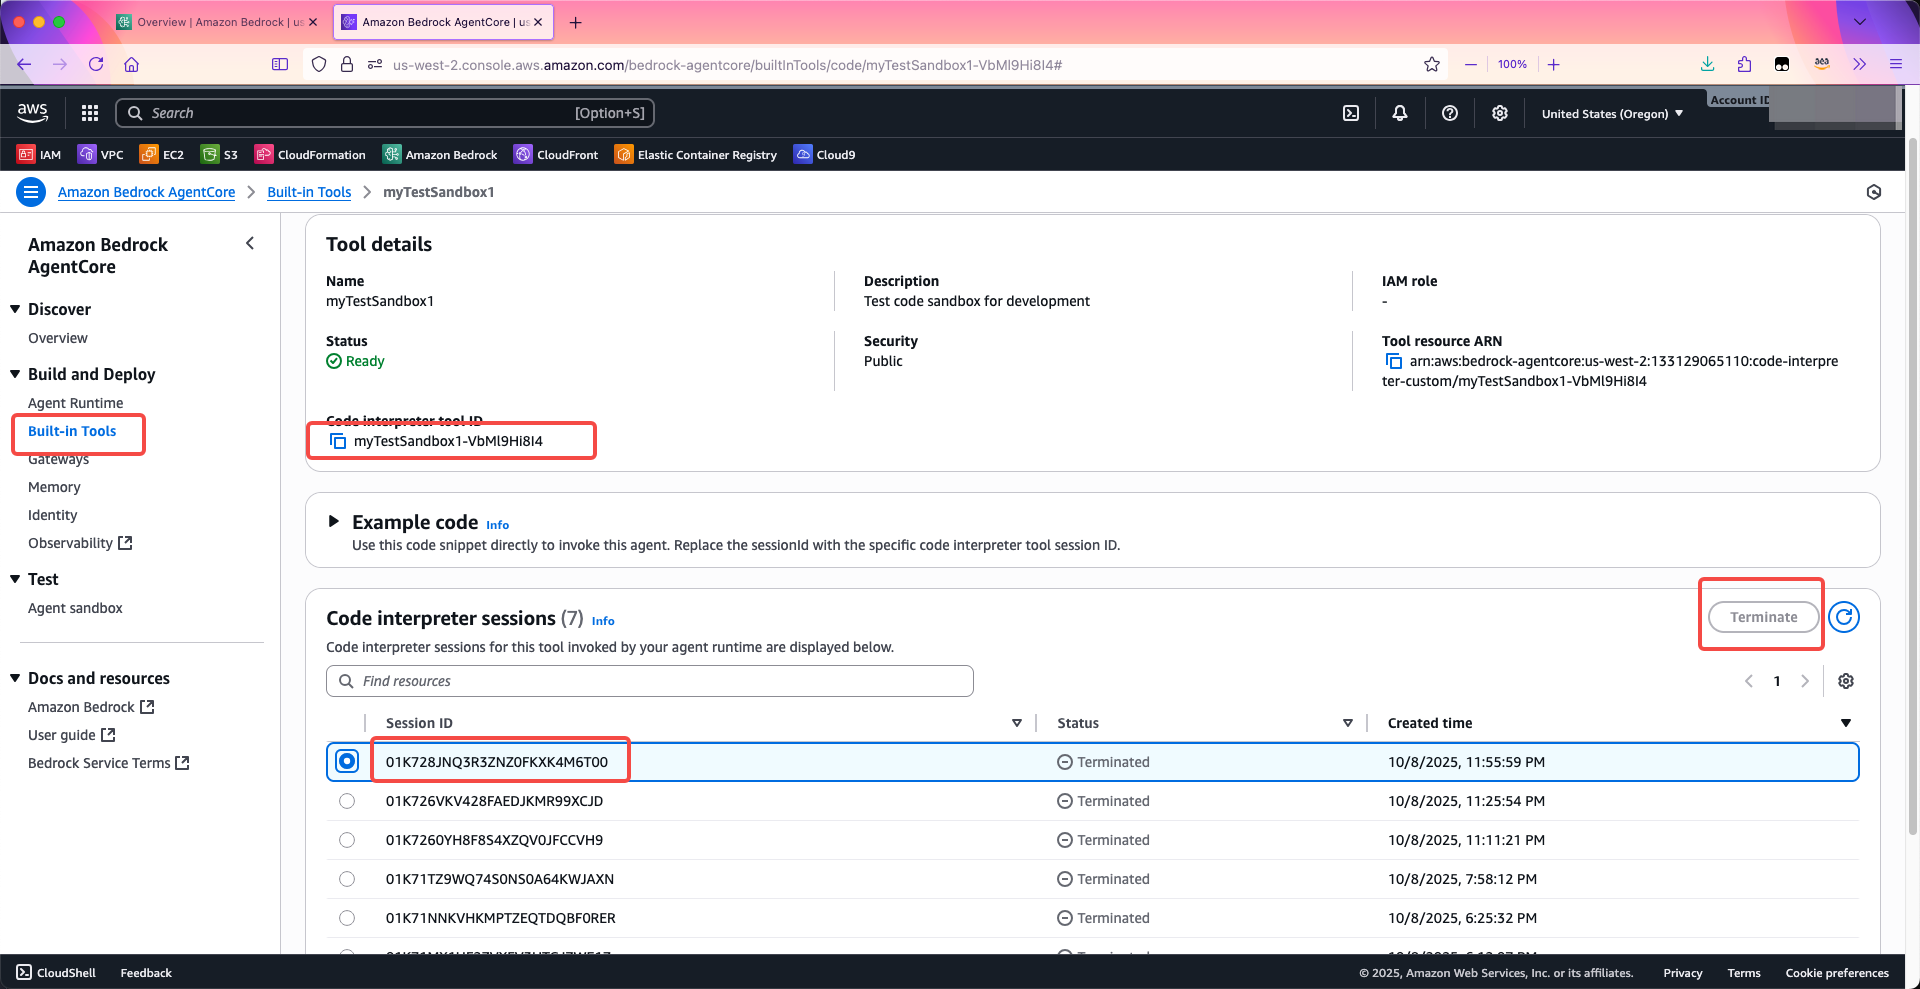
图形控制台界面仅为展示,现在回到脚本和代码继续。
4、使用AWSCLI获取Session ID
上一步创建的Session可以使用AWS Bedrock AgentCore的图形控制台查看,这需要登陆AWS网页界面。另外也可以使用AWSCLI或者API查看。例如使用如下CLI命令:
aws bedrock-agentcore \
  list-code-interpreter-sessions \
  --code-interpreter-identifier myTestSandbox1-VbMl9Hi8I4
执行后显示结果如下,其中状态是TERMINATED就是因为Session超时了自动关闭的。现在我们选择一个状态是READY的,继续执行命令。
{
    "items": [
        {
            "codeInterpreterIdentifier": "myTestSandbox1-VbMl9Hi8I4",
            "sessionId": "01K71KR8C71VPQFKFZX3RRA1J3",
            "name": "mysandbox-session-01",
            "status": "TERMINATED",
            "createdAt": "2025-10-08T09:52:01.900094+00:00",
            "lastUpdatedAt": "2025-10-08T09:52:01.900094+00:00"
        },
        {
            "codeInterpreterIdentifier": "myTestSandbox1-VbMl9Hi8I4",
            "sessionId": "01K71MX1HF2ZVXFV3HTGJZWE1Z",
            "name": "mysandbox-session-01",
            "status": "READY",
            "createdAt": "2025-10-08T10:12:07.312044+00:00",
            "lastUpdatedAt": "2025-10-08T10:12:07.312044+00:00"
        }
    ]
}
(END)
如果希望只显示处于READY状态的,那么就可以增加jq命令来过滤输出结果。
aws bedrock-agentcore \
  list-code-interpreter-sessions \
  --code-interpreter-identifier myTestSandbox1-VbMl9Hi8I4 \
  | jq '{items: [.items[] | select(.status == "READY")]}'
5、调用沙盒执行Shell命令(以curl为例)
执行Shell命令的场景可能是用于系统配置,或者是直接用于外部资源调用。
从上一步获取到还没超时、处于READY状态的沙盒,将其ID代入到代码中,开始执行程序。构建如下程序,保存为run-curl.py,运行的shell以执行curl为例。
import boto3
import json
import re

region = "us-west-2"
sandbox_id = "myTestSandbox1-VbMl9Hi8I4"
session_id = "01K71TZ9WQ74S0NS0A64KWJAXN"
command_to_run = '''
curl -I https://blog.bitipcman.com/
'''

def format_http_response(text):
    """将转义的HTTP响应文本转换为人类可读格式"""
    # 解码Unicode转义字符
    decoded = text.encode().decode('unicode_escape')
    # 移除ANSI颜色代码
    ansi_escape = re.compile(r'\x1b\[[0-9;]*m')
    clean_text = ansi_escape.sub('', decoded)
    # 替换\r\r\n为换行符
    formatted = clean_text.replace('\r\r\n', '\n')
    return formatted

client = boto3.client('bedrock-agentcore', region_name=region)
response = client.invoke_code_interpreter(
    codeInterpreterIdentifier=sandbox_id,
    sessionId=session_id,
    name='executeCommand',
    arguments={
        'command': command_to_run
    }
)

for event in response["stream"]:
    result = event["result"]
    # 检查content数组中的text
    if "content" in result:
        for content_item in result["content"]:
            if content_item.get("type") == "text" and "HTTP/" in content_item.get("text", ""):
                formatted_text = format_http_response(content_item["text"])
                print("格式化后的输出:")
                print(formatted_text)
                print("\n原始输出:")
                print(json.dumps(result, indent=2))
在以上代码的开始部分,替换沙盒id、session id,然后执行,即可在具有public网络的沙盒中使用curl获取外部信息。由于CURL执行后会包含特殊字符,这里使用转换函数进行转换,以获得人类可以识别的结果。执行代码uv run run-curl.py,执行结果如下。
格式化后的输出:
HTTP/2 200
server: CloudFront
content-type: text/html
content-length: 34100
x-amz-replication-status: COMPLETED
last-modified: Mon, 29 Sep 2025 04:01:51 GMT
x-amz-server-side-encryption: AES256
x-amz-version-id: wShrjGXUPtNOGBYfodc26YSi1V954sVp
accept-ranges: bytes
date: Wed, 08 Oct 2025 10:27:55 GMT
x-cache: Hit from cloudfront
via: 1.1 93b50b5ce635a36621d7bd38d3b0d6da.cloudfront.net (CloudFront)
x-amz-cf-pop: HIO52-P4
x-amz-cf-id: vvP_od9rfQtdBsExlvJDHu3c0lP7CvUqCF1aCo8Su7JVb_-87JsGAw==
age: 5541

原始输出:
{
  "content": [
    {
      "type": "text",
      "text": "HTTP/2 200 \r\r\n\u001b[1mserver\u001b[0m: CloudFront\r\r\n\u001b[1mcontent-type\u001b[0m: text/html\r\r\n\u001b[1mcontent-length\u001b[0m: 34100\r\r\n\u001b[1mx-amz-replication-status\u001b[0m: COMPLETED\r\r\n\u001b[1mlast-modified\u001b[0m: Mon, 29 Sep 2025 04:01:51 GMT\r\r\n\u001b[1mx-amz-server-side-encryption\u001b[0m: AES256\r\r\n\u001b[1mx-amz-version-id\u001b[0m: wShrjGXUPtNOGBYfodc26YSi1V954sVp\r\r\n\u001b[1maccept-ranges\u001b[0m: bytes\r\r\n\u001b[1mdate\u001b[0m: Wed, 08 Oct 2025 10:27:55 GMT\r\r\n\u001b[1mx-cache\u001b[0m: Hit from cloudfront\r\r\n\u001b[1mvia\u001b[0m: 1.1 93b50b5ce635a36621d7bd38d3b0d6da.cloudfront.net (CloudFront)\r\r\n\u001b[1mx-amz-cf-pop\u001b[0m: HIO52-P4\r\r\n\u001b[1mx-amz-cf-id\u001b[0m: vvP_od9rfQtdBsExlvJDHu3c0lP7CvUqCF1aCo8Su7JVb_-87JsGAw==\r\r\n\u001b[1mage\u001b[0m: 5541\r\r\n\r\r\n"
    }
  ],
  "structuredContent": {
    "stdout": "HTTP/2 200 \r\r\n\u001b[1mserver\u001b[0m: CloudFront\r\r\n\u001b[1mcontent-type\u001b[0m: text/html\r\r\n\u001b[1mcontent-length\u001b[0m: 34100\r\r\n\u001b[1mx-amz-replication-status\u001b[0m: COMPLETED\r\r\n\u001b[1mlast-modified\u001b[0m: Mon, 29 Sep 2025 04:01:51 GMT\r\r\n\u001b[1mx-amz-server-side-encryption\u001b[0m: AES256\r\r\n\u001b[1mx-amz-version-id\u001b[0m: wShrjGXUPtNOGBYfodc26YSi1V954sVp\r\r\n\u001b[1maccept-ranges\u001b[0m: bytes\r\r\n\u001b[1mdate\u001b[0m: Wed, 08 Oct 2025 10:27:55 GMT\r\r\n\u001b[1mx-cache\u001b[0m: Hit from cloudfront\r\r\n\u001b[1mvia\u001b[0m: 1.1 93b50b5ce635a36621d7bd38d3b0d6da.cloudfront.net (CloudFront)\r\r\n\u001b[1mx-amz-cf-pop\u001b[0m: HIO52-P4\r\r\n\u001b[1mx-amz-cf-id\u001b[0m: vvP_od9rfQtdBsExlvJDHu3c0lP7CvUqCF1aCo8Su7JVb_-87JsGAw==\r\r\n\u001b[1mage\u001b[0m: 5541\r\r\n\r\r\n",
    "stderr": "",
    "exitCode": 0,
    "executionTime": 0.10361337661743164
  },
  "isError": false
}
由此可看到代码正常执行,原始输出和被转换为人类可阅读的结果都答应了出来。
6、调用沙盒执行Shell+Python命令
在沙盒中执行Python代码的时候,可能会需要需要额外安装Python扩展库的情况,此时就可以用上一步的调用shell的方式,调用pip install安装扩展包,然后再次调用这个session,执行Python命令就可以了。
现在以查询股价为例,安装Yahoo财经(海外站)的Python库,即可查询美股的股价。
import boto3
import json

# code interpreter configuration
region = "us-west-2"
sandbox_id = "myTestSandbox1-VbMl9Hi8I4"
session_id = "01K726VKV428FAEDJKMR99XCJD"

command_to_run = '''
pip install yfinance
'''

python_to_run = '''
import yfinance as yf
amzn = yf.Ticker('AMZN')
data = amzn.history(period='1d')
today_close = data['Close'].values[-1]
print(today_close)
'''

# 检查输入的session id对应的沙盒session的状态
def check_session_status(session_id, client):
    response = client.get_code_interpreter_session(
        codeInterpreterIdentifier=sandbox_id,
        sessionId=session_id
    )
    return response["status"]

client = boto3.client('bedrock-agentcore', region_name=region)

# 先检查沙盒状态,如果是READY则继续;如果超时了则无法运行,需要启动新session
if check_session_status(session_id, client) == "READY":
    # install python library
    response = client.invoke_code_interpreter(
        codeInterpreterIdentifier=sandbox_id,
        sessionId=session_id,
        name='executeCommand',
        arguments={
            'command': command_to_run
        }
    )
    # run python code
    response = client.invoke_code_interpreter(
        codeInterpreterIdentifier=sandbox_id,
        sessionId=session_id,
        name='executeCode',
        arguments={
            'code': python_to_run,
            "language": "python",
            "clearContext": False
        },
    )
    for event in response["stream"]:
        print(json.dumps(event["result"], indent=2))
else:
    # session is not ready
    print("Code Interpreter session is not ready, please start new session and use new session id")
在以上代码中,前半部分为分别配置沙盒id、session id等,然后输入要执行的shell命令(pip install)和python程序。由于使用相同的session id,因此在同一个session内先安装依赖包,然后运行python获得结果。执行uv run run-shell-and-python.py运行程序。注意沙盒id和sesison id必须正确,且session没有超时,必须是READY状态。
运行后返回结果如下:
{
  "content": [
    {
      "type": "text",
      "text": "223.9739990234375"
    }
  ],
  "structuredContent": {
    "stdout": "223.9739990234375",
    "stderr": "",
    "exitCode": 0,
    "executionTime": 0.07219767570495605
  },
  "isError": false
}
可看到沙盒内的程序运行成功。沙盒运行完毕后,接下来需要关闭沙盒。同一个Sandbox是允许多session并发的,每一个session执行成功都需要手工关闭,否则会消耗资源导致更多计费。
7、关闭Session(Terminate session)
关闭Session可以通过AWS控制台上Bedrock AgentCore服务界面的Built-in Tools里边的Code interpreter tools来关闭session,也可以通过AWSCLI、API等多种方式来关闭。这里以Python的SDK为例。
构建terminate-session.py,代码如下。
import boto3

region="us-west-2"
codetool_id = "myTestSandbox1-VbMl9Hi8I4"
session_id = "01K728JNQ3R3ZNZ0FKXK4M6T00"

# Initialize the boto3 client
dp_client = boto3.client(
    'bedrock-agentcore',
    region_name=region,
    endpoint_url="https://bedrock-agentcore."+region+".amazonaws.com"
)

# Stop the Code Interpreter session
response = dp_client.stop_code_interpreter_session(
    codeInterpreterIdentifier = codetool_id,
    sessionId = session_id
)

print("Session stopped successfully")
执行以上程序uv run terminate-session.py`,结果如下。
Session stopped successfully
以上就是关闭Session的例子,在每个调试完成的沙盒的运行逻辑后边,都需要添加关闭Session的代码。
8、小结
从以上过程可以看出,为了让大模型交互过程获取外部信息,建议使用沙盒来确保安全。将以上几个主要步骤汇总如下:
- 创建网络类型是Public的沙盒
- 开发阶段
- 启动新Session,超时时间配置的比较长,获得session id
- 调试代码,执行shell或者python code
- 调试完毕,手工关闭session
- 线上生产
- 程序开头自己拉起新session,中间运行代码并预期结果后,程序关闭自己的session
四、Code Interpreter计费
1、为何需要手动关闭session
在启动Session时候,我们指定了600秒超时,这是针对沙盒内的shell或者python code执行超时的特殊情况。而在正常使用中,一个沙盒内程序执行完毕后,就需要将其退出,待下一次调用时候再启动新的沙盒。将其退出的过程,需要开发者人为的发起申请。这样做的原因是Bedrock AgentCore的沙盒采用类似Lambda的收费方式,针对运行消耗的vCPU和内存资源的时间长度进行计费,因此需要及时关闭沙盒。
虽然Code Interpreter沙盒的计费与Lambda类似,但与Lambda不同的是Lambda程序执行是有入口的,当程序运行Lambda会自动关闭,日志和计费系统中会记录下Lambda运行消耗的资源。每一次Lambda都是无状态的重新启动一个session,完全Event-Driven的方式。AgentCore的Code Interpreter沙盒采用的执行方式是启动一个session后不会自动停止,用户可发送多种类型的命令到这个session,直到设置的timeout超时关闭,或者人为关闭。因此,在一段代码执行完毕后,就必须关闭Session。如果没有手动关闭Session,那么Session的运行时长就会一直延长到预设的timeout时间,造成资源占用和成本上升。
2、沙盒资源、超时和最大并发
- 每个沙盒分配2vCPU/8GB内存
- 每个AWS账户允许创建100个沙盒
- 每个AWS账户的所有沙盒允许500个处于活动的Session(可开support case提升)
- 默认Session超时时间是900秒(15分钟)
3、Code Interpreter计费
从AWS官网Bedrock AgentCore产品页面可以看到,Preview阶段产品免费。但这一时间可能会延长。
You can try AgentCore services at no charge until October 6, 2025.
Standard AWS pricing applies to any additional AWS Services used as part of
using AgentCore (e.g., CloudWatch pricing will apply for AgentCore Observability).
Starting October 7, 2025, AWS will bill you for AgentCore service usage based on this page.
截止2025年10月9日,Bedrock AgentCore产品处于Preview阶段,因此未来转为正式产品后,计费可能发生改变。
官方价格是:
- vCPU: $0.0895 per vCPU-hour
- Memory: $0.00945 per GB-hour
与Lambda计费逻辑有所不同,AgentCore Code Interpreter对实际使用的资源收费,而非对整个沙盒(2vCPU/8GB收费)。官方网页上对计费的描述文字如下:
You only pay for what you use, with no pre-configuration of resources required.
For CPU resources, you are charged only when your tool is actively processing
(not during I/O wait periods if you are just waiting for LLM responses).
For memory resources, you're only charged for the memory your agent is consuming.
官网详细计费项:
- No upfront resource selection required
- Billing is calculated per second, using the highest watermark of CPU and memory usage for that second, with a 1-second minimum
- 128MB minimum memory billing applies
- Network data transfer through customer ENIs is billed at standard EC2 rates
根据官网以上信息,vCPU在活跃的时间将会被以1s为单位计费,而内存则会持续计费。因此这也就是需要在session运行完毕后主动关闭session已节约费用。
注意:AgengCore从Preview转为正式产品后,计费可能发生改变。请随时关注AWS官网。
五、参考文档
Amazon Bedrock AgentCore - Developer Guide
https://docs.aws.amazon.com/bedrock-agentcore/latest/devguide/what-is-bedrock-agentcore.html
Code Interpreter的Quota和Limit
AgentCore Prevew阶段计费
https://aws.amazon.com/bedrock/agentcore/pricing/
最后修改于 2025-10-09